No more criminals for president. Not this time. Never again.

No more Hillary Clinton - no more fraudI rarely speak out on specific presidential candidates, but I’ve pretty much had enough of this comedy unfolding that we call our political process. With Trump making a complete arse of himself, Ted Cruz saying “we need another war president” and other candidates flat-out lying, making up facts and paying third-party companies to create false campaigns and disinformation on their competition, I’ve had it.

The worst offender? That’s right… Hillary Rodham Clinton. A felon, admittedly breaking dozens of federal laws, and trying to use her fame to erase the legality of those laws. Her campaign continues to build on its own corruption, greed and malice.

Now, after openly admitting she had classified information in the form of emails and attachments, on her own private email server in her home, the State Department is trying to delay the release of those emails until after the Iowa caucus, because the release would be so utterly damaging to her campaign, that she would lose that caucus and have to forego the general election.

But we’re not talking about a few classified emails, we’re talking about 50,000 classified emails. The first wave is to release 9,000 of them, but her campaign wants a 1-month extension, until just after the Iowa numbers are counted, before releasing them. They have the emails now, they’re not going anywhere, so why the delay?

Read the rest of this entry »

HOWTO: Run multiple Zwift sessions on the same PC (Windows only)

Zwift LogoMany people have asked me to write this up and I’m happy to be the first person to push Zwift this far with multiple, simultaneous sessions.
I can say with confidence that up to this point, I’m actually the only person who has this working correctly without overwriting or clobbering critical logs and data files. Others have tried some hacky methods, but they all result in instability and data loss (see “What does NOT work, and why” below).

I started this quest because I am working on a product design (“Secret Sauce” to be withheld in this HOWTO) that involves running multiple Zwift sessions on a single, 100% wireless PC, with the only wire being the single power cable to the wall. No USB cables, no video cables, no HDMI cables, no network cables.

Let’s get some general housekeeping out of the way first…

Read the rest of this entry »

HOWTO: Correct and avoid clock skew on Windows and OS X platforms

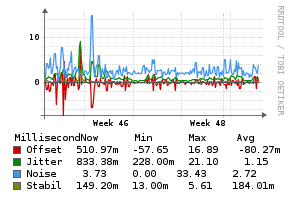
ntpd-server-statsThis has come up a lot recently in the context of Zwift rides and races, becasue many rider’s PC and Mac gaming rigs are suffering clock skew. In short, it can be defined as:

“Clock skew is when the clock arrives at different points of the circuit at different times due to the distance, capacitance etc which may cause it to malfunction.”

If you want more detailed set of diagrams and explanations describing clock skew, there’s a great discussion on the StackExchange electronics forum about it.

When your machine is suffering from clock skew, you can inadvertently enter a ride or race earlier or later than you meant to do, and your overall finish time can be later than you expect. For races where the winner is separated from the other podium places by mere seconds or less, having an accurate clock matters!

Here’s how to fix it for both Microsoft Windows and Mac OS X platforms!
Read the rest of this entry »

HOWTO: Fully automated Zwift login on Mac OS X

Zwift LogoQuite a few riders on the Facebook Zwift Riders group have expressed an interest in this, so I decided to take a couple of hours, learn AppleScript and knock this out. Done! (if you’re on Windows, you want this other HOWTO instead)

What this code does, is allows you to create a single icon that will log you into Zwift, with no human interaction needed. It will put in your email, password, click the “Start Ride” button and away you go!

This also leverages the OS X Keychain to store your Zwift email address and password, so it’s secure, not leaked into the filesystem and is able to be called on by any other apps that might need it (ahem, like… Zwift itself!) :D

So here’s how to get it working…

First, we need to create a separate keychain to store the Zwift credentials. You could store them in the main keychain, but I’m a fan of credential separation, so let’s use that.

Read the rest of this entry »

HOWTO: Configure Windows to remember Zwift application passwords

Zwift Virtual Gaming Environnent
This will be a quick-n-dirty post to solve a very tactical problem. (if you’re a Mac user, use this other HOWTO I wrote for OS X instead)

This topic has been talked about dozens to hundreds of times in the Zwift Riders Facebook group and on the Zwift Support area through their Feature Request tracker. It’s become enough of an itch, that I decided to write up this post to detail how to “fix” the “problem” (not a Zwift bug, however).

First, make sure you’re using the latest available launcher from the Zwift website. Even if you have Zwift installed and it’s updating itself regularly, the launcher itself does not yet auto-update, so you need to go back to the website from time to time to pull a new version and update that.

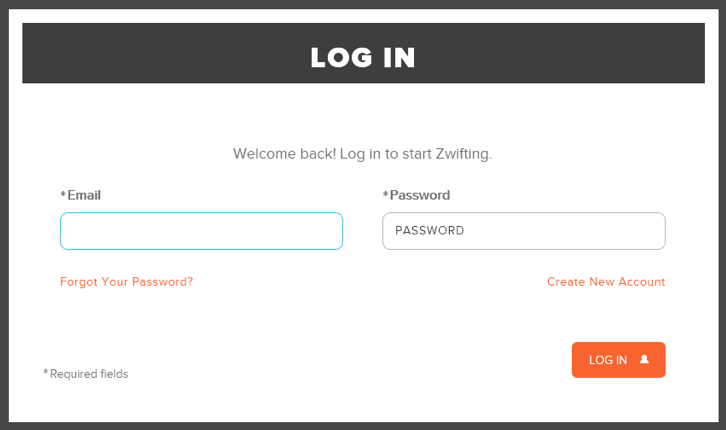
Once installed, launch Zwift, and you’ll see a familiar dialog:
Zwift Application Login Dialog

Read the rest of this entry »

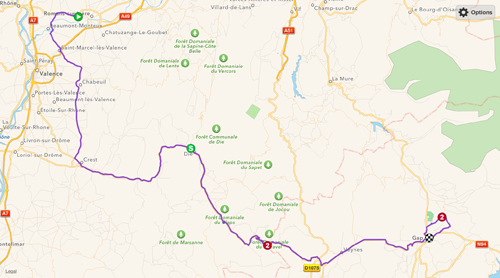
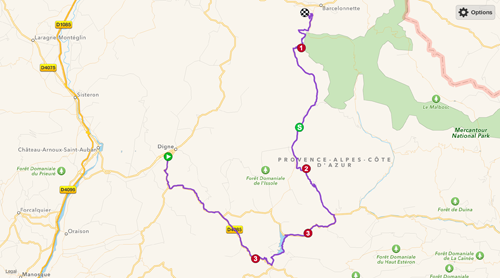
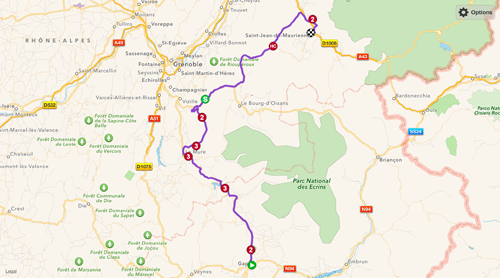
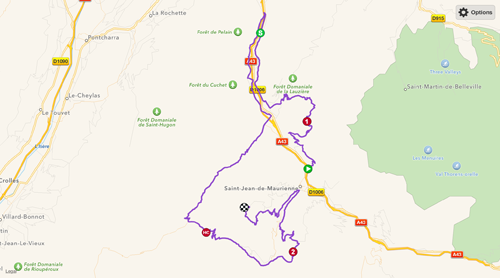
2015 Tour de France Stages Mapped and Ready


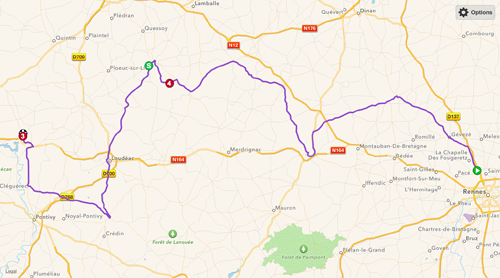
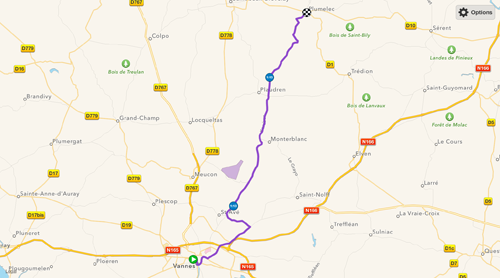
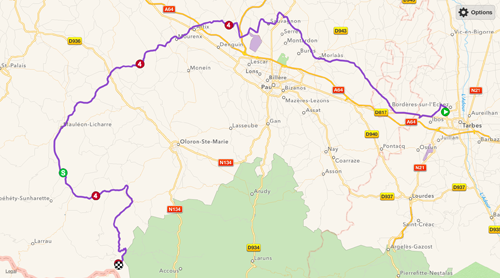
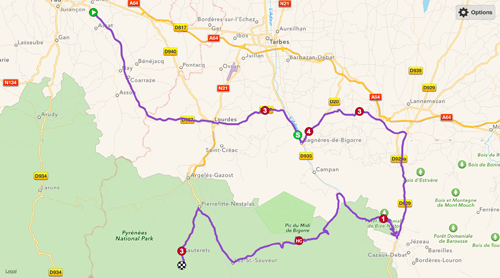
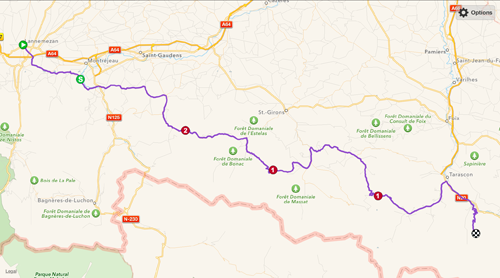
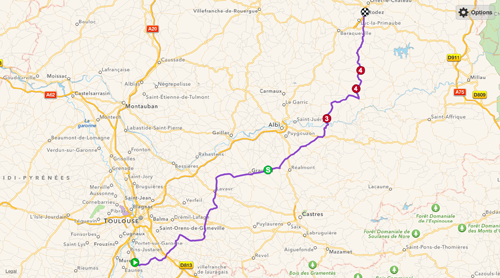
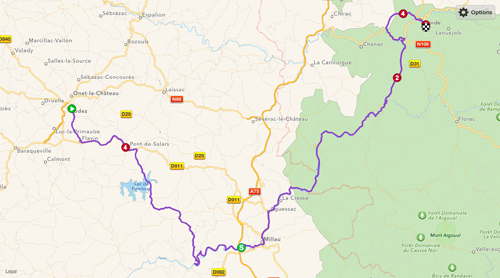
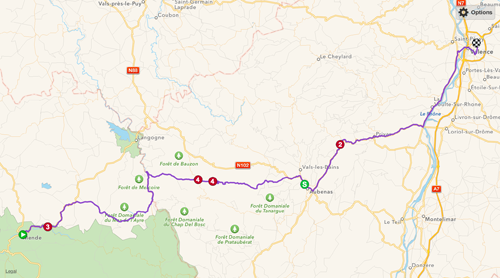
The 2015 Tour de France is almost here! I did some searching and noticed there aren’t a lot of detailed maps and routes for this year’s Tour yet, as it’s still pretty early. Sooo I decided to start putting the routes together, road by road, turn by turn, lane change by lane change, as close to accurate as I could find them.

I’ll continue to update this blog post with detailed route maps, commentary, links to stage videos and more as more details come in. They’re still early and not 100% locked-down yet, so it’s unclear exactly which roads might be used for some of the later stages (as of 2015-07-01).

Here are the stages for the 2015 Tour de France, the 102nd tour:

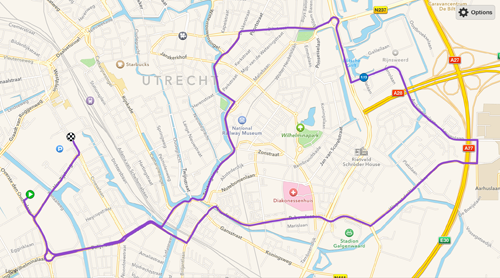
July 4, Stage 1: Utrecht, individual time trial, 13.7km

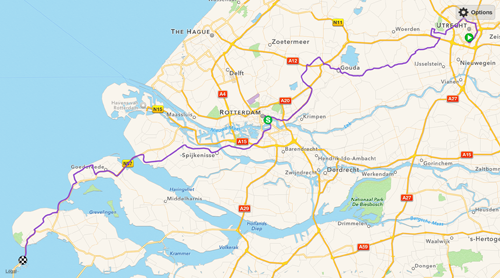
July 5, Stage 2: Utrecht – Zélande, 166km

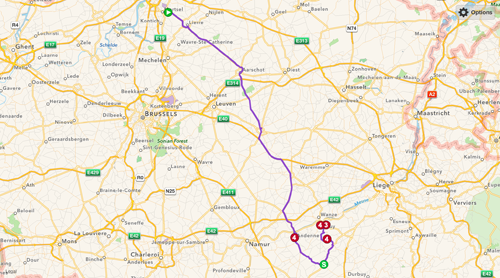
July 6, Stage 3: Anvers – Huy, 154km

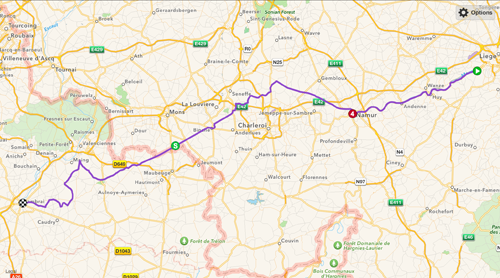
July 7, Stage 4: Seriang – Cambrai, 221km

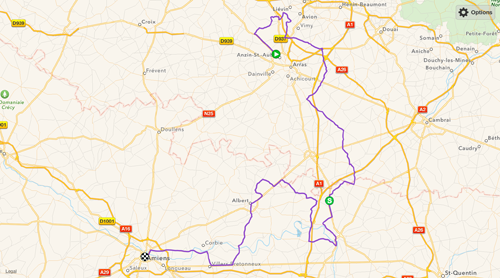
July 8, Stage 5: Arras – Amiens Métropole, 189km

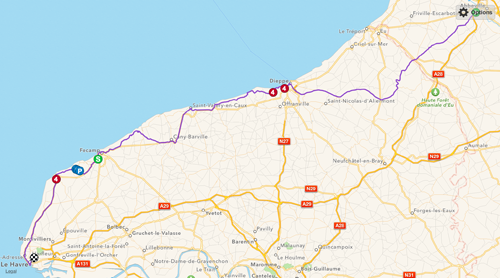
July 9, Stage 6: Abbeville – Le Havre, 191km

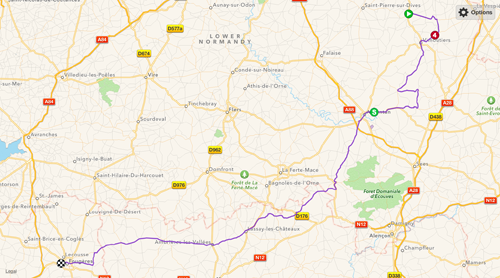
July 10, Stage 7: Livarot – Fougères, 190km

July 11, Stage 8: Rennes – Mûr-de-Bretagne, 719km

July 12, Stage 9: Vannes – Plumelec, team time trial, 28km

July 13, rest day: Pau

July 14, Stage 10: Tarbes – La Pierre Saint-Martin, 167km

July 15, Stage 11: Pau – Cauterets-Vallée de Saint-Savin, 188km

July 16, Stage 12: Lannemazen – Plateau de Beille, 195km

July 17, Stage 13: Muret – Rodez, 200km

July 18, Stage 14: Rodez – Mende – Montée Laurent Jalabert, 178km

July 19, Stage 15: Mende – Valence, 182km

July 20, Stage 16: Bourg-de-Péage – Gap, 201km

July 21, Rest day: Gap/Digne-les-Bains

July 22, Stage 17: Digne-les-Bains – Pra-Loup, 161km

July 23, Stage 18: Gap – Saint-Jean-de-Maurienne, 185km

July 24, Stage 19: Saint-Jean-de-Maurienne – La Toussuire – Les Sybelles, 138km

July 25, Stage 20: Modane Valfréjus – Alpe d’Huez, 110km

July 26, Stage 21: Sèvres – Grand Paris Seine Ouest – Paris Champs-Élysées, 107km

HOWTO: Enable Docker API through firewalld on CentOS 7.x (el7)

centos-dockerPlaying more and more with Docker across multiple Linux distributions has taught me that not all Linux distributions are treated the same.

There’s a discord right now in the Linux community about systemd vs. SysV init. In our example, CentOS 7.x uses systemd, where all system services are spawned and started.

I am using this version of Linux to set up my own Docker lab host for tire-kicking, but it needs some tweaks.

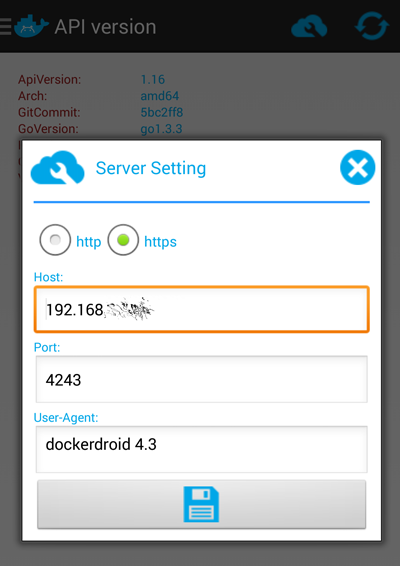
I also wanted to see if I could use the Docker API from my Android phone, using DockerDroid, which (after configuring this) works famously!

Here’s what you need to do:

  1. Log into your CentOS machine and update to the most-current Docker version. The version shipped with CentOS 7 in the repo as I write this post, is “docker-1.3.2-4.el7.centos.x86_64”. You want to be using something more current, and 1.4 is the latest. To fetch that (and preserve your existing version), run the following:
    $ su -
    # cd /bin && mv /bin/docker /bin/docker.el7
    # wget https://get.docker.com/builds/Linux/x86_64/docker-latest -O docker
    # systemctl restart docker
    # exit
    $ 
    

    Now you should have a working Docker with the right version (current). You can verify that:

    $ sudo docker version
    Client version: 1.4.1
    Client API version: 1.16
    Go version (client): go1.3.3
    Git commit (client): 5bc2ff8
    OS/Arch (client): linux/amd64
    Server version: 1.4.1
    Server API version: 1.16
    Go version (server): go1.3.3
    Git commit (server): 5bc2ff8
  2. So far, so good! Now we need to make sure firewalld has a rule to permit this port to be exposed for external connections:
    $ sudo firewall-cmd --zone=public --add-port=4243/tcp --permanent
    $ sudo firewall-cmd --reload
    success
    

    You can verify that this new rule was added, by looking at /etc/firewalld/zones/public.xml, which should now have a line that looks like this:

    <port protocol="tcp" port="4243"/>
  3. Now let’s reconfigure Docker to expose the API to external client connections, by making sure the OPTIONS line in /etc/sysconfig/docker looks like this (note the portion in bold):
    OPTIONS=--selinux-enabled -H fd:// -H tcp://0.0.0.0:4243
    
  4. Restart the Docker service to enact the API on that port (if successful, you will not see any output):
    sudo systemctl restart docker
  5. To test the port locally, install telnet and then try telnet’ing to the port on localhost:
    $ sudo telnet localhost 4243
    Trying ::1...
    Connected to localhost.
    Escape character is '^]'.
    
    HTTP/1.1 400 Bad Request
    
    Connection closed by foreign host.

    All looks good so far!

  6. Lastly, install DockerDroid and configure it to talk to your server on this port:

    DockerDroid connecting to CentOS via API

  7. Now you should be able to use DockerDroid to navigate your Images, Containers and API.

    Good luck!

Tuesday Tip: rsync Command to Include Only Specific Files

I find myself using rsync a lot, both for moving data around, for creating backups using rsnapshot (yes, even on Windows!) and for mirroring public Open Source projects and repositories.

I used to create all sorts of filters and scripts to make sure I was getting only the files I wanted and needed, but I found a better way, and it wasn’t exactly intuitive.

--include="*/" --include="*.iso" --exclude="*"

In order for this to work as intended, the “include” patterns have to come before the “excludes”. This is because the very first pattern that matches is the one that gets evaluated. If your intended filename matches the specified exclude pattern first, it gets excluded from the scope.

When dealing with a very large, possibly unknown remote directory structure, you either have to include all of the remote subdirectories individually like this:

--include="/opt" --include="/var" --include="/home"

Or you can use the following syntax to include all directories (not files) in the scope:

--include="*/"

Once you’ve included every directory below your target scope, you can pass the filespec you’re interested in (in this case, I wanted every bootable ISO file from a remote CentOS mirror), and then you exclude everything else that doesn’t match that filespec. It looks like this:

1.) Include every directory:

--include="*/"

2.) Include *.iso as your intended matching scope

--include="*.iso"

3.) Exclude everything else

--exclude="*"

That’s the magic sauce.

Some of these options and the order they appear in may seem very non-intuitive, so please read the rsync documentation carefully paying specific attention to the “EXCLUDE PATTERNS” section of the docs.

When in doubt, always use “–dry-run –stats” to check your work before copying or modifying any data.

Measure twice, cut once.

HOWTO: Run boot2docker in VMware Fusion and ESXi with Shipyard to Manage Your Containers

fbbb494a7eef5f9278c6967b6072ca3eThis took me awhile to piece together, and I had to go direct to the maintainers of several of these components to get clarity on why some things worked, while others did not, even following the explicit instructions. Here, I present the 100% working HOWTO:

I started with a post I found written by someone on the boot2docker project page, describing how to get this working in VMware. But he missed some crucial steps, and the syntax is wrong. Also, Shipyard has gone to a new version, and the method of starting the containers is very different from the steps posted.

Creating the boot2docker VM Instance

First, we need to create a VM inside VMware Fusion and/or ESXi. If you’re using VMware Workstation, the steps are roughly the same, but the screenshots may differ slightly.

You’ll create a new VM, and add two NICs and a single IDE HDD to the VM. Something like 10GB should be fine to hold all of your containers, build scripts and any other persistent data you might need. Follow the screenshots below for some specifics and details. There are a few subtle tweaks you’ll need to maximize your boot2docker VM.

Read the rest of this entry »

SOLVED: Installing VMware Tools in Ubuntu 5.04 under ESXi

It may seem odd, that it’s almost 2015, and I’m writing a post describing how to install VMware Tools inside Ubuntu 5.04, a Linux distribution that was released on April 8th, 2005 and went End of Life on October 31, 2006.

I run a home lab here with a number of test machines (all VMs now), which includes every single major Linux distribution and version. Yes, really. I’ve been going back trying to update all of them to current tools, VMHW versions, NIC drivers and tweaking other things. Among these, were a number of very old Linux distributions who did not support VMware drivers natively (eg: open-vm-tools didn’t exist at that time).

If you run the standard configuration (I run it non-interactive as below)…

# ./vmware-install.pl --clobber-kernel-modules=vmci     \
                      --clobber-kernel-modules=vmxnet3  \ 
                      --clobber-kernel-modules=pvscsi   \
                      --clobber-kernel-modules=vmmemctl \
                      --clobber-kernel-modules=vsock    \ 
                      -d

At some point after the X11 configuration, you’ll see this error displayed:

Creating a new initrd boot image for the kernel.

$Id: mkinitrd,v 1.201 2004/05/16 22:00:48 herbert Exp $

Usage: /usr/sbin/mkinitrd [OPTION]... <-o outfile> [version]

Options:
  -d confdir  Specify an alternative configuration directory.
  -k          Keep temporary directory used to make the image.
  -m command  Set the command to make an initrd image.
  -o outfile  Write to outfile.
  -r root     Override ROOT setting in mkinitrd.conf.

See mkinitrd(8) for further details.
ERROR: "/usr/sbin/mkinitrd" exited with non-zero status.

Your system currently may not have a functioning init image and may not boot
properly.  DO NOT REBOOT!  Please ensure that you have enough free space
available in your /boot directory and run this configuration script again.

Execution aborted.

Found VMware Tools CDROM mounted at /media/cdrom0. Ejecting device /dev/hdc ...

But there’s a one-line fix! Open up “vmware-tools-distrib/bin/vmware-config-tools.pl” in an editor and go down to line 7692, and you’ll see something that looks like this:

      $initmodfile = '/etc/sysconfig/kernel';
      if ($gSystem{'distribution'} eq 'suse') {
          $syscmd = join(' ', $binary, $kernelList, $initrdList);
      } else {
          $syscmd = $binary;
      }

You’ll want to modify that last “$syscmd” line to look as follows:

      $initmodfile = '/etc/sysconfig/kernel';
      if ($gSystem{'distribution'} eq 'suse') {
          $syscmd = join(' ', $binary, $kernelList, $initrdList);
      } else {
          $syscmd = join(' ', $binary, '-o', "/boot/initrd-$kernRel.img", $kernRel);
      }

That will now result in the following successful output:

Creating a new initrd boot image for the kernel.
   Checking acpi hot plug                                              done
Starting VMware Tools services in the virtual machine:
   Switching to guest configuration:                                   done
   Guest operating system daemon:                                      done
The configuration of VMware Tools 9.0.5 build-1065307 for Linux for this
running kernel completed successfully.

You must restart your X session before any mouse or graphics changes take
effect.

You can now run VMware Tools by invoking "/usr/bin/vmware-toolbox-cmd" from the
command line.

To enable advanced X features (e.g., guest resolution fit, drag and drop, and
file and text copy/paste), you will need to do one (or more) of the following:
1. Manually start /usr/bin/vmware-user
2. Log out and log back into your desktop session; and,
3. Restart your X session.

Enjoy,

--the VMware team

Voila! Now you have a successful build of the native VMware modules and can switch your ethernet module to VMXNET3 from E1000 to save a little memory on the ESXi side.

Bad Behavior has blocked 2500 access attempts in the last 7 days.