
Archive for September, 2013
SOLVED: Enabling transparent desktop icons on XFCE desktop
![]() Another quick and dirty XFCE desktop hack, this one to add transparent icon backgrounds to your desktop icons.
Another quick and dirty XFCE desktop hack, this one to add transparent icon backgrounds to your desktop icons.
If you’re tired of looking at ugly icon label backgrounds, and really want transparent backgrounds, the fix is simple!
![]()
![]()
Here’s the code:
style "xfdesktop-icon-view" {
  ## opacity of text background (0 - 255, 0 = transparent)
  XfdesktopIconView::label-alpha = 0
  XfdesktopIconView::selected-label-alpha = 100

  ## text background colors
  base[NORMAL]    = "#edeceb"
  base[ACTIVE]    = shade (0.8, "#86abd9")
  base[SELECTED]  = "#86abd9"

  ## text foreground colors
  fg[NORMAL]      = shade (0.9, "#ffffff")
  fg[ACTIVE]      = shade (0.8, "#ffffff")
  fg[SELECTED]    = "#ffffff"

}
widget_class "*XfdesktopIconView*" style "xfdesktop-icon-view"
Just add this snippet to your “~/.gtkrc-2.0” file, kill xfdesktop (or log out and back in), and you’re all set!
HOWTO: Fix the broken “Open Terminal Here” menu icon in XFCE
![]()
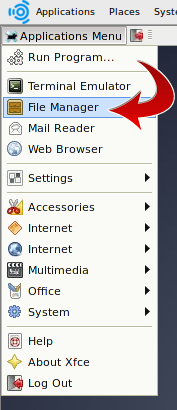
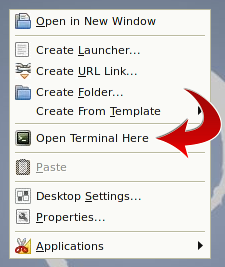
If you’re using XFCE, specifically version 4, you’ve probably seen this issue come up a few times. It looks like this:
![]()
The fix is pretty simple and straightforward. Here’s how:
- Go up to your “Applications Menu” and choose “File Manager”. This will launch your configured, default file manager (most-likely Thunar, unless you’ve changed something).
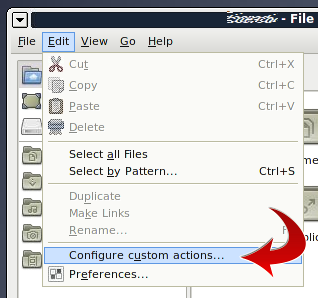
- Choose “Configure Custom Actions” from the “Edit” menu, as shown here:
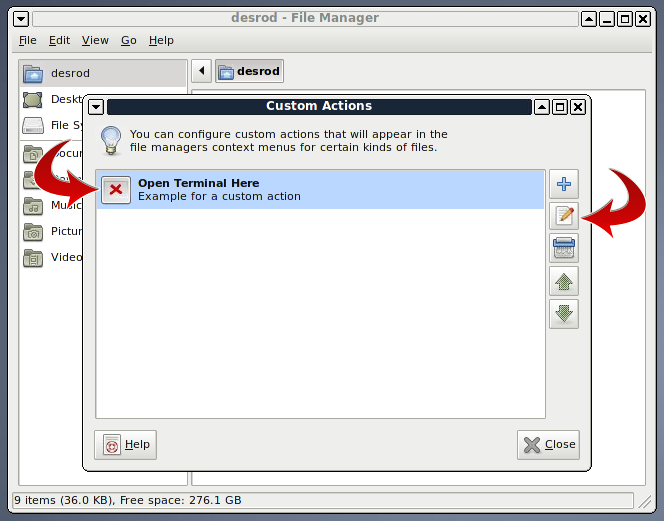
- Now select the “Open Terminal Here” option, and click the “Edit” button (looks like a little pencil and paper)
- Now you’ll see a screen where you can change/edit your custom action’s metadata, including its display icon. Click the broken icon image to change it to something reasonable.
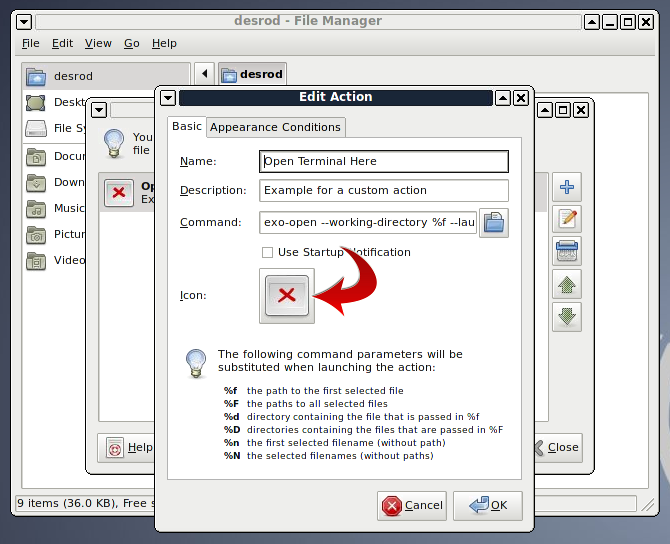
- Once you choose an icon, click “Ok” to save it. I chose something that looked like a terminal session icon. You can choose whatever you wish that fits your needs. Once you save it, you’ll see it show up in the metadata screen like this:
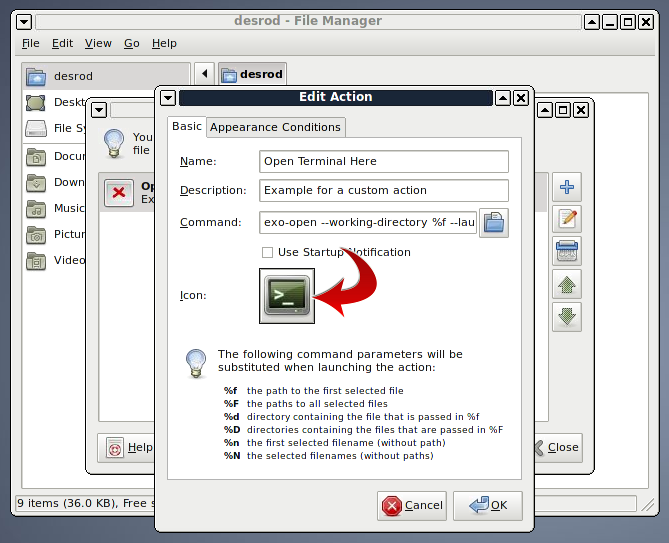
- Now you can click “Ok”, and “Close” on the previous dialog box to save the changes you’ve made.
But wait! The icon hasn’t changed yet! You’re probably still seeing a broken icon on the menu. There’s one more thing you need to do…
- To refresh those cached-in-memory icons, you have to either log out and back in, or.. kill the desktop. I prefer the latter, so simply open a terminal, and run the following command:
$ killall xfdesktop
That’s it. Now if you right-click, you’ll see your shiny new icon show up on the menu, no more broken icon!
Hopefully that helps!
HOWTO: Create a Warrant Canary, or NSL Dead Man’s Switch

Thanks Slashdot for carrying your users over to my blog this morning!
The rsync team has been doing this for quite awhile, and I had an idea. Why not share this more broadly?
So I created a quick little script to generate my own “warrant canary”. Instructions follow below.
Note: Based on the direct emails from Slashdot users, I’ll update this post with more information in the coming days/weeks to keep this current.
#!/usr/bin/perl

use warnings;
use strict;
use LWP::Simple;   # Fetch the remote feed via HTTP
use XML::RSS;      # Parse the RSS feed into tree and DOM elements
use HTML::Strip;   # Clean up bad tags, HTML, CDATA in RSS feeds
use File::Slurp;   # Easily read/write files to the filesystem
use Crypt::GPG;    # Call out to gpg for signing the canary

# Pick an RSS news source that is current, updated, and neutral if possible:
my $url           = "http://www.npr.org/rss/rss.php?id=1001";
# my $url         = 'http://feeds.bbci.co.uk/news/world/rss.xml';

binmode(STDOUT, ":utf8");

my $hs            = HTML::Strip->new();
my $gpg           = new Crypt::GPG;
my @newscanary = '';

my $rss           = XML::RSS->new();
my $data          = get($url);
$rss->parse($data);

my $channel       = $rss->{channel};

foreach my $item (@{ $rss->{items}}) {
	my $title = $item->{title};
	my $date  = $item->{pubDate};
	my $desc  = $hs->parse($item->{description});

	# Word wrap the output at 70 characters
	$desc =~ s/(.{70}[^\s]*)\s+/$1\n/xg;

	push @newscanary, "$title\n$date\n" . "-"x70 . "\n$desc\n\n\n";
}

write_file('canary.txt', @newscanary) ;

my $boilerplate = read_file('boilerplate.txt', {binmode => ':raw'});
my $newscanary = read_file('canary.txt', {binmode => ':raw'});

print $boilerplate, $newscanary;

$hs->eof;
Now you create a file called ‘boilerplate.txt’, which includes the header you want to show up at the top of your canary, such as this example (nicked and modified from the rsync canary):
Existing and proposed laws, especially as relate to the US Patriot Act,
etc., provide for secret warrants, searches and seizures of data, such as
library records.

Some such laws provide for criminal penalties for revealing the warrant,
search or seizure, disallowing the disclosure of events that would
materially affect the users of a service such as those provided by
YOUR_COMPANY and subsidiary domains and services.

YOUR_COMPANY and its principals and employees will in fact comply with
such warrants and their provisions for secrecy as legally prescribed by US
law.

YOUR_COMPANY will also make available, hourly, a "warrant canary" in
the form of a cryptographically signed message containing the following:

	- a declaration that, up to that point, no warrants have been
	  served, nor have any searches or seizures taken place

	- a cut and paste headline from a major news source, establishing
	  date

Special note should be taken if these messages ever cease being updated, or
are removed from this page.
The current message is here:
I’ll leave it as an exercise to the reader how to sign the output of that with GNU Privacy Guard (hint: gpg –clearsign), and how to protect that key and copy the completed canary.txt over to your webserver (hint: use rsync).
Set that up in an hourly cron job, and you should be all set.
HOWTO: Disable Usernames from Login Managers for Linux and Windows
With all the news flying around about security, the less we give a potential malicious attacker, the better. To that end, here’s how to disable the list of usernames or the last logged-in user on your machine(s) for Windows and Linux (gdm) when you boot them up and get to the login screen.
Disable Usernames in GDM v1, v2
There are several ways to do this, some work, some do not, depending on your version of GDM (v1 vs. v2), so I’ll show you what command to run to set this, and I’ll also show you where you can set it in the actual configuration file.
If you’re running gdm (Red Hat, CentOS Fedora, Ubuntu, Debian, openSUSE), run this command:
$ sudo gconftool-2 –direct –config-source xml:readwrite:/etc/gconf/gconf.xml.defaults \
  –type bool –set /apps/gdm/simple-greeter/disable_user_list true
This actually modifies the file:
/etc/gconf/gconf.xml.defaults/%gconf-tree.xml
The modifications you want to make in section “gdm/simple_greeter” are (just add/edit the whole block below):
<entry name=â€disable_user_list†mtime=â€1289993214″ type=â€schema†stype=â€bool†owner=â€gdm-simple-greeter†gettext_domain=â€gdmâ€> <local_schema locale=â€C†short_desc=â€Do not show known users in the login windowâ€> <default type=â€bool†value=â€trueâ€/> <longdesc>Set to true to disable showing known users in the login window.</longdesc> </entry>
Disable Usernames in GDM v3
If you’re using GDM3, and many current and recent Linux distributions are, here’s how to neuter the userlist so your system doesn’t leak the list of valid users who have access to the system:
Add the following to a new file you create, called 01-settings in /etc/dconf/db/gdm.d/. Make sure the text on the ‘banner-message-text’ line is all on one line in the configuration file. I’ve wrapped it here for visibility:
$ sudo vi /etc/dconf/db/gdm.d/01-settings
[org/gnome/login-screen]
banner-message-enable=true
banner-message-text='WARNING!!! You have accessed a private system.\n
                     UNAUTHORIZED ACCESS IS PROHIBITED\n
                     Violators will be prosecuted to the full extent of the law.\n
                     Your access to this network may be monitored and recorded for quality\n
                     assurance, security, performance, and maintenance purposes.'
disable-restart-buttons=true
disable-user-list=true
Remove the compiled dconf configuration for gdm:
$ sudo rm /etc/dconf/db/gdm
Then re-build that database:
$ sudo dconf update
Restart GDM (the easy way) to validate you’ve got this correct:
$ sudo telinit 3
$ sudo telinit 5
Disable Usernames in LightDM (lightdm)
LightDM is much easier than GDM to configure to enforce a user to type in their username as well as their password. Just add/create the following structure to a file called “/etc/lightdm/lightdm.conf”:
[SeatDefaults]
greeter-show-manual-login = true
greeter-hide-users = true
allow-guest = false
Note that is not a typo in the above, it’s actually SeatDefaults, not SetDefaults.
Now just restart lightdm to re-enact that configuration.
$ sudo /etc/init.d/lightdm restart
Disable Usernames in KDM
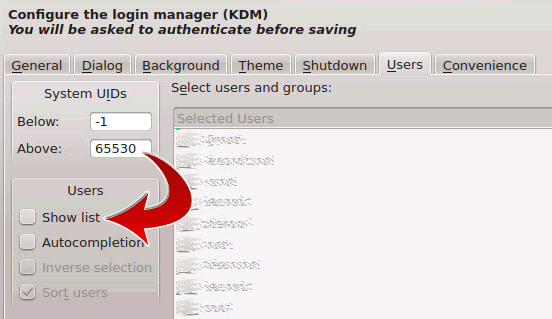
The documentation for KDM claims you can do this with one checkbox in the settings, but that’s not correct. They hide it in two places, which have to be configured. Go to “System Settings” -> “System Administration” -> “Login Screen”. Then on the “Users” tab, adjust the following:
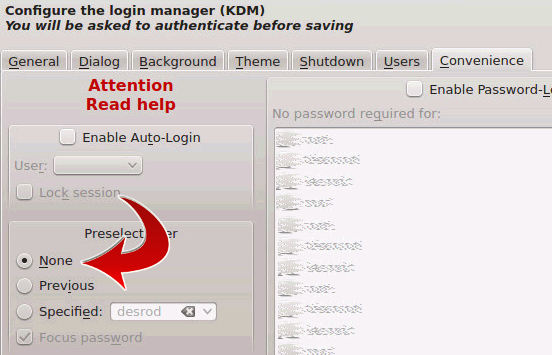
Then on the “Convenience” tab, adjust the following:
Restart your machine, restart kdm or use the runmode 3, 5 trick above, and you should see a screen prompting for a username, but without a userlist visible.
How to disable this on Microsoft Windows (98 through 2008 Server)
- Windows 98 or Me
Open [HKEY_LOCAL_MACHINE\Network\Logon] and create new string value called “DontShowLastUser” and set it to “1” to hide the last user. - Windows 2000 or XP
Open [HKEY_LOCAL_MACHINE\Software\Microsoft\Windows\CurrentVersion\Policies\System] and create a new string value, or modify the existing value, called “DontDisplayLastUserName” and set it to “1” to enable or “0” to disable the restriction. - Windows NT
Open [HKEY_LOCAL_MACHINE\SOFTWARE\Microsoft\Windows NT\CurrentVersion\Winlogon] and create a new string value, or modify the existing value, called “DontDisplayLastUserName” and set it to “1” to enable or “0” to disable the restriction.
Now when you get to your login screen, you have to manually, interactively type in your username in order to log in.