
Archive for March, 2022
HOWTO: Rebuild Tasmota firmware with Prometheus support
This project was a fun one. I run a lot of devices here, currently 80 according to my network reports, and many of those devices are configured to export their data, status, metrics to a /metrics endpoint that I pull with Prometheus (via prometheus-node-exporter) and then push to Grafana, so I can see fun, pretty graphs of the metrics.
These metrics range from the fan speed, thermal sensors on my laptop, to the ingress/egress packets across my network switch ports to the number of activations per-minute of my basement sump pump plugged into a smart plug, and dozens of other datpoints.
The smart plugs I’m currently using are Sonoff S31 smart plugs (specifically those in this link, because the ZigBee versions do not work with Tasmota firmware). Make sure you get the right version! You can use any plug or device that is already running the Tasmota firmware.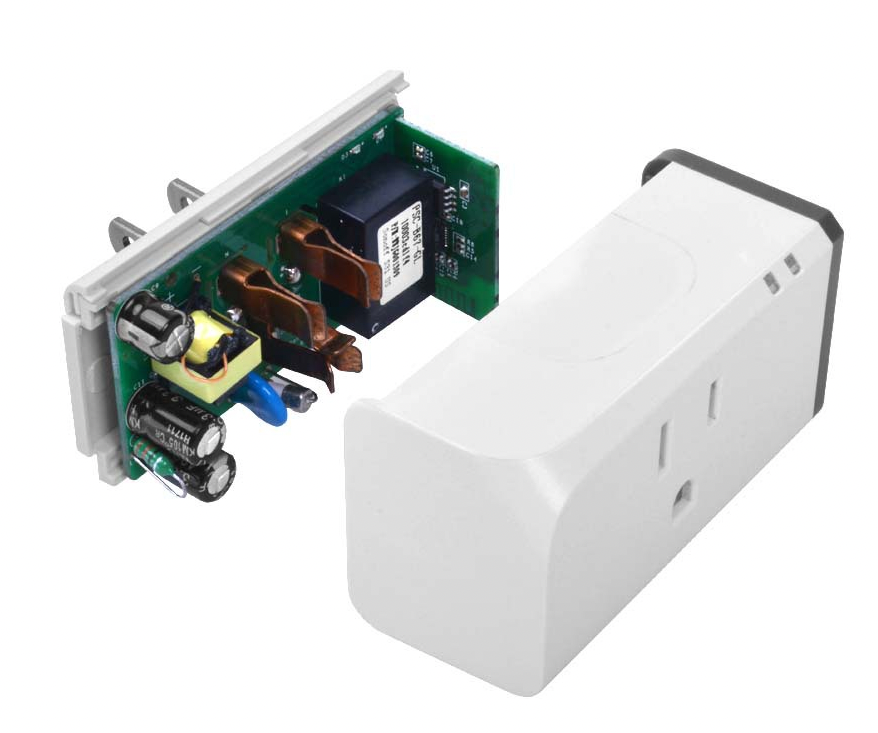
This HOWTO does not go into detail about how to dismantle your plug and reflash it with Tasmota. The S31 plugs make this trivially easy, solder-free, compared to many other plugs on the market that require much more dismantling or re-soldering pins.
These plugs by default, can measure current coming across the terminals, and give me a lot more data about what’s plugged into them. This data can be exported and made visible in Grafana, but not by default. This HOWTO will show you how to rebuild the Tasmota firmware (very easily), and add that capability.
There’s a few quick pre-requisites:
- Download Visual Studio Code. You can download the version directly from Microsoft, or you can use the VSCodium version, which is exactly the same bytes, but compiled without the “phone-home” telemetry and monitoring that Microsoft is known for building into their products. I chose the latter. Functionally, they’re identical.
- Download the Platform IO extension for VSCode. Other tutorials describe searching for this from within vscode, but that no longer works. You’ll want to go straight to the Version History tab and click the “Download” link next to the latest version on the right side.
- Download the Microsoft CPP Tools package in the same way you did for Platform IO in the previous step (choose “Version History” and click “Download” on the right side). The difference here, is you’ll need to be sure you choose the one specific to the platform you’re building Tasmota on. In my case, I’ll be building it on an Apple Silicon M1 MacBook, so I chose that version:

- Clone the Tasmota firmware repository from Github, using using
git clone https://github.com/arendst/Tasmotato some local project directory.
Once you have those 3 pieces downloaded, you can start configuring the build environment and building out Tasmota. Here’s how!
- Launch vscode (on whichever platform you’re using, it supports all of them).
- Bring up your “Extensions” side-panel. On macOS for example, this is done with Shift+Cmd+X. On other environments, the shortcut may be different.
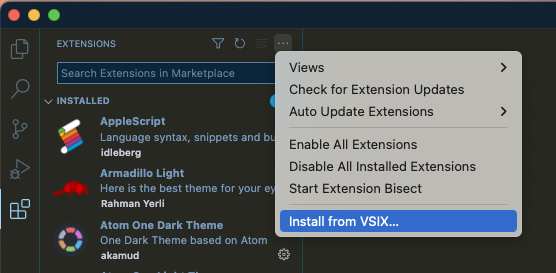
- In the upper-right corner of the extensions side-panel, click the 3-dot menu, and choose “Install from VSIX” at the bottom, as shown here:
- Choose the location where you downloaded the
platformio.platformio-ide-2.4.3.vsixfile, and install that. Do the same for thems-vscode.cpptools-1.9.6@darwin-arm64.vsixpackage you downloaded. - After installing, you may be asked to restart vscodium. Go ahead and do that anyway, even if you’re not asked. When you do, you’ll probably notice several other, supplementary packages being installed to support this package.
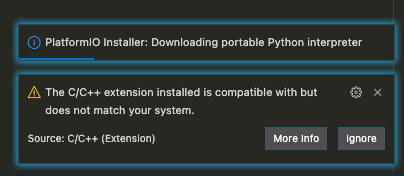
When I did, I got a weird message that my chosen version of the CPP tools was not correct for my platform (it was correct), so just ignore that if you’re on Apple Silicon, and proceed anyway.
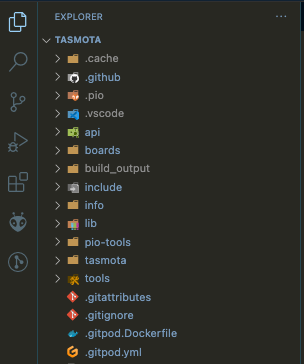
- We now need to open up the project directory of the git clone you pulled in Step 4 of the Pre-requisites section above, so it appears as your current project in the File Browser hierarchy:
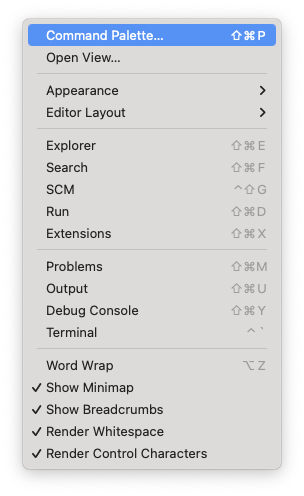
- From here, you wan to go to your “Command Palette” in vscode (Shift+Cmd+P on macOS, your key shortcut may vary, but it’s under the “View” menu).
And type ‘platform’, until you see “PlatformIO Build”, which should show you something like this: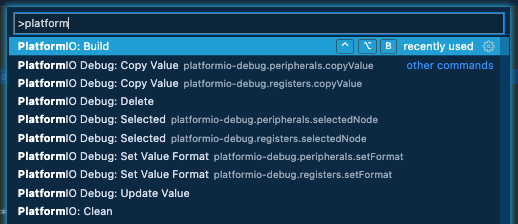
- Now choose that, and let it build to completion. It should be successful, as we haven’t changed anything at all yet. We’re just making sure the basic toolchain works as expected, unaltered.
If you got this far, we’re almost done! - In the Explorer sidebar, navigate down to the
tasmotadirectory inside the project directory (soTasmota/tasmota) and inside that directory, you’ll find a file calleduser_config_override.h. Open that file in the vscode editor and scroll to the bottom. We’re going to add 1 line to this file just before the last line of the file and save it: #define USE_PROMETHEUS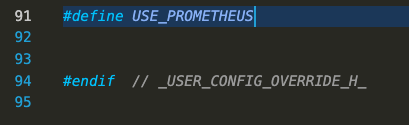
- We also need to choose which firmware we’re going to rebuild with this Prometheus support. In the case of my S31 smart plugs, that’s going to be the ‘sensors’ firmware version. That configuration is found in the file called
platformio_override.iniin the root of the Tasmota project tree. There is also a sample file there you can use for other options. Open that file in the vscode editor window and uncomment (remove the;from the line) the firmware you’re building. After the edits, that file should look like the following: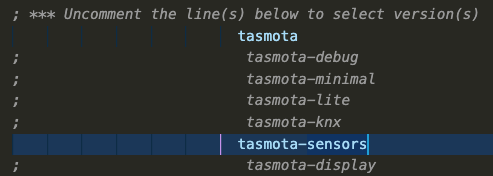
You can uncomment as many firmware types as you want, and they’ll be built simultaneously: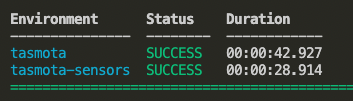
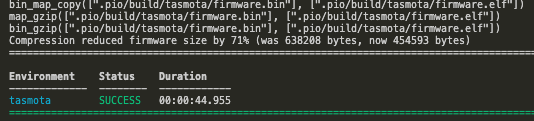
You can find the completed firmware builds in theTasmota/build_output/firmwaredirectory of the tree. - Now you can upload that firmware to your smart plug or other device, and you’ll then have a
/metricsendpoint exposed with some useful data, which you can point your Prometheus configuration at, to query that data on your interval.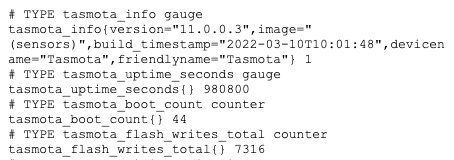
Now go have fun graphing those metrics.. I sure did! 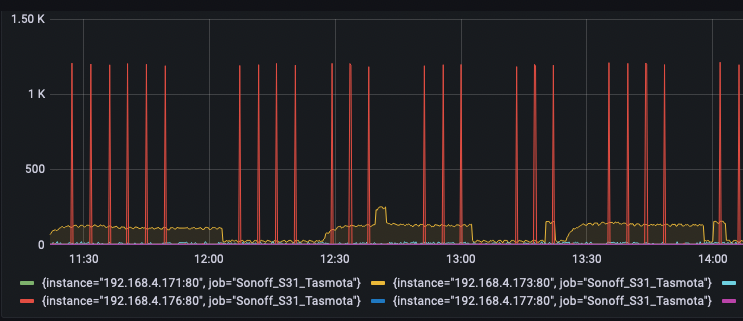
The correct way to copy LXD VMs and containers between hosts
There are quite a few posts out there describing some very odd methods to copy LXD containers from host to host, including shipping snapshots and tarballs of the container’s data directory around.
Those instructions are wrong. Don’t follow them.
The correct, and clean way to do this, is to configure your LXD hosts to talk to each other, and simply copy the containers between them. There’s a few reasons to use this approach:
- It’s more secure, using a secure transport, and proper authorization
- It doesn’t clutter up the source and destination with 2-3x the container size to create a temporary tarball which gets shipped around between hosts
- It allows you to start moving towards using LXD clusters, which is a “Good Thing(tm)”
- It relies purely on LXD concepts and built-ins, not external apps, programs or workarounds
So let’s get to it.
On LXD host_1, you can create a container or VM, as follows:
$ lxc launch ubuntu:20.04 --vm vm1 # virtual machine 1
$ lxc launch ubuntu:20.04 c1       # container 1
Wait for those to spin up and get an IP from your network.
$ lxc list
+--------------------+---------+-------------------------+------+-----------------+-----------+
|        NAME        |  STATE  |          IPV4           | IPV6 |      TYPE       | SNAPSHOTS |
+--------------------+---------+-------------------------+------+-----------------+-----------+
| c1                 | RUNNING | 192.168.101.57 (eth0)   |      | CONTAINER       | 0         |
+--------------------+---------+-------------------------+------+-----------------+-----------+
| vm1                | RUNNING | 192.168.101.56 (enp5s0) |      | VIRTUAL-MACHINE | 0         |
+--------------------+---------+-------------------------+------+-----------------+-----------+
On this same LXD host, we can now configure a “remote” LXD host for it to speak to:
$ lxc remote add host_2You will be prompted to accept the host’s fingerprint, and alternately a connection password to authorize the addition. Once added, you can verify it with:
$ lxc remote list
+-----------------+------------------------------------------+---------------+-------------+--------+--------+--------+
|      NAME       |                   URL                    |   PROTOCOL    |  AUTH TYPE  | PUBLIC | STATIC | GLOBAL |
+-----------------+------------------------------------------+---------------+-------------+--------+--------+--------+
| host_2          | https://host_2:8443                      | lxd           | tls         | NO     | NO     | NO     |
+-----------------+------------------------------------------+---------------+-------------+--------+--------+--------+
| images          | https://images.linuxcontainers.org       | simplestreams | none        | YES    | NO     | NO     |
+-----------------+------------------------------------------+---------------+-------------+--------+--------+--------+
| local (current) | unix://                                  | lxd           | file access | NO     | YES    | NO     |
+-----------------+------------------------------------------+---------------+-------------+--------+--------+--------+
| ubuntu          | https://cloud-images.ubuntu.com/releases | simplestreams | none        | YES    | YES    | NO     |
+-----------------+------------------------------------------+---------------+-------------+--------+--------+--------+
| ubuntu-daily    | https://cloud-images.ubuntu.com/daily    | simplestreams | none        | YES    | YES    | NO     |
+-----------------+------------------------------------------+---------------+-------------+--------+--------+--------+
Before we do anything to the running VM (vm1) and container (c1), we want to take a snapshot to ensure that any trouble we have, can be restored safely from that snapshot.
$ lxc stop vm1
$ lxc stop c1
$ lxc snapshot vm1 2022-03-12-snapshot # any name will do
$ lxc snapshot c1 2022-03-12-snapshot
We always confirm our changes, especially where it relates to data preservation:
$ lxc info vm1
Name: vm1
Status: STOPPED
Type: virtual-machine
Architecture: x86_64
Created: 2022/03/12 19:35 EST
Last Used: 2022/03/12 19:36 EST

Snapshots:
+---------------------+----------------------+------------+----------+
|        NAME         |       TAKEN AT       | EXPIRES AT | STATEFUL |
+---------------------+----------------------+------------+----------+
| 2022-03-12-snapshot | 2022/03/12 19:44 EST |            | NO       |
+---------------------+----------------------+------------+----------+
Now we can start those back up:
$ lxc start vm1 c1 From here, we can now copy the snapshots we just made on LXD host_1 to LXD host_2:
$ lxc copy vm1/2022-03-12-snapshot host_2:vm1 --verbose
Transferring instance: vm1: 938.46MB (117.30MB/s)
On host_2, you can see that the vm1 we created on host_1, is now copied to host_2, and remains in a ‘STOPPED‘ state:
$ lxc list
+--------------------+---------+-----------------------+------+-----------------+-----------+
|        NAME        |  STATE  |         IPV4          | IPV6 |      TYPE       | SNAPSHOTS |
+--------------------+---------+-----------------------+------+-----------------+-----------+
| vm1                | STOPPED |                       |      | VIRTUAL-MACHINE | 0         |
+--------------------+---------+-----------------------+------+-----------------+-----------+
You can now start that VM, and have it running there, on host_2:
$ lxc start vm1Note: host_2 may have live on the same subnet as host_1, which means it may need a new IP address, if the original container is still running on host_1.
You will need to stop the container on host_1 and either give host_1 a new IP address, or start up host_2, and give it a new IP address. The two containers on the same L2 network will conflict, and your DHCP server will refuse to hand out a lease to the second one requesting it.
There are a couple of ways to do this:
- Give the container a static IP address. When you copy it to the second host, give it a different static IP address there, or
- If these containers will request a DHCP lease, you can remove /etc/machine-id and generate a new one by running
systemd-machine-id-setup. With a new machine-id, the container will appear to be a new machine to your DHCP server, and it will hand out a second lease to the second container.
With the container(s) copied from host to host, and their networking reconfigured to fit your LAN/network topology, you should have them running.
This is a stopgap though, as this isn’t an HA setup. If you truly want to have resilience, you should set up a LXD cluster between both LXD hosts, and then you can see/create/move/migrate containers between the hosts on-demand, seamlessly. When you configure those LXD servers to use shared storage (common to both LXD hosts in this case), the containers will survive a full outage of one or the other LXD host.
Good luck!
HOWTO: Roll back Ubuntu to a Previous Release
Note: I work for Canonical, we make Ubuntu (among dozens of other products)
In many cases, you want to be able to upgrade your Ubuntu release between different versions over time. There are many tools that allow you to do this seamlessly and without loss of function or data. One such tool is called do-release-upgrade, found in the ubuntu-release-upgrader-core package. You can move between supported LTS releases, as well as development releases.
What’s missing, is the ability to roll back from a release, for example when an application or library you rely on, has no support for the newer version of the OS release. With ZFS root on Ubuntu, you can create a snapshot before upgrading and roll back that snapshot when things do not go to plan. With VMs and containers, taking snapshots and reverting those becomes even easier.
But let’s stick with standard tools and supported mechanisms for the moment. I just did this minutes before writing this blog post, and have done this dozens of times in the past.
I have a working, Ubuntu Focal Fossa (20.04) baremetal machine I use as a reproducer for tricky customer issues using MAAS (Canonical’s baremetal provisioning product). In some cases, I need to move between MAAS versions to execute those tests, and they have to be done on baremetal, because VMs and containers can’t model the same topology.
MAAS has matured in its version support and newer versions of MAAS no longer support older versions of Ubuntu. For example, Ubuntu Bionic Beaver (18.04) supports MAAS versions up to version 2.8, but to consume a newer version of MAAS (2.9, 3.0, 3.1), you have to upgrade to Focal (20.04). Once the machine has been upgraded and running MAAS 3.1 on 20.04, you can’t test issues reported against 2.8 or Bionic. Rolling back becomes important.
So let’s do that!
First and most-important, is to make sure you have no broken packages, half-installed .deb packages or weird/custom PPAs. You can use ppa-purge to get rid of those third-party PPAs (you can put them back later), but for now, let’s just move them out of the way:
rename.ul list orig /etc/apt/sources.list.d/*.listNote: rename.ul comes from the util-linux package on most Linux distributions.
Now we can wipe out the cached package lists for the current Ubuntu release:
rm /var/lib/apt/lists/*We also need to transform our sources.list file in /etc/apt/ to point to the previous Ubuntu release. We can either edit the file directly, or make a copy for each release, and refer to them individually. Since I roll forward and back very often, I keep copies of both, and use a symlink to flip between them. That looks like this:
-rw-r--r-- 1 root root 3060 Mar 12 11:12 sources.list-bionic
-rw-r--r-- 1 root root 3035 Mar 12 11:12 sources.list-focal
lrwxrwxrwx 1 root root 19 Mar 12 11:12 sources.list -> sources.list-bionic
When I want to move between releases, I just remake that symlink:
ln -sf /etc/apt/sources.list-focal /etc/apt/sources.listNote: The extension of the original file cannot include the .list extension, or it will be parsed by apt/apt-get. They have to be a different extension, as .list is significant.
For now, I’m rolling back from Focal to Bionic, so this is the correct link.
We also need to make sure we define a preference to permit us to roll back. We do this with setting the package priority in a file that lives in the /etc/apt/preferences.d directory:
Create a file in there called rollback.pref with the following contents. You can use the same logic as I did with the sources.list symlink above.
Note: The extension of the original file cannot include the .pref extension, or it will be parsed by apt, and that’s not what you want.
Package: *
Pin: release a=Bionic
Pin-Priority: 1001
This indicates that the package priority for the packages with the series ‘Bionic’ have a higher priority than the currently installed versions of those same/similar packages.
Now we can update those package lists with apt update or apt-get update as you prefer. Once the package lists have been updated, hopefully without any errors, we can execute the following to downgrade all of them to the versions we need:
apt-get -fyu upgrade --allow-downgradesNote, this may not be foolproof, depending on what’s running on your system and how you used those packages. You may need to make note of some conflicts and do some removal/reinstall of those conflicting package to work around some up/down dependency issues, but that should be minimal. Here’s one example:
# apt-get -fyu dist-upgrade --allow-downgrades
Reading package lists... Done
Building dependency tree
Reading state information... Done
Calculating upgrade... Done
Hmm, seems like the AutoRemover destroyed something which really
shouldn't happen. Please file a bug report against apt.

The following information may help to resolve the situation:

The following packages have unmet dependencies:
 f2fs-tools : Depends: libf2fs0 (= 1.10.0-1) but it is not going to be installed
E: Internal Error, AutoRemover broke stuff
To resolve this, I can do something like the following:
# apt-get --reinstall install f2fs-tools
Reading package lists... Done
Building dependency tree
Reading state information... Done
The following packages were automatically installed and are no longer required:
  libf2fs-format4 libf2fs5
Use 'apt autoremove' to remove them.
The following additional packages will be installed:
  libf2fs0
The following NEW packages will be installed:
  libf2fs0
The following packages will be DOWNGRADED:
  f2fs-tools
0 upgraded, 1 newly installed, 1 downgraded, 0 to remove and 237 not upgraded.
Need to get 127 kB of archives.
After this operation, 99.3 kB disk space will be freed.
Do you want to continue? [Y/n]
Answering ‘Yes’ will resolve that conflict for me:
Do you want to continue? [Y/n] y
Get:1 http://us.archive.ubuntu.com/ubuntu bionic/universe amd64 libf2fs0 amd64 1.10.0-1 [24.6 kB]
Get:2 http://us.archive.ubuntu.com/ubuntu bionic/universe amd64 f2fs-tools amd64 1.10.0-1 [102 kB]
Fetched 127 kB in 0s (1,111 kB/s)
Selecting previously unselected package libf2fs0:amd64.
(Reading database ... 78864 files and directories currently installed.)
Preparing to unpack .../libf2fs0_1.10.0-1_amd64.deb ...
Unpacking libf2fs0:amd64 (1.10.0-1) ...
dpkg: warning: downgrading f2fs-tools from 1.11.0-1.1ubuntu1 to 1.10.0-1
Preparing to unpack .../f2fs-tools_1.10.0-1_amd64.deb ...
Unpacking f2fs-tools (1.10.0-1) over (1.11.0-1.1ubuntu1) ...
If you want to be pedantic and ensure your system will definitely boot, you can do two more things before that final reboot.
sudo update-initramfs -uk all
sudo update-grub
And that’s it! Once the packages are cleanly downgraded, you should be able to reboot the machine back into the previous Ubuntu OS release.
Update: I just noticed that immediately after my first reboot, there were more packages that needed to be downgraded. I simply re-ran the downgrade again, and these were updated to the previous versions:
apt-get -fyu dist-upgrade --allow-downgradesI also ran the following, to remove unneeded packages after that last, clean downgrade step:
apt-get -y autoremove