
HOWTO: Properly install native VMware Tools in pfSense 2.0.3 (FreeBSD 8.1)
Tags: FreeBSD, Open Source, security, VMware![]() If you’re anything like me, you take security seriously. With all the recent news about the NSA and Prism and over-reach of surveillance, you’ll take this very seriously. I run several layers of nested firewalls, VPNs and other layers of security at my office.
If you’re anything like me, you take security seriously. With all the recent news about the NSA and Prism and over-reach of surveillance, you’ll take this very seriously. I run several layers of nested firewalls, VPNs and other layers of security at my office.
One of the things I run in a virtualized environment (VMware ESXi), is pfSense. pfSense ibs an Open Source firewall distribution based on FreeBSD. It’s very full-featured, has a web-management console, and lots of add-on packages to enhance it’s capabilities.
“pfSense is a free, open source customized distribution of FreeBSD tailored for use as a firewall and router. In addition to being a powerful, flexible firewalling and routing platform, it includes a long list of related features and a package system allowing further expandability without adding bloat and potential security vulnerabilities to the base distribution. pfSense is a popular project with more than 1 million downloads since its inception, and proven in countless installations ranging from small home networks protecting a single computer to large corporations, universities and other organizations protecting thousands of network devices.”
pfSense is currently using FreeBSD 8.1, which has been EOL’d by the BSD team last July. The pfSense team is diligently working on new versions, but they’re not out yet. For now, you can continue to use FreeBSD 8.1.
If you run pfSense inside a VM, you’ll want and need to get the base VMware tools installed within it, but that process isn’t straightforward. You want to make sure you install the VMware Tools dependencies and core modules before installing anything else, so you don’t get into package conflicts and other troubles.
I’ve been writing a lot of posts about VMware lately, because I’m finding myself using it more and more, and I’m teaching myself how to use it in a higher-volume capacity.
Here’s how to install pfSense and immedaitely get the correct version of VMware Tools (from VMware itself, not the Open Source ‘open-vm-toolbox‘ or ‘vmfs-tools’) installed within it.
Let’s get started (click any images below to view them full-size):
- First, create a new VM and attach your pfSense ISO to it, using whatever mechanism your hypervisor of choice provides. Boot it, and install pfSense into your VM. This part is easy and straightforward.
- Once fully installed, shut down (power off) your VM, and detach the CD, so it no longer boots, but keep the CD/DVD device configured for your VM, you’ll use that again in a moment.
- Boot your pfSense VM back up, configure networking (in my case the NIC was em0), and you’ll get to a screen that looks something like this:
(click image to view full size)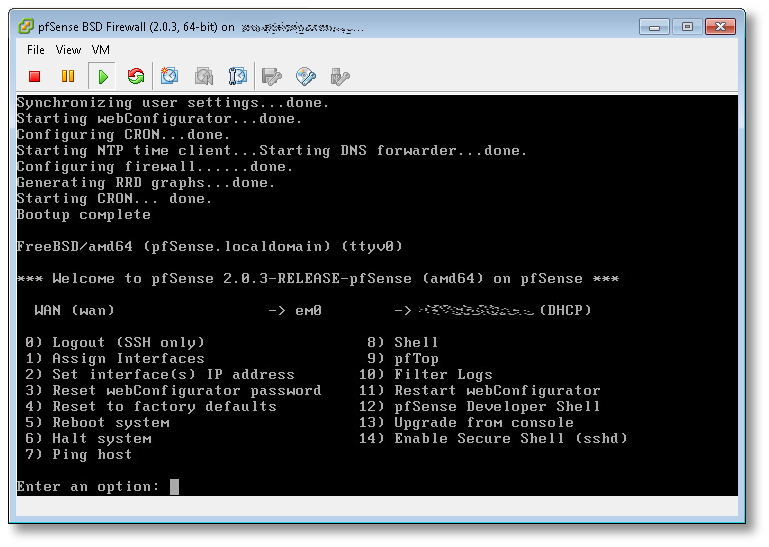
- From here, the first thing you want to do, is change your root password! Hit (8) to drop to a shell, and use the standard passwd(1) utility. Once changed, hit ^D (Control-D) to exit and return to the pfSense main menu.
- Next, we’re going to start SSHD, so we can log into the VM remotely, and manage it using a normal Windows, Mac or Linux terminal, vs. interacting with it using the VMware ESXi console (as in this example). Hit (14) to enable the SSH shell.
- In the previous screenshot, directly to the left of the (DHCP) part, was the IP of the pfSense server. SSH over to that now, as the root user, using whatever native terminal you prefer.
$ ssh root@192.168.1.50
- Once SSH’d into pfSense remotely, you’ll need to set the PACKAGESITE environment variable, to make sure all core packging tools refer to the 8.1-release tag from the FreeBSD archive site, and not the 8.1-release-p13 that it will try to use by default from the primary site, which will fail, because FreeBSD 8.1 is EOL as I write this.
-
[2.0.3-RELEASE][root@pfSense.localdomain]/root(1): setenv \
PACKAGESITE \
http://ftp-archive.freebsd.org/pub/FreeBSD-Archive/ports/amd64/packages-8.1-release/Latest/
Here’s what will happen if you do not set this variable:
[2.0.3-RELEASE][root@pfSense.localdomain]/root(3): pkg_add -rv wget
looking up ftp.freebsd.org
connecting to ftp.freebsd.org:21
Error: Unable to get ftp://ftp.freebsd.org/pub/FreeBSD/ports/amd64/packages-8.1-release/Latest/wget.tbz:
File unavailable (e.g., file not found, no access)
pkg_add: unable to fetch 'ftp://ftp.freebsd.org/pub/FreeBSD/ports/amd64/packages-8.1-release/Latest/wget.tbz' by URL
pkg_add: 1 package addition(s) failed
Once you set the variable to refer to the archive site, you’ll have success here:
[2.0.3-RELEASE][root@pfSense.localdomain]/root(5): pkg_add -rv wget
looking up ftp-archive.freebsd.org
connecting to ftp-archive.freebsd.org:80
requesting http://ftp-archive.freebsd.org/pub/FreeBSD-Archive/ports/amd64/packages-8.1-release/Latest/wget.tbz
Fetching http://ftp-archive.freebsd.org/pub/FreeBSD-Archive/ports/amd64/packages-8.1-release/Latest/wget.tbz...x +CONTENTS
x +COMMENT
x +DESC
x +MTREE_DIRS
x man/man1/wget.1.gz
x bin/wget
...
- Now we know we can get to the backup/archive site that holds the 8.1 RELEASE packages, let’s get the ones we need to get VMware Tools up and running. We’re going to need two core packages: compat6x-amd64 and perl to be able to run the script and dynamically load the VMware modules at kernel boot.
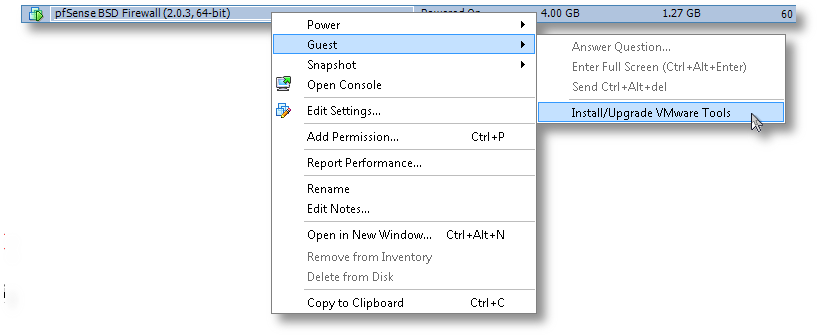
[2.0.3-RELEASE][root@pfSense.localdomain]/root(6): pkg_add -r compat6x-amd64 perl Fetching http://ftp-archive.freebsd.org/pub/FreeBSD-Archive/ports/amd64/packages-8.1-release/Latest/compat6x-amd64.tbz... Done. ******************************************************************************* * * * Do not forget to add COMPAT_FREEBSD6 into * * your kernel configuration (enabled by default). * * * * To configure and recompile your kernel see: * * http://www.freebsd.org/doc/en_US.ISO8859-1/books/handbook/kernelconfig.html * * * ******************************************************************************* Fetching http://ftp-archive.freebsd.org/pub/FreeBSD-Archive/ports/amd64/packages-8.1-release/Latest/perl.tbz... Done. Removing stale symlinks from /usr/bin... Skipping /usr/bin/perl Skipping /usr/bin/perl5 Done. Creating various symlinks in /usr/bin... Symlinking /usr/local/bin/perl5.10.1 to /usr/bin/perl Symlinking /usr/local/bin/perl5.10.1 to /usr/bin/perl5 Done. cd: can't cd to /usr/include Cleaning up /etc/make.conf... Done. Spamming /etc/make.conf... Done. Cleaning up /etc/manpath.config... Done. Spamming /etc/manpath.config... Done. - Now we need to mount the CD ISO for VMware Tools for FreeBSD. This is the step I mentioned earlier and why we needed to keep the CD/DVD device configured for this VM. In ESXi, you’ll need to do that from the console, by right-clicking on the VM, go to Guest and then to “Install VMware Tools”, as shown here:

- Now the drive is mapped to the VM, we need to mount it and access the vmware tarball within:
[2.0.3-RELEASE][root@pfSense.localdomain]/root(8): mkdir /tmp/cdrom/
[2.0.3-RELEASE][root@pfSense.localdomain]/root(9): mount_cd9660 /dev/acd0 /tmp/cdrom/
[2.0.3-RELEASE][root@pfSense.localdomain]/root(10): cd /tmp/cdrom/
[2.0.3-RELEASE][root@pfSense.localdomain]/tmp/cdrom(11): ls -l
total 15030
-r--r--r--  1 root  wheel        29 Mar 23 15:02 manifest.txt
-r--r--r--  1 root  wheel  15390306 Mar 23 15:02 vmware-freebsd-tools.tar.gz
[2.0.3-RELEASE][root@pfSense.localdomain]/tmp/cdrom(12): tar zxvf vmware-freebsd-tools.tar.gz -C /tmp/
- Now we can go into /tmp/vmware-tools-distrib and build the required interfaces for FreeBSD. For the most part, you’ll just accept the defaults to most of the questions. Read them carefully if you think you want something custom for your needs.
[2.0.3-RELEASE][root@pfSense.localdomain]/tmp/vmware-tools-distrib(14): ./vmware-install.pl --clobber-kernel-modules=vmci    \
                  --clobber-kernel-modules=vsock   \
                  --clobber-kernel-modules=vmxnet3 \
                  --clobber-kernel-modules=pvscsi  \
                  --clobber-kernel-modules=vmmemctl
Creating a new VMware Tools installer database using the tar4 format.

Installing VMware Tools.

In which directory do you want to install the binary files?
[/usr/local/bin]

In which directory do you want to install the startup script?
[/usr/local/etc/rc.d]

In which directory do you want to install the daemon files?
[/usr/local/sbin]

In which directory do you want to install the library files?
[/usr/local/lib/vmware-tools]

The path "/usr/local/lib/vmware-tools" does not exist currently. This program
is going to create it, including needed parent directories. Is this what you
want? [yes]

In which directory do you want to install the documentation files?
[/usr/local/share/doc/vmware-tools]

The path "/usr/local/share/doc/vmware-tools" does not exist currently. This
program is going to create it, including needed parent directories. Is this
what you want? [yes]

The installation of VMware Tools 9.0.5 build-1065307 for FreeBSD completed
successfully. You can decide to remove this software from your system at any
time by invoking the following command:
"/usr/local/bin/vmware-uninstall-tools.pl".

Before running VMware Tools for the first time, you need to configure it by
invoking the following command: "/usr/local/bin/vmware-config-tools.pl". Do you
want this program to invoke the command for you now? [yes]

Initializing...


Making sure services for VMware Tools are stopped.

Stopping VMware Tools services in the virtual machine:
   Guest operating system daemon:                                      done


The vmblock enables dragging or copying files between host and guest in a
Fusion or Workstation virtual environment.  Do you wish to enable this feature?
[no]

No X install found.

Starting VMware Tools services in the virtual machine:
   Switching to guest configuration:                                   done
   Guest memory manager:                                               done
   Guest operating system daemon:                                      done
The configuration of VMware Tools 9.0.5 build-1065307 for FreeBSD for this
running kernel completed successfully.

You must restart your X session before any mouse or graphics changes take
effect.

You can now run VMware Tools by invoking "/usr/local/bin/vmware-toolbox-cmd"
from the command line.

Please remember to configure your network by adding:
ifconfig_vxn0="dhcp"
to the /etc/rc.conf file and start the network with:
/etc/netstart
to use the vmxnet interface using DHCP.

Enjoy,

--the VMware team
That’s it. You’ve now got a working VMware Tools install using the native, VMware-provided kit, inside your VM. If you’re running ESXi, you’ll now notice that it correctly reports its version, status and IP back to the console, which was missing before we started.

Good luck!
Snapshot backups of EVERYTHING using rsync (including Windows!)
Tags: Backups, FreeBSD, linux, Perl, rsnapshot, rsync, servers, sync, Windows Let me just start by saying that I have a lot of data. In multiple places. Some on laptops, some on servers, some on removable drives and mirrored hard disks sitting in a bank vault (yes, really). Lots of data on lots of systems in different states and locations: client data, personal data, work data, community data and lots more.
Over the years, I’ve tried my best to unify where that data is sourced from, for example by relocating the standard “My Documents” location on all of my Windows machines (physical and virtual), to point to a Samba share that is served up by a GELI-encrypted volume on my FreeBSD or Linux servers. That part works well, so far, but that’s only a small piece of the larger puzzle.
Over the last decade, the amount of data I’m holding and responsible for managing has grown significantly, and I needed a better way to manage it all.
There are plenty of backup solutions for Linux including the popular Amanda and Bacula, but I needed something more portable, leaner and much more efficient. That quest led me to look to find Unison mostly due to it’s cross-platform support, but it was still a bit more complicated than I needed.
So I kept looking and eventually found rsnapshot, a Perl-based tool wrapped around the standard rsync utility written by Andrew Tridgell.
Since I’d already been using rsync quite a bit over the last 10 years or so to copy data around as I needed it and to perform nightly full backups of my remote servers, I decided to look into using rsync to manage a new backup solution based around incremental backups as well as full backups.
I’m already using rsync to pull a couple of terabytes of mirrored data to my servers on a nightly basis. I’m mirroring CPAN, FreeBSD, Project Gutenberg, Cygwin, Wikipedia and several other key projects, so this was a natural graft onto my existing environment.
Read the rest of this entry »
VMware Tweaking
Tags: FreeBSD, linux, sync, VMwareRoUS, VMware is something I know a great deal about, inside and out. I can probably help you.
I’ve gotten many unsupported USB devices working, regularly sync my Palms over USB, Ir, and serial into and out of vmware guest images, and have no problems with NAT or DVD playback.
Hit me up in email and I can help you out. I have some tweaks as well, that you may want to implement, which will speed up the performance of that NT image for you inside the vm.
I have about 12 images I use in vmware on nearly a daily basis (and as I type this, FreeBSD 4.3 is happily compiling gnome inside VMware right now on another window).
I rely on it quite heavily for my cross-platform work, where I need a “soft” box to test in.