
HOWTO: Properly install native VMware Tools in pfSense 2.0.3 (FreeBSD 8.1)
Tags: FreeBSD, Open Source, security, VMware![]() If you’re anything like me, you take security seriously. With all the recent news about the NSA and Prism and over-reach of surveillance, you’ll take this very seriously. I run several layers of nested firewalls, VPNs and other layers of security at my office.
If you’re anything like me, you take security seriously. With all the recent news about the NSA and Prism and over-reach of surveillance, you’ll take this very seriously. I run several layers of nested firewalls, VPNs and other layers of security at my office.
One of the things I run in a virtualized environment (VMware ESXi), is pfSense. pfSense ibs an Open Source firewall distribution based on FreeBSD. It’s very full-featured, has a web-management console, and lots of add-on packages to enhance it’s capabilities.
“pfSense is a free, open source customized distribution of FreeBSD tailored for use as a firewall and router. In addition to being a powerful, flexible firewalling and routing platform, it includes a long list of related features and a package system allowing further expandability without adding bloat and potential security vulnerabilities to the base distribution. pfSense is a popular project with more than 1 million downloads since its inception, and proven in countless installations ranging from small home networks protecting a single computer to large corporations, universities and other organizations protecting thousands of network devices.”
pfSense is currently using FreeBSD 8.1, which has been EOL’d by the BSD team last July. The pfSense team is diligently working on new versions, but they’re not out yet. For now, you can continue to use FreeBSD 8.1.
If you run pfSense inside a VM, you’ll want and need to get the base VMware tools installed within it, but that process isn’t straightforward. You want to make sure you install the VMware Tools dependencies and core modules before installing anything else, so you don’t get into package conflicts and other troubles.
I’ve been writing a lot of posts about VMware lately, because I’m finding myself using it more and more, and I’m teaching myself how to use it in a higher-volume capacity.
Here’s how to install pfSense and immedaitely get the correct version of VMware Tools (from VMware itself, not the Open Source ‘open-vm-toolbox‘ or ‘vmfs-tools’) installed within it.
Let’s get started (click any images below to view them full-size):
- First, create a new VM and attach your pfSense ISO to it, using whatever mechanism your hypervisor of choice provides. Boot it, and install pfSense into your VM. This part is easy and straightforward.
- Once fully installed, shut down (power off) your VM, and detach the CD, so it no longer boots, but keep the CD/DVD device configured for your VM, you’ll use that again in a moment.
- Boot your pfSense VM back up, configure networking (in my case the NIC was em0), and you’ll get to a screen that looks something like this:
(click image to view full size)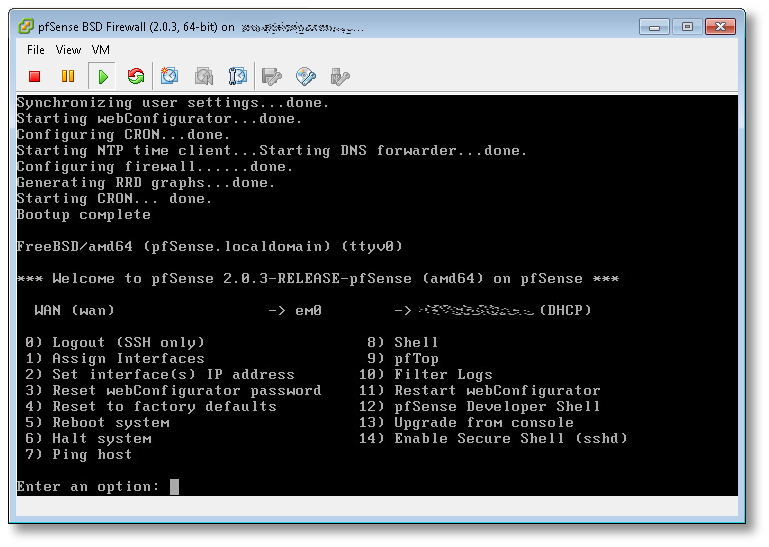
- From here, the first thing you want to do, is change your root password! Hit (8) to drop to a shell, and use the standard passwd(1) utility. Once changed, hit ^D (Control-D) to exit and return to the pfSense main menu.
- Next, we’re going to start SSHD, so we can log into the VM remotely, and manage it using a normal Windows, Mac or Linux terminal, vs. interacting with it using the VMware ESXi console (as in this example). Hit (14) to enable the SSH shell.
- In the previous screenshot, directly to the left of the (DHCP) part, was the IP of the pfSense server. SSH over to that now, as the root user, using whatever native terminal you prefer.
$ ssh root@192.168.1.50
- Once SSH’d into pfSense remotely, you’ll need to set the PACKAGESITE environment variable, to make sure all core packging tools refer to the 8.1-release tag from the FreeBSD archive site, and not the 8.1-release-p13 that it will try to use by default from the primary site, which will fail, because FreeBSD 8.1 is EOL as I write this.
-
[2.0.3-RELEASE][root@pfSense.localdomain]/root(1): setenv \
PACKAGESITE \
http://ftp-archive.freebsd.org/pub/FreeBSD-Archive/ports/amd64/packages-8.1-release/Latest/
Here’s what will happen if you do not set this variable:
[2.0.3-RELEASE][root@pfSense.localdomain]/root(3): pkg_add -rv wget
looking up ftp.freebsd.org
connecting to ftp.freebsd.org:21
Error: Unable to get ftp://ftp.freebsd.org/pub/FreeBSD/ports/amd64/packages-8.1-release/Latest/wget.tbz:
File unavailable (e.g., file not found, no access)
pkg_add: unable to fetch 'ftp://ftp.freebsd.org/pub/FreeBSD/ports/amd64/packages-8.1-release/Latest/wget.tbz' by URL
pkg_add: 1 package addition(s) failed
Once you set the variable to refer to the archive site, you’ll have success here:
[2.0.3-RELEASE][root@pfSense.localdomain]/root(5): pkg_add -rv wget
looking up ftp-archive.freebsd.org
connecting to ftp-archive.freebsd.org:80
requesting http://ftp-archive.freebsd.org/pub/FreeBSD-Archive/ports/amd64/packages-8.1-release/Latest/wget.tbz
Fetching http://ftp-archive.freebsd.org/pub/FreeBSD-Archive/ports/amd64/packages-8.1-release/Latest/wget.tbz...x +CONTENTS
x +COMMENT
x +DESC
x +MTREE_DIRS
x man/man1/wget.1.gz
x bin/wget
...
- Now we know we can get to the backup/archive site that holds the 8.1 RELEASE packages, let’s get the ones we need to get VMware Tools up and running. We’re going to need two core packages: compat6x-amd64 and perl to be able to run the script and dynamically load the VMware modules at kernel boot.
[2.0.3-RELEASE][root@pfSense.localdomain]/root(6): pkg_add -r compat6x-amd64 perl Fetching http://ftp-archive.freebsd.org/pub/FreeBSD-Archive/ports/amd64/packages-8.1-release/Latest/compat6x-amd64.tbz... Done. ******************************************************************************* * * * Do not forget to add COMPAT_FREEBSD6 into * * your kernel configuration (enabled by default). * * * * To configure and recompile your kernel see: * * http://www.freebsd.org/doc/en_US.ISO8859-1/books/handbook/kernelconfig.html * * * ******************************************************************************* Fetching http://ftp-archive.freebsd.org/pub/FreeBSD-Archive/ports/amd64/packages-8.1-release/Latest/perl.tbz... Done. Removing stale symlinks from /usr/bin... Skipping /usr/bin/perl Skipping /usr/bin/perl5 Done. Creating various symlinks in /usr/bin... Symlinking /usr/local/bin/perl5.10.1 to /usr/bin/perl Symlinking /usr/local/bin/perl5.10.1 to /usr/bin/perl5 Done. cd: can't cd to /usr/include Cleaning up /etc/make.conf... Done. Spamming /etc/make.conf... Done. Cleaning up /etc/manpath.config... Done. Spamming /etc/manpath.config... Done. - Now we need to mount the CD ISO for VMware Tools for FreeBSD. This is the step I mentioned earlier and why we needed to keep the CD/DVD device configured for this VM. In ESXi, you’ll need to do that from the console, by right-clicking on the VM, go to Guest and then to “Install VMware Tools”, as shown here:
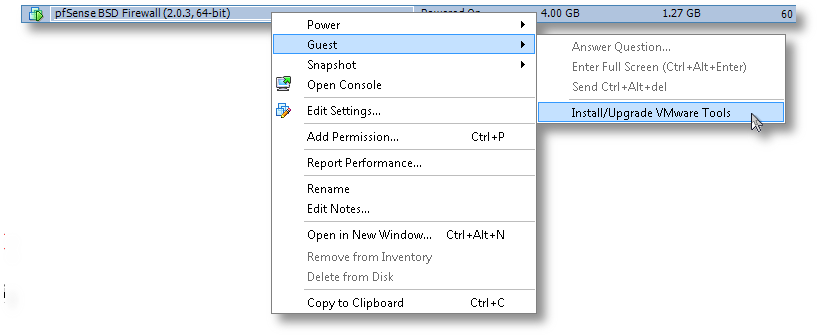

- Now the drive is mapped to the VM, we need to mount it and access the vmware tarball within:
[2.0.3-RELEASE][root@pfSense.localdomain]/root(8): mkdir /tmp/cdrom/
[2.0.3-RELEASE][root@pfSense.localdomain]/root(9): mount_cd9660 /dev/acd0 /tmp/cdrom/
[2.0.3-RELEASE][root@pfSense.localdomain]/root(10): cd /tmp/cdrom/
[2.0.3-RELEASE][root@pfSense.localdomain]/tmp/cdrom(11): ls -l
total 15030
-r--r--r--  1 root  wheel        29 Mar 23 15:02 manifest.txt
-r--r--r--  1 root  wheel  15390306 Mar 23 15:02 vmware-freebsd-tools.tar.gz
[2.0.3-RELEASE][root@pfSense.localdomain]/tmp/cdrom(12): tar zxvf vmware-freebsd-tools.tar.gz -C /tmp/
- Now we can go into /tmp/vmware-tools-distrib and build the required interfaces for FreeBSD. For the most part, you’ll just accept the defaults to most of the questions. Read them carefully if you think you want something custom for your needs.
[2.0.3-RELEASE][root@pfSense.localdomain]/tmp/vmware-tools-distrib(14): ./vmware-install.pl --clobber-kernel-modules=vmci    \
                  --clobber-kernel-modules=vsock   \
                  --clobber-kernel-modules=vmxnet3 \
                  --clobber-kernel-modules=pvscsi  \
                  --clobber-kernel-modules=vmmemctl
Creating a new VMware Tools installer database using the tar4 format.

Installing VMware Tools.

In which directory do you want to install the binary files?
[/usr/local/bin]

In which directory do you want to install the startup script?
[/usr/local/etc/rc.d]

In which directory do you want to install the daemon files?
[/usr/local/sbin]

In which directory do you want to install the library files?
[/usr/local/lib/vmware-tools]

The path "/usr/local/lib/vmware-tools" does not exist currently. This program
is going to create it, including needed parent directories. Is this what you
want? [yes]

In which directory do you want to install the documentation files?
[/usr/local/share/doc/vmware-tools]

The path "/usr/local/share/doc/vmware-tools" does not exist currently. This
program is going to create it, including needed parent directories. Is this
what you want? [yes]

The installation of VMware Tools 9.0.5 build-1065307 for FreeBSD completed
successfully. You can decide to remove this software from your system at any
time by invoking the following command:
"/usr/local/bin/vmware-uninstall-tools.pl".

Before running VMware Tools for the first time, you need to configure it by
invoking the following command: "/usr/local/bin/vmware-config-tools.pl". Do you
want this program to invoke the command for you now? [yes]

Initializing...


Making sure services for VMware Tools are stopped.

Stopping VMware Tools services in the virtual machine:
   Guest operating system daemon:                                      done


The vmblock enables dragging or copying files between host and guest in a
Fusion or Workstation virtual environment.  Do you wish to enable this feature?
[no]

No X install found.

Starting VMware Tools services in the virtual machine:
   Switching to guest configuration:                                   done
   Guest memory manager:                                               done
   Guest operating system daemon:                                      done
The configuration of VMware Tools 9.0.5 build-1065307 for FreeBSD for this
running kernel completed successfully.

You must restart your X session before any mouse or graphics changes take
effect.

You can now run VMware Tools by invoking "/usr/local/bin/vmware-toolbox-cmd"
from the command line.

Please remember to configure your network by adding:
ifconfig_vxn0="dhcp"
to the /etc/rc.conf file and start the network with:
/etc/netstart
to use the vmxnet interface using DHCP.

Enjoy,

--the VMware team
That’s it. You’ve now got a working VMware Tools install using the native, VMware-provided kit, inside your VM. If you’re running ESXi, you’ll now notice that it correctly reports its version, status and IP back to the console, which was missing before we started.

Good luck!
HOWTO: Configure XChat Azure on OS X to connect to Freenode using SASL + Tor
Tags: Apple, Encryption, irc, Open Source, OSX, TorWith all the recent news about the NSA, Prism Surveillance Program and the US Federal Government actively spying on its citizens without cause, I decided to update the detailed HOWTO I posted in early 2011 describing how to connect to Freenode using Xchat (on Linux/FreeBSD) using SASL + Tor. The process is relatively simple, but there is a simplified version now, and it works seamlessly with XChat Azure on OS X, as well as Linux, without having to compile any plugins using GCC.
A win, win, all around! Let’s get started! (click the images below to zoom to full size)
Installing Tor on Your OS X Machine
Configuring Browsers to use Tor (to validate Tor functionality)
Configuring XChat Azure to Speak Through the Tor Proxy
Adding a Freenode Tor Network Server to XChat Azure
Installing the SASL Perl Script to Manage SASL Connections
Connecting to Freenode using SASL + Tor
Installing Tor on Your OS X Machine
To get Tor running on your OS X machine, you’ll need to install it. There are several ways to do this, but the easiest is to use the TorBrowser Bundle, package for OS X.
It’s straightforward to install that, just download and install it as you would any other OS X software. Once you’ve got it installed, you’ll see the main Control Panel, shown here:
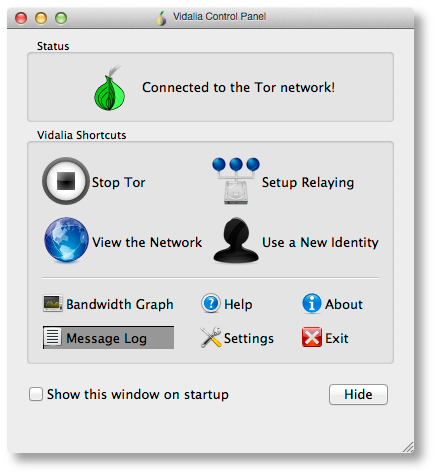
If you see the green “onion” icon in your Finder menubar at the top of your screen, you’re up and running and connected to the Tor network. You can check this further by looking at the “Bandwidth Graph” to see if bytes are actually flowing across your connection.
Configuring Browsers to use Tor (to validate Tor functionality)
Now you’ve got Tor running, you’ll need to verify that it actually works and that you can send and receive traffic over it.
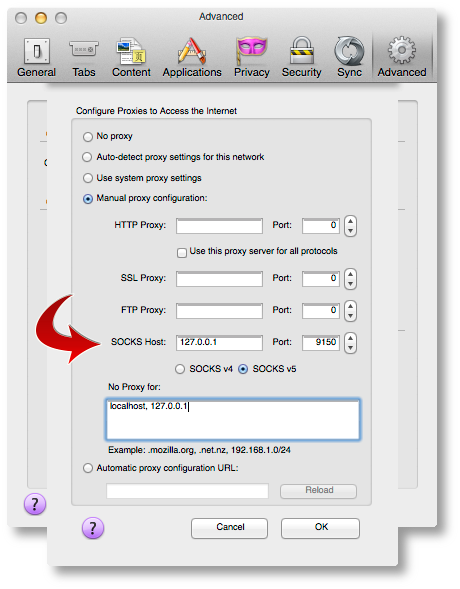
Open your browser of choice (I use Firefox but any browser will work) and find the configuration option in your browser’s Preferences pane for setting a “Proxy Server”. You’ll want to point it to a proxy server address of 127.0.0.1, port 9150, as shown below.
The reason this isn’t the “standard” Tor port of 9050, is because the Tor Browser Bundle project wanted to ensure that they didn’t collide with a system-installed version of Tor, so they went with 9150 instead.
Once you’ve got that configured, point your browser to the Tor Check Site. You should see output that looks like this:
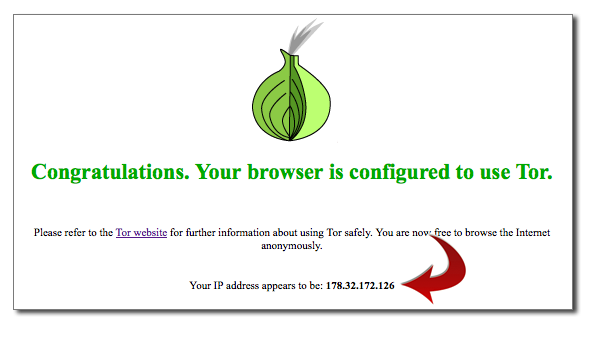
If you’ve gotten this far, you’re almost there! If you see an error message or cannot connect to the Proxy, make sure Tor Browser is running, that it’s showing ‘green’ in your menubar, and that you’re using port 9150, not 9050 in your Proxy port configuration.
Configuring XChat Azure to Speak Through the Tor Proxy
Now let’s configure XChat Azure. Open up your XChat Preferences (Command-,) and go to the “Network setup” page. Here is where you’ll configure similar parameters we just used for Firefox above to permit XChat Azure to communicate across Tor.
Configure it to look like the following values:

Now ALL of your networks will attempt to use Tor, which may not be what you want. We’ll go over that in a moment, so you can exclude (“bypass”) the proxy for public networks.
Adding a Freenode Tor Network Server to XChat Azure
To add a new Network in XChat Azure, you’ll want to go to “File => Network List”, or use Command-S. You’ll see a default network list here.
Click the [+] sign in the lower-left corner to add a new network. You’ll name this “Freenode_Tor” or something similar. Don’t put spaces in the name, this is important.
When you add this network, you’ll want to click on “Show Details” and configure it to look similar to the following two screenshots.
The first tab, you’ll want to double-click the server name line and add a server with the name:
p4fsi4ockecnea7l.onion
And the port:
6697
Make sure you also check the “SSL” box there. This is the SSL port for Freenode servers.

On the second tab, you’ll want to check the two boxes shown. If you want to reject invalid SSL certs (not a bad idea), uncheck that second box.
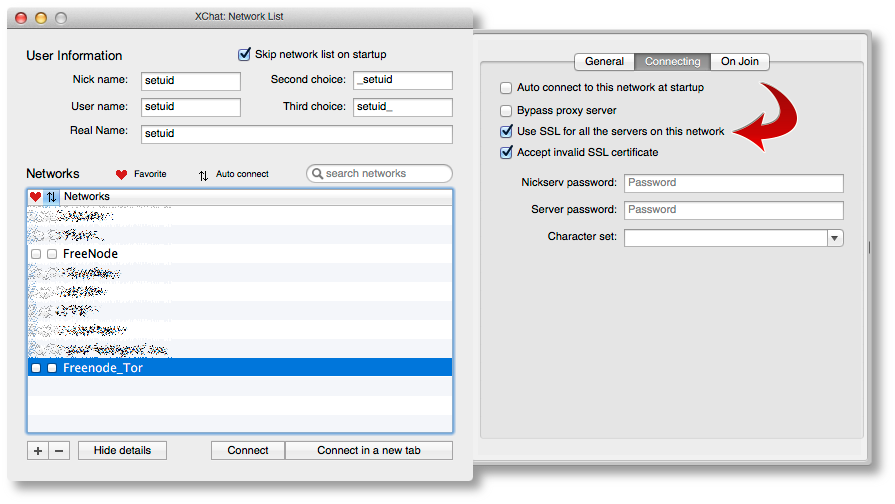
You’ll also see a checkbox that says “Bypass proxy server”. You’ll want to check that box for all other non-Tor networks, but not this one. We actually want to use the proxy server here, so leave it unchecked.
Installing the SASL Perl Script to Manage SASL Connections
Next, we need to install a small script that will be used to manage our SASL connections under XChat Azure. You can find several of those on the Freenode SASL page. I haven’t tested any of the scripts there except the Perl script, so we’re going to use that one for this HOWTO.
Download that Perl script using whatever tool you use, and put it into your $USER/.xchat2/ directory using iTerm or Finder.
Now when you start up XChat Azure, you should see something like this at the top:
[07:58]   Perl interface loaded
[07:58]   Python interface loaded
[07:58]   SASL: auth loaded from /Users/setuid/Library/Containers/org.3rddev.xchatazure/Data/Library/Application Support/XChat Azure/sasl.auth
We need to make sure we set some auth values while this script is loaded. To do that, you’ll run the following command inside the XChat Azure text box:
/sasl set Freenode_Tor <username> <password> PLAIN
/sasl save
So if your Freenode username was ‘foobar’ with a Freenode NickServ password of ‘MyS3cretPas5word’, you’d type:
/sasl set Freenode_Tor foobar MyS3cretPas5word PLAIN
/sasl save
Now your SASL authentication is saved, and you’re ready to connect!
Connecting to Freenode using SASL + Tor
Using Command-S (or File => Network List from the app menus), highlight your “Freenode_Tor” network and click the “Connect” button. It will take a few moments, but you should see something that looks like the following:
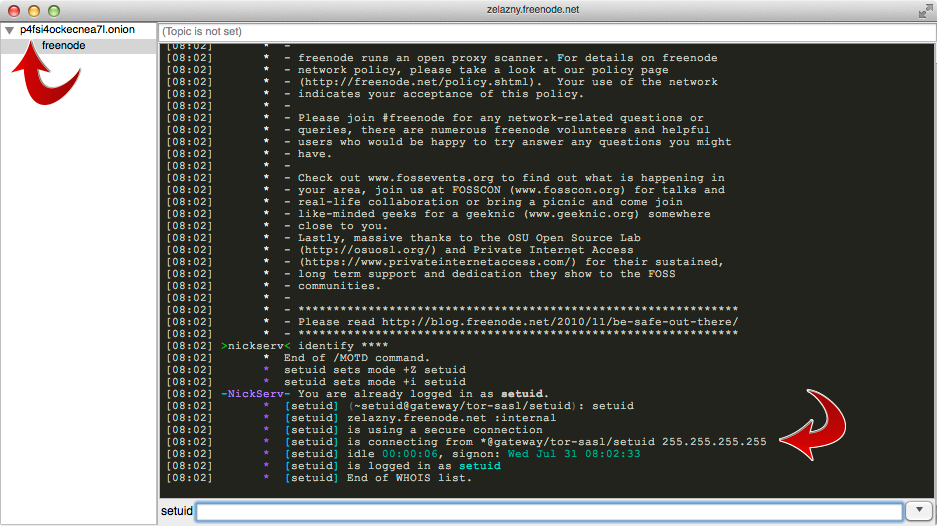
If you see that, you’re all set! Now you can join any channels you wish and be sure that your IRC communications are being anonymized behind the Tor network.
Note: Sometimes you’ll see an error that looks like the one below, when you randomly reach a Freenode server with a wildcard SSL cert.
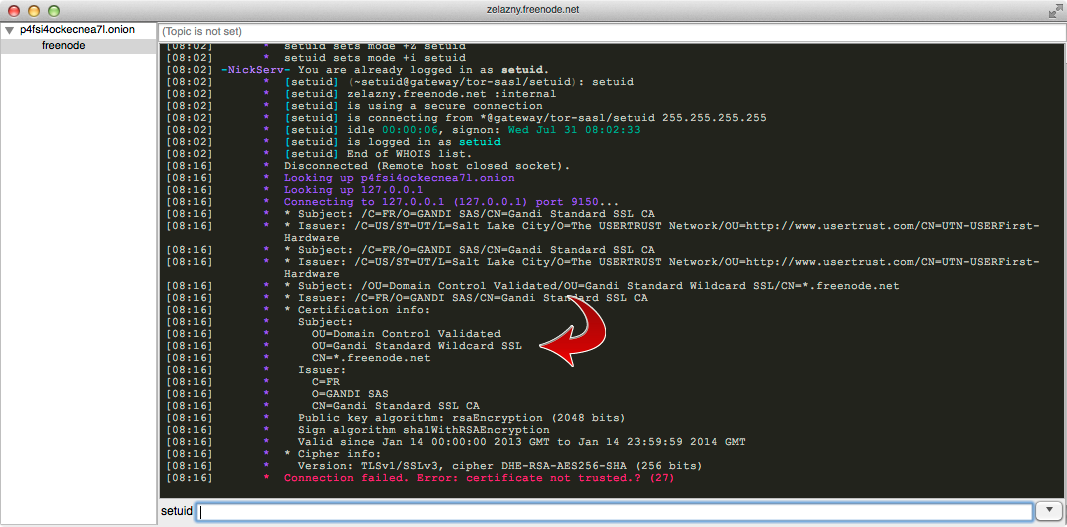
If you run into this, just close XChat down and restart, or attempt to reconnect to the “Freenode_Tor” network again until you get a proper server in the randomized list.
That’s it, good luck!
Open Source Advocacy on the Amtrak Train
Tags: Amtrak, Open Source, OpenOffice.org, WindowsI take the Amtrak train into work 3-5 days a week from Norwich, CT to Manhattan. The ride is a 2.5 hour commute each way (137 miles each direction, 275 miles total). It gives me a lot of “focus time” to work on the train, and the schedule is relatively reliable. I don’t mind it at all. The cost is a bit prohibitive, but that’s all a wash in the “cost of doing business”.
I basically travel the entire length of the state of CT twice a day, almost every weekday.
On the commute, I end up talking to dozens of people who are heading to various places along the East coast. Some are going to Richmond, VA… some are going to Boston, MA, and some are going to New York City as I am. There’s always someone interesting to have a side conversation with, and the Amtrak staff all knows me now from being on the train so often. I end up helping other passengers when the power is out in the cabin (GFCI is hidden at the end of the corridor) or when other things pop up, it’s really not boring at all… (except when the trains are 3 hours late, like they were Monday night. Arg!)
This week, I was in the cafe car working on the ride in, and a gentleman sat next to me with an old’ish Windows laptop, and was trying to copy some fonts from an external drive to his machine, overwriting the ones Windows was reading from C:\Windows\fonts. There were hundreds of them, and he had to confirm each overwrite from the GUI. He was tapping the Enter key for nearly 15 minutes straight until he decided to prop up his phone on the Enter key to hold it down for him, because he was tired of hitting it for each new font to be overwritten.
Being an uber-optimizer, I leaned over and told him that he could do it in a fraction of the time, if he did it from the shell. He didn’t even know what that was, so I walked him through how to open a Command Prompt, cd over to his external drive and copy all of the fonts from there to C:\Windows\fonts. It took about 4 seconds to do all of the fonts in one go.
He then explained that he had some sort of crash, and had to reinstall the operating system from scratch and that he didn’t have all of his programs installed yet. He specifically mentioned how he was behind on his deadlines, because he still couldn’t find and install his copy of Microsoft Office.
Since I always carry a cache of Open Source software for Windows with me in a directory in my code tree, I knew I had a fairly recent copy of OpenOffice.org for Windows in there. I explained to him what OpenOffice.org was, showed him how I was using it on my laptop at the time and said that I could get him a copy right then and there, on the train, so he could get back to working again. I had to answer all of his questions about compatibility and functionality, and he was sold.
I also mentioned that Oo.org supported more file formats than Microsoft office, supported exporting to PDF (which requires an expensive application from Adobe to function within Microsoft Office), and that it also includes a handful of other things you’ll never get from Microsoft Office.
Oh, and it’s 100% free of any cost, of course (but donating to the project is good for the soul!).
I put it on a USB key I had with me, handed it over the aisle to him, he mounted it, copied the installer over, and installed it on his machine.
For the remainder of the ride as I continued to work on my projects, I glanced over and noticed he was not only doing what appeared to be “official work”, but he was also playing around in the features of Oo.org’s interface and applications. I saw him making a mock presentation in ooimpress, playing with the templates and slide layout and some other things.
It’s good to see how easy it is to convince someone of a better, faster, more-intuitive, secure way to function.. And all I was doing was taking the train into work.