
Archive for the 'Windows' Category
HOWTO: Run multiple Zwift sessions on the same PC (Windows only)
 Many people have asked me to write this up and I’m happy to be the first person to push Zwift this far with multiple, simultaneous sessions.
I can say with confidence that up to this point, I’m actually the only person who has this working correctly without overwriting or clobbering critical logs and data files. Others have tried some hacky methods, but they all result in instability and data loss (see “What does NOT work, and why” below).
I started this quest because I am working on a product design (“Secret Sauce” to be withheld in this HOWTO) that involves running multiple Zwift sessions on a single, 100% wireless PC, with the only wire being the single power cable to the wall. No USB cables, no video cables, no HDMI cables, no network cables.
Let’s get some general housekeeping out of the way first…
Read the rest of this entry »
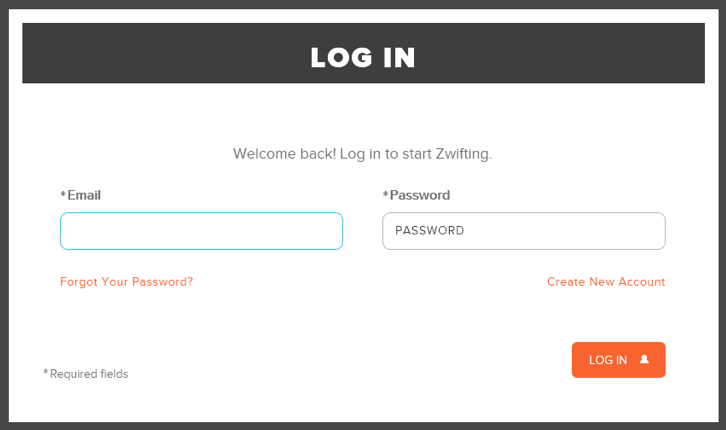
HOWTO: Configure Windows to remember Zwift application passwords

This will be a quick-n-dirty post to solve a very tactical problem. (if you’re a Mac user, use this other HOWTO I wrote for OS X instead)
This topic has been talked about dozens to hundreds of times in the Zwift Riders Facebook group and on the Zwift Support area through their Feature Request tracker. It’s become enough of an itch, that I decided to write up this post to detail how to “fix” the “problem” (not a Zwift bug, however).
First, make sure you’re using the latest available launcher from the Zwift website. Even if you have Zwift installed and it’s updating itself regularly, the launcher itself does not yet auto-update, so you need to go back to the website from time to time to pull a new version and update that.
Once installed, launch Zwift, and you’ll see a familiar dialog:
Read the rest of this entry »
HOWTO: Quick 7-Zip Trick to Encrypt Your Files with Non-Interactive Mode
I have a lot of data that I archive away on a regular basis, both on my “PC” machines and my mobile devices OTA. I needed a secure, reproducible way to secure those data with a very strong, complex password using extremely tight compression.
Unfortunately, p7zip on Linux and 7-Zip for Windows don’t permit a non-interactive way to pass in a password. So I came up with a quick-and-dirty workaround!
- First, generate a complex password and put this in a file with one line. Make sure there are no leading or trailing characters in this file, including a trailing newline. There should be one and only one line in this file. Here’s are some examples of a password generated with the level of complexity you’ll want for secured archives (42 characters in length, 15 minutes of generated entropy from a hardware dongle):
{Kt8}m.Gs7:g}=%-nfX[F_E(tKs[X,}GrN$mz^?m7^ +S/>>@7DzKafmLkSkS:-"4-*@k)#u@mQ>"=7j_vvu,! <prX9WG#h,t-Ka`poA9rhJWc]H9M}`NA(8_93tD\hR - Now with that password in a file, run the following loop to compress the data and pass in the password inline.
You’ll notice that on Windows, I use Cygwin here, because I can create scripts and retain previous commandline history to reproduce this on a regular basis.
I’m also using lzma2 here because it gives me slightly tighter compression for minimally more CPU time to generate the archives.
On Linux
cat your-pw-file | for i in *.xml; do 7z u -t7z -m0=lzma2 -mx=9 -mfb=64 -md=64m -ms=on $i.7z $i -p --; done;
On Windows (using Cygwin)
cat your-pw-file | for i in *.xml; do do /cygdrive/c/Program\ Files/7-Zip/7z.exe u -t7z -m0=lzma2 -mx=9 -mfb=64 -md=64m -ms=on $i.7z $i -p --; done;
- To verify that the files are properly encrypted and the right password works as expected, test as follows:
On Linux
cat your-pw-file | for i in *.7z; do 7z t $i -p --; done;
On Windows (using Cygwin)
cat your-pw-file | for i in *.7z; do do /cygdrive/c/Program\ Files/7-Zip/7z.exe t $i -p --; done;
- Now you can delete that password file from disk. I can’t stress this enough. Once you’ve used the password, and secured it in a managed password container, you’ll want to delete all traces of it that you do not need in plain sight on disk.
That’s it. Now when you want to decompress those archives, you’ll need to supply the password you generated before. Make sure you keep this password secured in a managed location. A password is only as secure as your ability to manage it.
Good luck!
Using fdupes to Solve the Data Duplication Problem: I’ve got some dupes!
Well, 11.6 hours later after scanning the NAS with fdupes, I noticed that I’ve got some dupes across my system backups.
# time ./fdupes -R -Sm "/nas/Backups/System Backups/"
2153352 duplicate files (in 717685 sets), occupying 102224.5 megabytes


real	698m15.606s
user	38m20.758s
sys	92m17.217s
That’s 2.1 million duplicate files occupying about 100GB of storage capacity in my backups folder on the NAS. DOH!
Now the real work begins, making sense of what needs to stay and what needs to get tossed in here.
UPDATE: I may give up on fsdupes altogether, and jump to rmlint instead. rmlint is significantly faster, and has more features and functions. Here’s a sample of the output:
# rmlint -t12 -v6 -KY -o "/nas/Backups/System Backups/"
Now scanning "/nas/Backups/System Backups/".. done.
Now in total 3716761 useable file(s) in cache.
Now mergesorting list based on filesize... done.
Now finding easy lint...
Now attempting to find duplicates. This may take a while...
Now removing files with unique sizes from list...109783 item(s) less in list.
Now removing 3917500 empty files / bad links / junk names from list...
Now sorting groups based on their location on the drive... done.
Now doing fingerprints and full checksums..
Now calculation finished.. now writing end of log...
=> In total 3716761 files, whereof 1664491 are duplicate(s)
=> In total  77.66 GB  [83382805000 Bytes] can be removed without dataloss.
HOWTO: How to Fix a Forgotten Windows Administrator or User Password with Sticky Keys
I pulled some of my very old Windows VMs out of my backup NAS recently with the intent to pull them into ESXi 5.0.1, and manage them there.
But they hadn’t been booted or updated in 4+ years. I thought I remembered the password for the users of these VMs, but none of my obvious choices worked.
I tried getting into it by booting an ISO loaded with chntpw to blank the Administrator password, but that didn’t work. I tried enabling the Guest account and setting a password there (also with chntpw), but that failed as well.
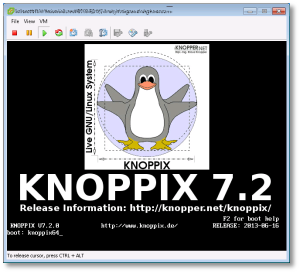
So the next option was to boot up a KNOPPIX DVD in my VM, and follow these steps to reset the password using the “Sticky Keys” trick:
Click image to open full size
- Boot from the KNOPPIX DVD (or Windows PE, Windows RE) in your Windows machine or VM. When you get to the boot prompt, type the following to get a 64-bit environment:
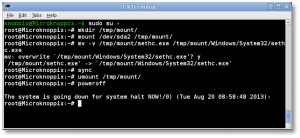
- Let the OS load (graphical or otherwise) and open a shell session (Linux “command prompt”). You’re going to manually mount the Windows drive here, and copy some files around.

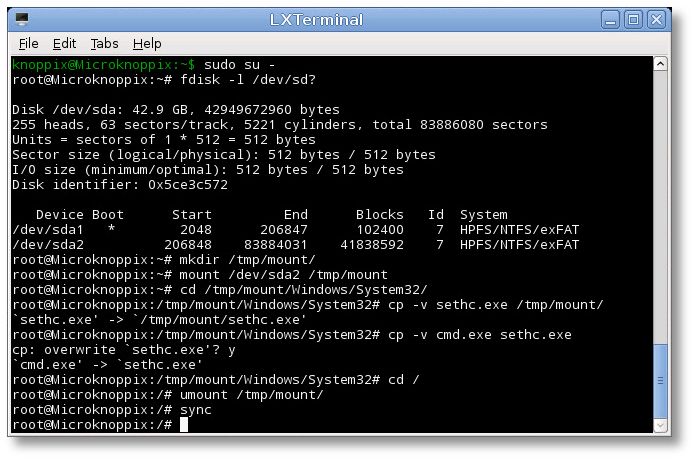
- sudo to root
$ sudo su -
- At the shell, find your Windows drive. It will typically be something like /dev/sda1, as seen from KNOPPIX. The following fdisk(1) command will help you find it:
# fdisk -l /dev/sd?
- Now you’ll need to mount that drive to access it:
# mkdir /tmp/mount
# mount /dev/sda1 /tmp/mount
# cd /tmp/mount
- Change to the System32 directory under the Windows directory in your temporary mountpoint. Note that depending on your OS version, this may have a different case sensitivity. It may be “Windows”, “WINDOWS”, or “WinNT”.
# cd /tmp/mount/WINDOWS/System32
- Now we can preserve and copy files that will help us get into the machine. In this next step, we’re going to back up a copy of “sethc.exe” to the root of the C:\ drive. This is a backup copy we’ll use to restore later, once we’re able to log into the machine.
# cp -v sethc.exe /tmp/mount/
# cp -v cmd.exe sethc.exe
- Now you can unmount the drive, shut down your machine, disconnect the KNOPPIX DVD and boot back up to the drive natively, back to the point where you forgot the Administrator or user’s password.
# cd /
# umount /tmp/mount/
# sync
# poweroff
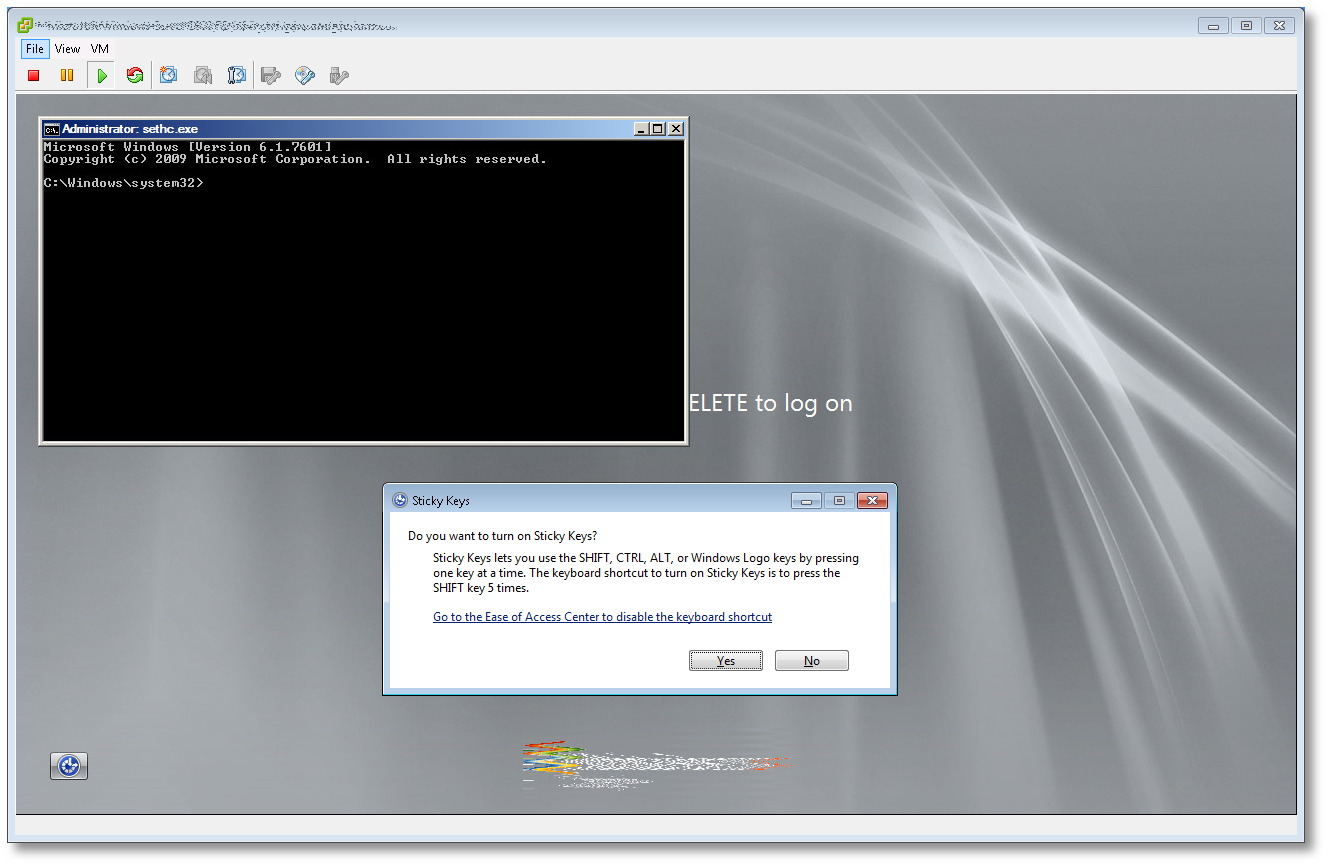
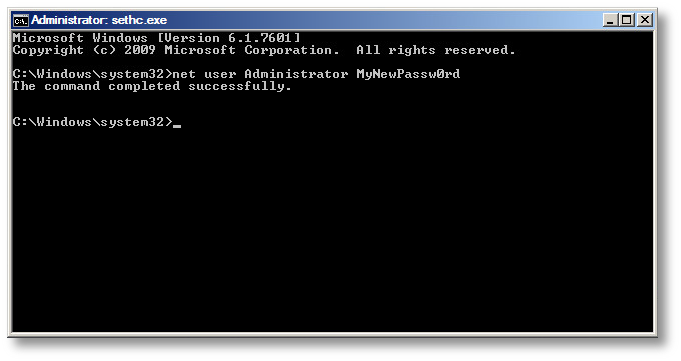
- Once your machine has fully booted, after you see the logon screen, press the SHIFT key five times. Do not hit Ctrl-Alt-Del here, just hit [shift] 5 times in a row. If you’ve done it right, you should see a Windows command prompt where you can enter the following command to reset the Windows password.


C:\Windows\System32\net user Administrator MyNewPassw0rd
Or if you need to just reset a non-Administrator account password, replace ‘Administrator’ in the above command with the appropriate username. If you don’t know your user name, just type the following to get list the available user names:
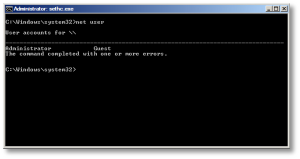
C:\Windows\System32\net user
- You should now be able to log on with the new password you just created.
- Don’t forget to restore C:\seth.exe to C:\Windows\System32\seth.exe, or anyone with access to your machine will be able to use the same trick to reset your password and breach your account! To do that, follow the same steps above (boot to KNOPPIX, mount drive, copy files) to replace the backed-up copy of the original file. You won’t be able to do this while the machine is booted, as those files are locked and will not be replaceable.


That’s it! Now you’ve got your password recovered, and you can log in without issues.
Note: If you want to prevent someone from using this same trick, or using Kon-Boot against your server, you need to install and configure full-disk encryption with a tool like TrueCrypt. Do not use Microsoft’s “Bitlocker” product, as it is easily cracked.