
HOWTO: Run multiple copies of Signal Messenger on your desktop/laptop
Tags: Privacy, security, SignalThis question has been asked many dozens of times for the last several years, and to-date, has not been solved in the core project itself. There were many attempts, hacks and workarounds, but nothing really supportable.
Let’s say you have two devices, a Personal phone and a Work phone, each running Signal. You want to be able to load one app and have conversations that span both devices. That is, converse with work colleagues and also converse with personal colleagues, from one desktop.
Today, you can’t. Well, not without some additional setup to do so.
To make this work, you’ll need to create a separate data directory for each “profile” you intend to use, and then configure Signal to refer to it when launching them. You can then tie these to a launcher or icon if you wish, in your favorite OS of choice (Linux and macOS are mine, macOS and Windows for others).
Your normal Signal data resides in a directory under your $HOME named ~/.config/Signal by default. Let’s make another to use for testing with your second device. Intuitively, you can name them by the device they are used with, so ~/.config/Signal-iPhone and ~/.config/Signal-Android for example on a POSIX based OS like Linux or macOS. On Windows, this will be stored in C:\Users\You\AppData\Roaming\Signal.
If you’re already using Signal on your desktop, your profile data will just be in the ~/.config/Signal directory, and you don’t need to change it. In fact, renaming it will likely break things until we create these additional profiles. Create a second directory at the same level as the existing one, for use with that second profile.
Now we need to launch Signal from the shell (Terminal in macOS, Command Prompt in Windows), and run it as follows:
/Applications/Signal.app/Contents/MacOS/Signal --user-data-dir=$HOME/.config/Signal-iPhone
This should prompt you to scan a QR code with your phone, to link the two devices, similar to the following:
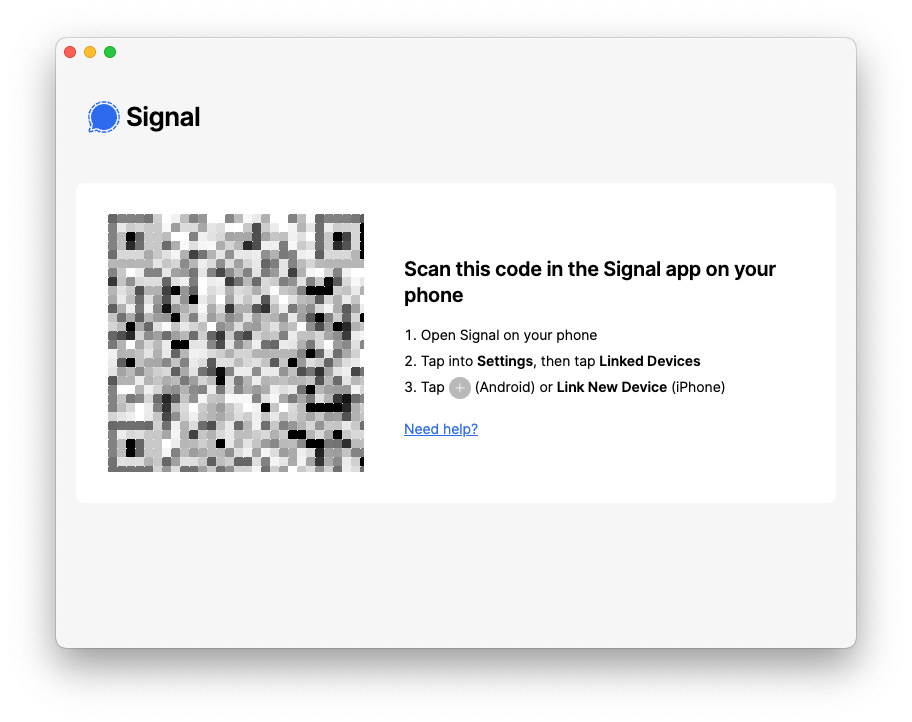
On your mobile device, go to Settings ? Linked Devices, and scan that QR code. It will now pair your phone with this instance of Signal Desktop.
So far, so good. Now while that is synchronizing your data, launch the other instance of Signal with the standard launcher. You should now get two instances of Signal Desktop running, one linked with your original mobile device, and this new instance linked with your second mobile device.
Ta-da! You did it.
Now let’s codify these changes into their own respective launchers/icons, so you don’t have to use the shell/Terminal/Command Prompt to do this each time.
On Linux, just create a launcher using your window manager that sets those commandline args as the default.
On macOS, you can create a new launcher for Signal with Automator, by choosing “Run Shell Script” from the Workflow menu. Double-click that, and a window will open to the right, allowing you to type in your shell commands. Mine is as follows, just like we ran from Terminal:
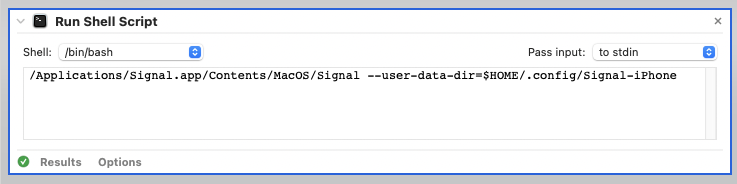
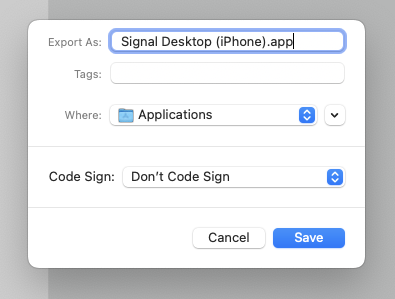
Click “Run” in the upper-right, to ensure it does indeed run Signal Desktop with your second (new) profile correctly. If it does, you can save it as a “Workflow” or an “Application”. I chose the latter, which looks like this:
Now you have your intended commands tied to an application launcher, which can be put into your Dock or other launcher location.
On Windows, you’ll need to create a new desktop shortcut by going to Preferences, and change the target to: C:\Users\You\AppData\Local\Programs\signal-desktop\Signal.exe --user-data-dir=C:\Users\You\AppData\Roaming\Signal-iPhone. You can choose any icon you wish to adorn this shortcut with.
That’s it! You now have a multi-Signal Desktop solution (that is, until the upstream project adds profile support to a newer release).
Have fun, and keep those messages secure!
HOWTO: Properly install native VMware Tools in pfSense 2.0.3 (FreeBSD 8.1)
Tags: FreeBSD, Open Source, security, VMware![]() If you’re anything like me, you take security seriously. With all the recent news about the NSA and Prism and over-reach of surveillance, you’ll take this very seriously. I run several layers of nested firewalls, VPNs and other layers of security at my office.
If you’re anything like me, you take security seriously. With all the recent news about the NSA and Prism and over-reach of surveillance, you’ll take this very seriously. I run several layers of nested firewalls, VPNs and other layers of security at my office.
One of the things I run in a virtualized environment (VMware ESXi), is pfSense. pfSense ibs an Open Source firewall distribution based on FreeBSD. It’s very full-featured, has a web-management console, and lots of add-on packages to enhance it’s capabilities.
“pfSense is a free, open source customized distribution of FreeBSD tailored for use as a firewall and router. In addition to being a powerful, flexible firewalling and routing platform, it includes a long list of related features and a package system allowing further expandability without adding bloat and potential security vulnerabilities to the base distribution. pfSense is a popular project with more than 1 million downloads since its inception, and proven in countless installations ranging from small home networks protecting a single computer to large corporations, universities and other organizations protecting thousands of network devices.”
pfSense is currently using FreeBSD 8.1, which has been EOL’d by the BSD team last July. The pfSense team is diligently working on new versions, but they’re not out yet. For now, you can continue to use FreeBSD 8.1.
If you run pfSense inside a VM, you’ll want and need to get the base VMware tools installed within it, but that process isn’t straightforward. You want to make sure you install the VMware Tools dependencies and core modules before installing anything else, so you don’t get into package conflicts and other troubles.
I’ve been writing a lot of posts about VMware lately, because I’m finding myself using it more and more, and I’m teaching myself how to use it in a higher-volume capacity.
Here’s how to install pfSense and immedaitely get the correct version of VMware Tools (from VMware itself, not the Open Source ‘open-vm-toolbox‘ or ‘vmfs-tools’) installed within it.
Let’s get started (click any images below to view them full-size):
- First, create a new VM and attach your pfSense ISO to it, using whatever mechanism your hypervisor of choice provides. Boot it, and install pfSense into your VM. This part is easy and straightforward.
- Once fully installed, shut down (power off) your VM, and detach the CD, so it no longer boots, but keep the CD/DVD device configured for your VM, you’ll use that again in a moment.
- Boot your pfSense VM back up, configure networking (in my case the NIC was em0), and you’ll get to a screen that looks something like this:
(click image to view full size)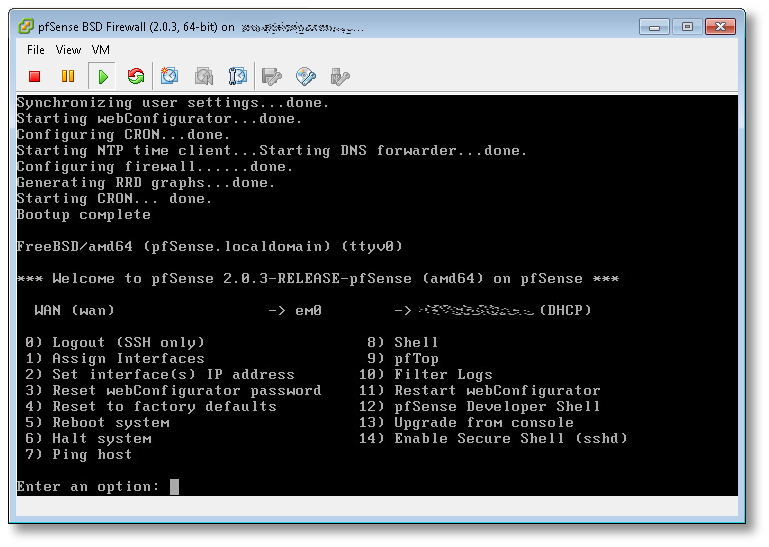
- From here, the first thing you want to do, is change your root password! Hit (8) to drop to a shell, and use the standard passwd(1) utility. Once changed, hit ^D (Control-D) to exit and return to the pfSense main menu.
- Next, we’re going to start SSHD, so we can log into the VM remotely, and manage it using a normal Windows, Mac or Linux terminal, vs. interacting with it using the VMware ESXi console (as in this example). Hit (14) to enable the SSH shell.
- In the previous screenshot, directly to the left of the (DHCP) part, was the IP of the pfSense server. SSH over to that now, as the root user, using whatever native terminal you prefer.
$ ssh root@192.168.1.50
- Once SSH’d into pfSense remotely, you’ll need to set the PACKAGESITE environment variable, to make sure all core packging tools refer to the 8.1-release tag from the FreeBSD archive site, and not the 8.1-release-p13 that it will try to use by default from the primary site, which will fail, because FreeBSD 8.1 is EOL as I write this.
-
[2.0.3-RELEASE][root@pfSense.localdomain]/root(1): setenv \
PACKAGESITE \
http://ftp-archive.freebsd.org/pub/FreeBSD-Archive/ports/amd64/packages-8.1-release/Latest/
Here’s what will happen if you do not set this variable:
[2.0.3-RELEASE][root@pfSense.localdomain]/root(3): pkg_add -rv wget
looking up ftp.freebsd.org
connecting to ftp.freebsd.org:21
Error: Unable to get ftp://ftp.freebsd.org/pub/FreeBSD/ports/amd64/packages-8.1-release/Latest/wget.tbz:
File unavailable (e.g., file not found, no access)
pkg_add: unable to fetch 'ftp://ftp.freebsd.org/pub/FreeBSD/ports/amd64/packages-8.1-release/Latest/wget.tbz' by URL
pkg_add: 1 package addition(s) failed
Once you set the variable to refer to the archive site, you’ll have success here:
[2.0.3-RELEASE][root@pfSense.localdomain]/root(5): pkg_add -rv wget
looking up ftp-archive.freebsd.org
connecting to ftp-archive.freebsd.org:80
requesting http://ftp-archive.freebsd.org/pub/FreeBSD-Archive/ports/amd64/packages-8.1-release/Latest/wget.tbz
Fetching http://ftp-archive.freebsd.org/pub/FreeBSD-Archive/ports/amd64/packages-8.1-release/Latest/wget.tbz...x +CONTENTS
x +COMMENT
x +DESC
x +MTREE_DIRS
x man/man1/wget.1.gz
x bin/wget
...
- Now we know we can get to the backup/archive site that holds the 8.1 RELEASE packages, let’s get the ones we need to get VMware Tools up and running. We’re going to need two core packages: compat6x-amd64 and perl to be able to run the script and dynamically load the VMware modules at kernel boot.
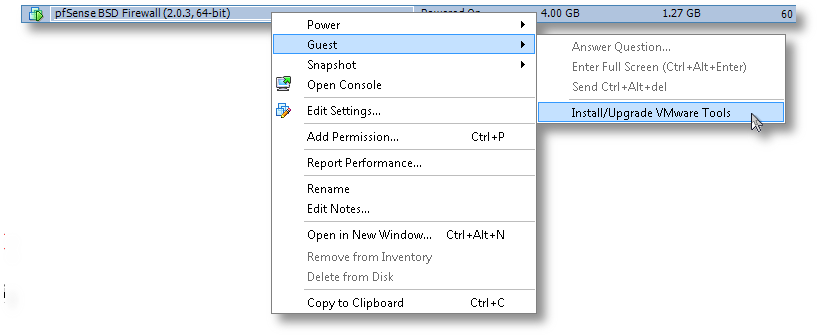
[2.0.3-RELEASE][root@pfSense.localdomain]/root(6): pkg_add -r compat6x-amd64 perl Fetching http://ftp-archive.freebsd.org/pub/FreeBSD-Archive/ports/amd64/packages-8.1-release/Latest/compat6x-amd64.tbz... Done. ******************************************************************************* * * * Do not forget to add COMPAT_FREEBSD6 into * * your kernel configuration (enabled by default). * * * * To configure and recompile your kernel see: * * http://www.freebsd.org/doc/en_US.ISO8859-1/books/handbook/kernelconfig.html * * * ******************************************************************************* Fetching http://ftp-archive.freebsd.org/pub/FreeBSD-Archive/ports/amd64/packages-8.1-release/Latest/perl.tbz... Done. Removing stale symlinks from /usr/bin... Skipping /usr/bin/perl Skipping /usr/bin/perl5 Done. Creating various symlinks in /usr/bin... Symlinking /usr/local/bin/perl5.10.1 to /usr/bin/perl Symlinking /usr/local/bin/perl5.10.1 to /usr/bin/perl5 Done. cd: can't cd to /usr/include Cleaning up /etc/make.conf... Done. Spamming /etc/make.conf... Done. Cleaning up /etc/manpath.config... Done. Spamming /etc/manpath.config... Done. - Now we need to mount the CD ISO for VMware Tools for FreeBSD. This is the step I mentioned earlier and why we needed to keep the CD/DVD device configured for this VM. In ESXi, you’ll need to do that from the console, by right-clicking on the VM, go to Guest and then to “Install VMware Tools”, as shown here:

- Now the drive is mapped to the VM, we need to mount it and access the vmware tarball within:
[2.0.3-RELEASE][root@pfSense.localdomain]/root(8): mkdir /tmp/cdrom/
[2.0.3-RELEASE][root@pfSense.localdomain]/root(9): mount_cd9660 /dev/acd0 /tmp/cdrom/
[2.0.3-RELEASE][root@pfSense.localdomain]/root(10): cd /tmp/cdrom/
[2.0.3-RELEASE][root@pfSense.localdomain]/tmp/cdrom(11): ls -l
total 15030
-r--r--r--  1 root  wheel        29 Mar 23 15:02 manifest.txt
-r--r--r--  1 root  wheel  15390306 Mar 23 15:02 vmware-freebsd-tools.tar.gz
[2.0.3-RELEASE][root@pfSense.localdomain]/tmp/cdrom(12): tar zxvf vmware-freebsd-tools.tar.gz -C /tmp/
- Now we can go into /tmp/vmware-tools-distrib and build the required interfaces for FreeBSD. For the most part, you’ll just accept the defaults to most of the questions. Read them carefully if you think you want something custom for your needs.
[2.0.3-RELEASE][root@pfSense.localdomain]/tmp/vmware-tools-distrib(14): ./vmware-install.pl --clobber-kernel-modules=vmci    \
                  --clobber-kernel-modules=vsock   \
                  --clobber-kernel-modules=vmxnet3 \
                  --clobber-kernel-modules=pvscsi  \
                  --clobber-kernel-modules=vmmemctl
Creating a new VMware Tools installer database using the tar4 format.

Installing VMware Tools.

In which directory do you want to install the binary files?
[/usr/local/bin]

In which directory do you want to install the startup script?
[/usr/local/etc/rc.d]

In which directory do you want to install the daemon files?
[/usr/local/sbin]

In which directory do you want to install the library files?
[/usr/local/lib/vmware-tools]

The path "/usr/local/lib/vmware-tools" does not exist currently. This program
is going to create it, including needed parent directories. Is this what you
want? [yes]

In which directory do you want to install the documentation files?
[/usr/local/share/doc/vmware-tools]

The path "/usr/local/share/doc/vmware-tools" does not exist currently. This
program is going to create it, including needed parent directories. Is this
what you want? [yes]

The installation of VMware Tools 9.0.5 build-1065307 for FreeBSD completed
successfully. You can decide to remove this software from your system at any
time by invoking the following command:
"/usr/local/bin/vmware-uninstall-tools.pl".

Before running VMware Tools for the first time, you need to configure it by
invoking the following command: "/usr/local/bin/vmware-config-tools.pl". Do you
want this program to invoke the command for you now? [yes]

Initializing...


Making sure services for VMware Tools are stopped.

Stopping VMware Tools services in the virtual machine:
   Guest operating system daemon:                                      done


The vmblock enables dragging or copying files between host and guest in a
Fusion or Workstation virtual environment.  Do you wish to enable this feature?
[no]

No X install found.

Starting VMware Tools services in the virtual machine:
   Switching to guest configuration:                                   done
   Guest memory manager:                                               done
   Guest operating system daemon:                                      done
The configuration of VMware Tools 9.0.5 build-1065307 for FreeBSD for this
running kernel completed successfully.

You must restart your X session before any mouse or graphics changes take
effect.

You can now run VMware Tools by invoking "/usr/local/bin/vmware-toolbox-cmd"
from the command line.

Please remember to configure your network by adding:
ifconfig_vxn0="dhcp"
to the /etc/rc.conf file and start the network with:
/etc/netstart
to use the vmxnet interface using DHCP.

Enjoy,

--the VMware team
That’s it. You’ve now got a working VMware Tools install using the native, VMware-provided kit, inside your VM. If you’re running ESXi, you’ll now notice that it correctly reports its version, status and IP back to the console, which was missing before we started.

Good luck!
DomainSite: This is Not the Way to Manage Passwords
Tags: DNS, Domainsite, securityAs per my end-of-month processing, I update and rotate/change the passwords and login credentials for the hundreds of websites and logins I own and use on a regular basis.
I reached my domain registrar, DomainSite, and successfully changed my password to something nice and secure, and their system happily accepted it.
I logged out, and attempted to log in with that new password to verify that it was a successful change, and was denied. I tried again, denied again, and then I received this message from their system:
“For security reasons, if you enter an incorrect password for this account more than 10 times, you will be blocked from this website and will be required to pay a fee to regain access.”

Not only is this an unhelpful message, but it also puts the burden on the owner of the account to pay up if someone else decides to try to lock out their account.
In other words, I can attempt to log into DomainSite as another user more than 10 times, and now that user will have to pay Domainsite to restore their password.
Seriously, who thought this up? In my multi-decade experience of using the Web, I’ve never heard of a single case of someone attempting to charge the owner of a valid login credential, for an account that was locked out and had to be reset or restored.
DomainSite, tsk, tsk! You should know better!
If you’re going to permit someone to change their password legitimately, verify the password or at least describe the password policy so we can decide how complex we can make our passwords, before we lock ourselves out, because your system fails to clarify this on both sides.
Facebook Does It Again, Silently Sending GPS Coordinates with Every Message
Tags: Facebook, GPS, securityYes, they’ve done it again.
The most-recent update of the Facebook mobile application (Android and iPhone) reverses and resets the default settings for “Location Services”, so that every single Facebook message you send, also sends your exact GPS coordinates to the recipient (and to Facebook’s own messaging servers), even if you have your GPS disabled on your phone. When the GPS is disabled, they fall back to AGPS to determine your coordinates with incredible accuracy.
Yes, even if you’ve had it disabled before, a recent update of the mobile app resets these preferences to expose your location when you’re using their Messenger app to send or receive messages through the app.
This is so specific, it actually revealed that I was in my kitchen (in the rear of my house), and not just my approximate street address on my road. Zooming into the map they helpfully provide, shows where inside my house my phone is when I sent the test messages that revealed this issue.
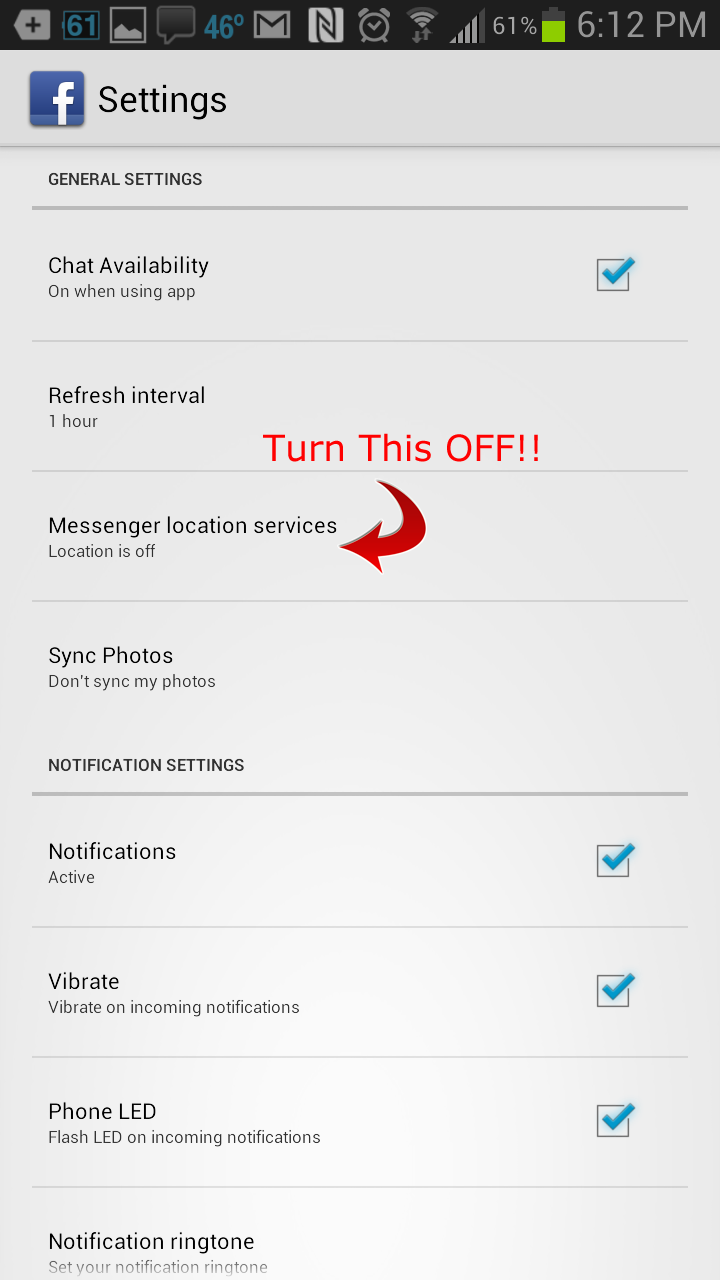
To prevent your phone from exposing your location with every message, go into your Facebook mobile application settings, and disable “Messenger Location Services”, as below. When you disable it here, your messages will just show “Sent from Messenger” or “Sent from Web” inside the app, instead of showing a map and GPS coordinates.
Click on the images below to see them full-size.

They may still be sending GPS coordinates with each message to their messaging servers, but not exposing it to the recipients when you disable this feature, but there’s no confirmed way to tell.
I don’t use the native Facebook mobile app to send or receive messages, opting instead to use Trillian Mobile for Android, which does not pass the GPS coordinates with each message. In addition, I can use all of my IM and chat services at once, in one interface, including Facebook, seamlessly. They have desktop apps and a web interface also, for those who wish to use those natively on any platform. Highly recommended.
Facebook, I’m not impressed with your complete lack of understanding of core security and privacy issues. This is 2013, and no application should be sending GPS coordinates to message or email recipients. Imagine what would happen if a random, unknown person were to message me, and I replied back to them. I’ve now exposed my personal location, which could include my home address, to a level of accuracy that includes where inside my home I am when I’ve responded.
In a word: Disgusting.
HOWTO: Block “SongPop” game updates and events on Facebook
Tags: Facebook, security, SongPop![]() I’m a big fan of keeping my Facebook feed, news and wall clean and filtered, no junk and no noise that I don’t need or want to read.
I’m a big fan of keeping my Facebook feed, news and wall clean and filtered, no junk and no noise that I don’t need or want to read.
On Google Chrome, I use the “Social Fixer” extension to block ads, drop columns and other unnecessary items from the pages, but this doesn’t work on Firefox Nightly builds because of a Javascript Sandbox change that the Social Fixer author hasn’t been able to find and fix yet.
But “Social Fixer” can only block some of the noise that Facebook renders, not all of it. Firefox is my preferred browser, so I needed to find a better solution here. Even SongPop’s own Support Page misunderstands the need of hundreds (nigh, thousands?) of Facebook users.
Most-recently, some of my friends have been playing a game called “Song Pop” on Facebook, and their status updates fill up my news feed on the right side. Last year it was Farmville, and this year it’s SongPop.
Here’s how to stop the noise from taking over your Facebook feed.
- First, search for “SongPop”, no spaces, in the Facebook search box at the top. Make sure you pick the Game page, not the App page. If you search for “Song Pop” with the space, you’ll get the wrong page.

- Now you should see the SongPop page, which looks like this:

- Down on the lower-right side of that page, is a link labeled “Block”, and looks like this:

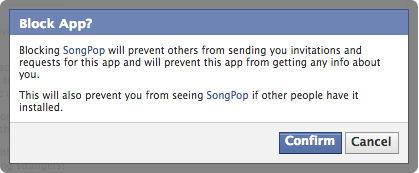
- Click that link, and you’ll get a popup to confirm your choice:
- Click “Confirm” on that link, and you’ll see the following success dialog:

- Now to confirm this, go to your “Privacy Settings” in the upper-right corner, scroll down to “Blocked People and Apps” and click “Manage Blocking”. Scroll down again to the bottom and you’ll see:

That’s it. Now if you go back and reload your Facebook Feed, you’ll see that the SongPop posts that were there moments ago, are now gone, stripped from your feed. If you want them back, just go back into the “Blocked People and Apps” and click the “Unblock” link shown in the image above.
Good luck!
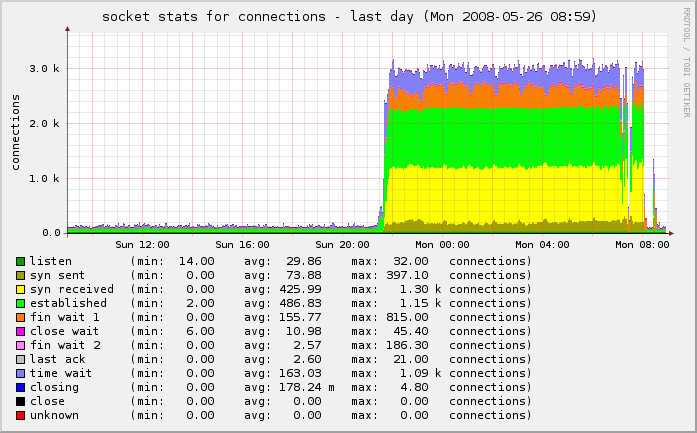
Graphing an active SPAM attack in progress
Tags: email, firewall, hacking, linux, security, spamI woke up this morning to very slow response time on my server, and decided to check the statistics. I graph these things with a great deal of detail so I can see precisely when it happened and begin narrowing down where I need to go to fix it or report it upstream.
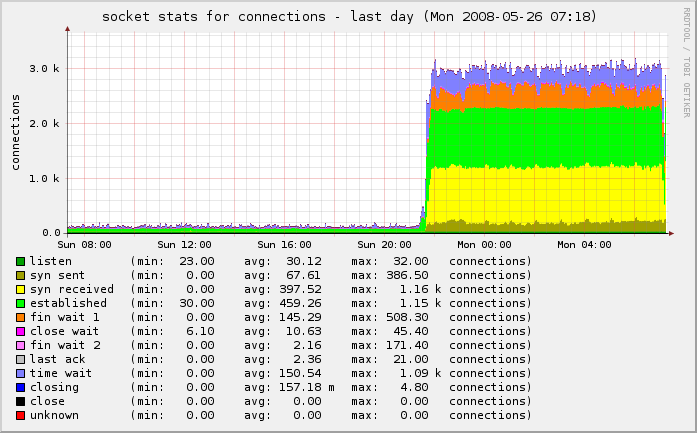
In this case, my incoming connections went from under 500/second to well over 3,000/second. Owch!
You can see the “wall” of traffic growing from our normal traffic rate to this enormously-increased rate:
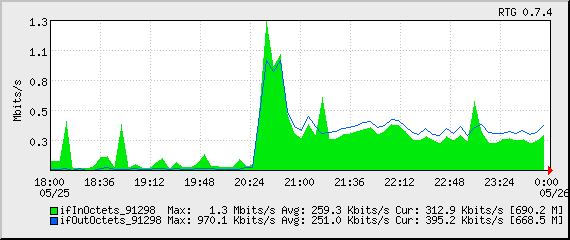
I checked all of the services, logs and protocols and didn’t see anything out of the ordinary. I started shutting down services one at a time and regenerated the graphs, to see if I could see any change.
One thing I noticed was that I had poppassd open on the public port. Not a huge problem, but it was something that was unnecessary on the public interface. I locked that down with iptables:
$IPT -A INPUT -s ! 127.0.0.1 -d ! 127.0.0.1 -p tcp -m tcp --dport 106 -j DROP
But as I looked further, I noticed even more:
netstat -tulpn | grep LISTEN
This showed that I had Squid listening on the public interface as well (0.0.0.0:3128). I jumped to the squid logs and was shocked to see that they were scrolling so fast that I couldn’t even read them. Ut oh!
Apparently some enterprising young spammer found my squid instance and decided to try to hijack it for his own needs. It was already locked down internally in my squid.conf to restrict use from only my block of IPs, but he was hammering it with 8,466 separate IPs trying to use it to send spam on port 25.
# cat access.log* | cut -b20-300 | grep ':25' | perl -lne 'print /((?:\d+\.){3}\d+)/' | sort | uniq  | wc -l
8464
Damn! There goes a few gigabytes of bandwidth that were eaten in the last 11 hours while I was sleeping.
I locked that down in a similar fashion:
$IPT -A INPUT -s ! 127.0.0.1 -d ! 127.0.0.1 -p tcp -m tcp --dport 3128 -j DROP
A bit more poking around with nmap, netstat, Webmin, HotSanIC and other tools allowed me to lock down some other services that incorrectly bind to the public interface and not the internal interface.
The result is that we’re back to normal:
One last piece needed my attention. Because this was an active spam attack, propagated using the IP of my server as a vector, I had to make sure to check my mail logs and delist myself from the various RBLs who had listed me as a spammer for sending out 43,745 separate spam attempts through my IP in a matter of hours.
SpamCop originally listed me, but I corrected that, and a few others. I also reported it to my provider so they can be sure to keep a closer eye on it.
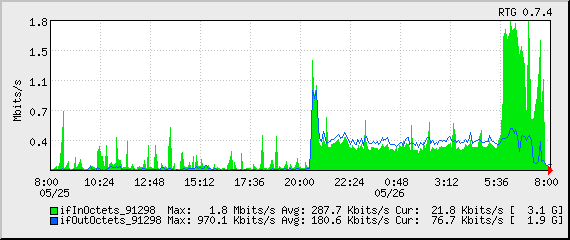
You can see the drop-off on the far right of the last two graphs above and in the traffic graph below.
Problem solved.