
HOWTO: Properly install native VMware Tools in pfSense 2.0.3 (FreeBSD 8.1)
Tags: FreeBSD, Open Source, security, VMware![]() If you’re anything like me, you take security seriously. With all the recent news about the NSA and Prism and over-reach of surveillance, you’ll take this very seriously. I run several layers of nested firewalls, VPNs and other layers of security at my office.
If you’re anything like me, you take security seriously. With all the recent news about the NSA and Prism and over-reach of surveillance, you’ll take this very seriously. I run several layers of nested firewalls, VPNs and other layers of security at my office.
One of the things I run in a virtualized environment (VMware ESXi), is pfSense. pfSense ibs an Open Source firewall distribution based on FreeBSD. It’s very full-featured, has a web-management console, and lots of add-on packages to enhance it’s capabilities.
“pfSense is a free, open source customized distribution of FreeBSD tailored for use as a firewall and router. In addition to being a powerful, flexible firewalling and routing platform, it includes a long list of related features and a package system allowing further expandability without adding bloat and potential security vulnerabilities to the base distribution. pfSense is a popular project with more than 1 million downloads since its inception, and proven in countless installations ranging from small home networks protecting a single computer to large corporations, universities and other organizations protecting thousands of network devices.”
pfSense is currently using FreeBSD 8.1, which has been EOL’d by the BSD team last July. The pfSense team is diligently working on new versions, but they’re not out yet. For now, you can continue to use FreeBSD 8.1.
If you run pfSense inside a VM, you’ll want and need to get the base VMware tools installed within it, but that process isn’t straightforward. You want to make sure you install the VMware Tools dependencies and core modules before installing anything else, so you don’t get into package conflicts and other troubles.
I’ve been writing a lot of posts about VMware lately, because I’m finding myself using it more and more, and I’m teaching myself how to use it in a higher-volume capacity.
Here’s how to install pfSense and immedaitely get the correct version of VMware Tools (from VMware itself, not the Open Source ‘open-vm-toolbox‘ or ‘vmfs-tools’) installed within it.
Let’s get started (click any images below to view them full-size):
- First, create a new VM and attach your pfSense ISO to it, using whatever mechanism your hypervisor of choice provides. Boot it, and install pfSense into your VM. This part is easy and straightforward.
- Once fully installed, shut down (power off) your VM, and detach the CD, so it no longer boots, but keep the CD/DVD device configured for your VM, you’ll use that again in a moment.
- Boot your pfSense VM back up, configure networking (in my case the NIC was em0), and you’ll get to a screen that looks something like this:
(click image to view full size)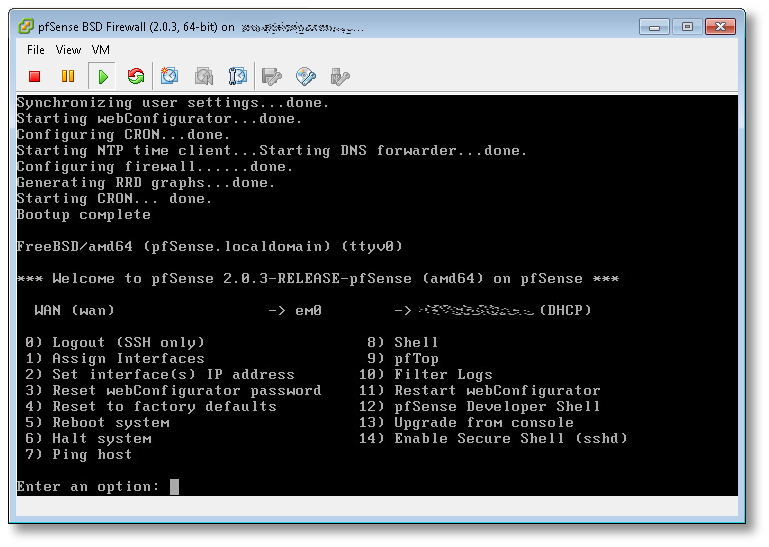
- From here, the first thing you want to do, is change your root password! Hit (8) to drop to a shell, and use the standard passwd(1) utility. Once changed, hit ^D (Control-D) to exit and return to the pfSense main menu.
- Next, we’re going to start SSHD, so we can log into the VM remotely, and manage it using a normal Windows, Mac or Linux terminal, vs. interacting with it using the VMware ESXi console (as in this example). Hit (14) to enable the SSH shell.
- In the previous screenshot, directly to the left of the (DHCP) part, was the IP of the pfSense server. SSH over to that now, as the root user, using whatever native terminal you prefer.
$ ssh root@192.168.1.50
- Once SSH’d into pfSense remotely, you’ll need to set the PACKAGESITE environment variable, to make sure all core packging tools refer to the 8.1-release tag from the FreeBSD archive site, and not the 8.1-release-p13 that it will try to use by default from the primary site, which will fail, because FreeBSD 8.1 is EOL as I write this.
-
[2.0.3-RELEASE][root@pfSense.localdomain]/root(1): setenv \
PACKAGESITE \
http://ftp-archive.freebsd.org/pub/FreeBSD-Archive/ports/amd64/packages-8.1-release/Latest/
Here’s what will happen if you do not set this variable:
[2.0.3-RELEASE][root@pfSense.localdomain]/root(3): pkg_add -rv wget
looking up ftp.freebsd.org
connecting to ftp.freebsd.org:21
Error: Unable to get ftp://ftp.freebsd.org/pub/FreeBSD/ports/amd64/packages-8.1-release/Latest/wget.tbz:
File unavailable (e.g., file not found, no access)
pkg_add: unable to fetch 'ftp://ftp.freebsd.org/pub/FreeBSD/ports/amd64/packages-8.1-release/Latest/wget.tbz' by URL
pkg_add: 1 package addition(s) failed
Once you set the variable to refer to the archive site, you’ll have success here:
[2.0.3-RELEASE][root@pfSense.localdomain]/root(5): pkg_add -rv wget
looking up ftp-archive.freebsd.org
connecting to ftp-archive.freebsd.org:80
requesting http://ftp-archive.freebsd.org/pub/FreeBSD-Archive/ports/amd64/packages-8.1-release/Latest/wget.tbz
Fetching http://ftp-archive.freebsd.org/pub/FreeBSD-Archive/ports/amd64/packages-8.1-release/Latest/wget.tbz...x +CONTENTS
x +COMMENT
x +DESC
x +MTREE_DIRS
x man/man1/wget.1.gz
x bin/wget
...
- Now we know we can get to the backup/archive site that holds the 8.1 RELEASE packages, let’s get the ones we need to get VMware Tools up and running. We’re going to need two core packages: compat6x-amd64 and perl to be able to run the script and dynamically load the VMware modules at kernel boot.
[2.0.3-RELEASE][root@pfSense.localdomain]/root(6): pkg_add -r compat6x-amd64 perl Fetching http://ftp-archive.freebsd.org/pub/FreeBSD-Archive/ports/amd64/packages-8.1-release/Latest/compat6x-amd64.tbz... Done. ******************************************************************************* * * * Do not forget to add COMPAT_FREEBSD6 into * * your kernel configuration (enabled by default). * * * * To configure and recompile your kernel see: * * http://www.freebsd.org/doc/en_US.ISO8859-1/books/handbook/kernelconfig.html * * * ******************************************************************************* Fetching http://ftp-archive.freebsd.org/pub/FreeBSD-Archive/ports/amd64/packages-8.1-release/Latest/perl.tbz... Done. Removing stale symlinks from /usr/bin... Skipping /usr/bin/perl Skipping /usr/bin/perl5 Done. Creating various symlinks in /usr/bin... Symlinking /usr/local/bin/perl5.10.1 to /usr/bin/perl Symlinking /usr/local/bin/perl5.10.1 to /usr/bin/perl5 Done. cd: can't cd to /usr/include Cleaning up /etc/make.conf... Done. Spamming /etc/make.conf... Done. Cleaning up /etc/manpath.config... Done. Spamming /etc/manpath.config... Done. - Now we need to mount the CD ISO for VMware Tools for FreeBSD. This is the step I mentioned earlier and why we needed to keep the CD/DVD device configured for this VM. In ESXi, you’ll need to do that from the console, by right-clicking on the VM, go to Guest and then to “Install VMware Tools”, as shown here:
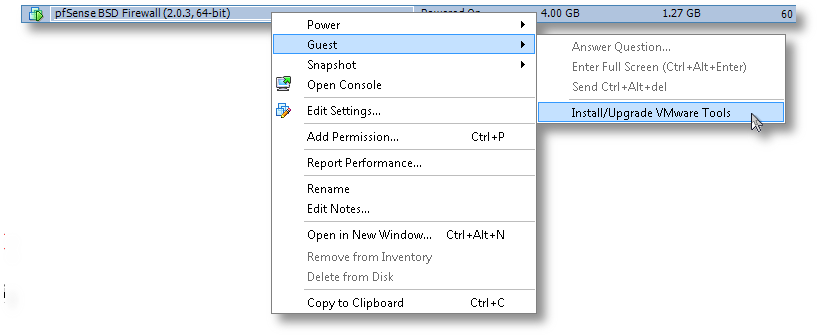

- Now the drive is mapped to the VM, we need to mount it and access the vmware tarball within:
[2.0.3-RELEASE][root@pfSense.localdomain]/root(8): mkdir /tmp/cdrom/
[2.0.3-RELEASE][root@pfSense.localdomain]/root(9): mount_cd9660 /dev/acd0 /tmp/cdrom/
[2.0.3-RELEASE][root@pfSense.localdomain]/root(10): cd /tmp/cdrom/
[2.0.3-RELEASE][root@pfSense.localdomain]/tmp/cdrom(11): ls -l
total 15030
-r--r--r--  1 root  wheel        29 Mar 23 15:02 manifest.txt
-r--r--r--  1 root  wheel  15390306 Mar 23 15:02 vmware-freebsd-tools.tar.gz
[2.0.3-RELEASE][root@pfSense.localdomain]/tmp/cdrom(12): tar zxvf vmware-freebsd-tools.tar.gz -C /tmp/
- Now we can go into /tmp/vmware-tools-distrib and build the required interfaces for FreeBSD. For the most part, you’ll just accept the defaults to most of the questions. Read them carefully if you think you want something custom for your needs.
[2.0.3-RELEASE][root@pfSense.localdomain]/tmp/vmware-tools-distrib(14): ./vmware-install.pl --clobber-kernel-modules=vmci    \
                  --clobber-kernel-modules=vsock   \
                  --clobber-kernel-modules=vmxnet3 \
                  --clobber-kernel-modules=pvscsi  \
                  --clobber-kernel-modules=vmmemctl
Creating a new VMware Tools installer database using the tar4 format.

Installing VMware Tools.

In which directory do you want to install the binary files?
[/usr/local/bin]

In which directory do you want to install the startup script?
[/usr/local/etc/rc.d]

In which directory do you want to install the daemon files?
[/usr/local/sbin]

In which directory do you want to install the library files?
[/usr/local/lib/vmware-tools]

The path "/usr/local/lib/vmware-tools" does not exist currently. This program
is going to create it, including needed parent directories. Is this what you
want? [yes]

In which directory do you want to install the documentation files?
[/usr/local/share/doc/vmware-tools]

The path "/usr/local/share/doc/vmware-tools" does not exist currently. This
program is going to create it, including needed parent directories. Is this
what you want? [yes]

The installation of VMware Tools 9.0.5 build-1065307 for FreeBSD completed
successfully. You can decide to remove this software from your system at any
time by invoking the following command:
"/usr/local/bin/vmware-uninstall-tools.pl".

Before running VMware Tools for the first time, you need to configure it by
invoking the following command: "/usr/local/bin/vmware-config-tools.pl". Do you
want this program to invoke the command for you now? [yes]

Initializing...


Making sure services for VMware Tools are stopped.

Stopping VMware Tools services in the virtual machine:
   Guest operating system daemon:                                      done


The vmblock enables dragging or copying files between host and guest in a
Fusion or Workstation virtual environment.  Do you wish to enable this feature?
[no]

No X install found.

Starting VMware Tools services in the virtual machine:
   Switching to guest configuration:                                   done
   Guest memory manager:                                               done
   Guest operating system daemon:                                      done
The configuration of VMware Tools 9.0.5 build-1065307 for FreeBSD for this
running kernel completed successfully.

You must restart your X session before any mouse or graphics changes take
effect.

You can now run VMware Tools by invoking "/usr/local/bin/vmware-toolbox-cmd"
from the command line.

Please remember to configure your network by adding:
ifconfig_vxn0="dhcp"
to the /etc/rc.conf file and start the network with:
/etc/netstart
to use the vmxnet interface using DHCP.

Enjoy,

--the VMware team
That’s it. You’ve now got a working VMware Tools install using the native, VMware-provided kit, inside your VM. If you’re running ESXi, you’ll now notice that it correctly reports its version, status and IP back to the console, which was missing before we started.

Good luck!
HOWTO: Configure Tor + SASL + irc to connect to Freenode
Tags: freenode, identd, irc, linux, nickname, Perl, Python, Tcl, VMware, xchatI fought this problem on the train into the city today, because my MiFi‘s hostname was not correctly reversing to it’s given IP (verified by dig) and Freenode was denying the connection; it looked like this:
Mar 22 06:51:41 *       Looking up irc.freenode.net
Mar 22 06:51:41 *       Connecting to chat.freenode.net (86.65.39.15) port 6667...
Mar 22 06:51:42 *       Connected. Now logging in...
Mar 22 06:51:42 *       *** Looking up your hostname...
Mar 22 06:51:42 *       *** Checking Ident
Mar 22 06:51:42 *       *** Your forward and reverse DNS do not match, ignoring hostname
Mar 22 06:51:55 *       *** No Ident response
Mar 22 06:51:55 *       *** Notice -- You need to identify via SASL to use this server
Mar 22 06:51:55 *       Closing Link: 166.199.4.113 (SASL access only)
Mar 22 06:51:55 *       Disconnected (Remote host closed socket).
Mar 22 06:52:05 Cycling to next server in Freenode...
Mar 22 06:52:05 *       Disconnected ().
I wanted to connect, to talk to the folks in #linux, and ask them about another question I had (see newer blog post about fullscreen VMware session for that). This was yet another example of the kind of Yak Shaving I deal with on a daily basis.
At first, I tried installing a few identd daemons, then some of the spoofing identd daemons, then purged them all and decided to try identifying using SASL like it suggested.
I did a few seconds of Google’ing and found a helpful website with a SASL plugin in C. I compiled that, installed it into /usr/lib/xchat/plugins, restarted XChat, and attempted to authenticate and identify using this plugin and the instructions.
If the site goes down, I have local copies of the files you need, just email me.
You’ll need to create a file called cap_sasl.conf and put it in ~/.xchat2/, which includes the following syntax:
/sasl [nickname] [password] FreeNode
So if your nickname (username on Freenode) was ‘foobar‘ and your password was “MyS3cretPas5word“, you’d put the following in that file:
/sasl foobar MyS3cretPas5word FreeNode
If you compiled this correctly and put it in the right place, you can also just issue a simple /help sasl command to get the syntax:
Usage: SASL <login> <password> <network>, enable SASL authentication for given network
When you load up XChat, you should see something like this in the main window (if the plugin works):
 Python interface loaded
 Display amarok loaded, type "/disrok help" for a command list
 Perl interface loaded
 Tcl plugin for XChat - Version 1.63
 Copyright 2002-2005 Daniel P. Stasinski
 http://www.scriptkitties.com/tclplugin/
 Tcl interface loaded
 Loading cap_sasl.conf
 Enabled SASL authentication for FreeNode
 cap_sasl plugin 0.0.4 loaded
The last two lines are what you’re looking for. Now typing “/sasl” will show you the following:
foobar:MyS3cretPas5word at FreeNode
This too, failed to authenticate me and validate my (incorrect) reverse DNS problem. What I saw was this:
Mar 22 20:24:02 *       Looking up irc.freenode.net
Mar 22 20:24:05 *       Connecting to chat.freenode.net (140.211.167.98) port 6667...
Mar 22 20:24:05 *       Connected. Now logging in...
Mar 22 20:24:05 *       *** Looking up your hostname...
Mar 22 20:24:05 *       *** Checking Ident
Mar 22 20:24:06 *       *** Couldn't look up your hostname
Mar 22 20:24:19 *       *** No Ident response
Mar 22 20:24:52 *       Closing Link: 32.138.186.102 (Connection timed out)
Mar 22 20:24:52 *       Disconnected (Remote host closed socket).
Mar 22 20:25:02 Cycling to next server in Freenode...
I decided to investigate a different solution: Tor!
Read the rest of this entry »
SOLVED: How to use Ctrl-Alt-F1 in VMware with Linux guests
Tags: VMware![]() If you’re like me, you probably use VMware Workstation (or VMware Player or VMware Fusion) quite a bit to test different aspects of other operating systems without having to break your host machine.
If you’re like me, you probably use VMware Workstation (or VMware Player or VMware Fusion) quite a bit to test different aspects of other operating systems without having to break your host machine.
I do development and testing on Linux, and need to ensure that the latest Linux distributions don’t break my code, or that a kernel module doesn’t provide a broken interface to the subsystems my code relies upon.
I also use VMware Workstation for testing out various Windows and Linux distributions either to run live CDs such as KNOPPIX or install a full operating system without having to have a dedicated computer just for that one set of tests directly.
Before Linux had a stable GUI environment, we all had to juggle across multiple consoles with L-ALT-Right/Left cursor key to jump between virtual console 1-7 and back.
Once Linux had adopted a stable GUI (XFree86, xorg) we had a way to run shells, via xterm/Terminal sessions in X, but we also wanted a way to get back to the console environment if we needed to, without dropping out of X. The way to do this is by hitting Ctrl-Alt-Fx (where ‘x’ is the console number you want to jump to).
Unless you change your /etc/inittab, consoles F1-F6 are dedicated to text-based console sessions, while F7 and up are dedicated to X itself. In other words, if you haven’t changed your configuration, the first X session that runs on your machine will be available via Alt+F7. If you add an additional X session, it would be available on Ctrl-Alt-F8, and so on.
Herein lies the problem, if you are on a Linux host, running VMware Workstation with Linux guests running within it. If you initiate a Ctrl-Alt-F1 from within a VMware guest session running Linux, the host will grab the keyboard input and send you to the host’s F1 console session, not the one inside the guest, which is probably where you intended it to go.
Part of this is due to the fact that the key command “Ctrl+Alt” has a very specific meaning in VMWare Workstation. it is used as the trigger to VMware to release the keyboard and mouse control from the guest and return it back to the host.
You can reset this combo, but it’s best not to.
If you want to send a Ctrl-Alt-Fx command to the guest, you need to use a slightly different combination: Ctrl+Alt+Space
Let’s go through this, step by step:
- You load up your Linux guest in VMware Workstation, and it loads up a graphical environment inside the guest.
- After X loads in the guest, you want to drop to the console in the guest to perform some action
- With the guest having the keyboard/mouse focus, you press Ctrl-Alt-Space, release Space, then hit the F1 key, to drop you to the F1 console of that guest’s session.
- To return to the X session, you can simply hit Alt-F7 (while the guest has the keyboard and mouse focus), or you can hold left-Alt, and use the right cursor arrow key on your keyboard to cycle through all of the console sessions until X re-appears.
Voila!
MilkSync for Microsoft Outlook is here!
Tags: linux, microsoft, Remember the Milk, VMware The folks at Remember the Milk have finally come out of beta on their “MilkSync for Outlook” plugin (only for Pro users, sorry to all you non-subscribing users, but you can upgrade to a Pro account).
It does exactly what it claims to do, and does it well. I highly recommend installing it, if you’re a Pro user (I am!).
Remember to adhere to the precautions: Backup, backup, backup!
I only use Microsoft Outlook 2010 in a VMware Workstation VM, so I rarely keep it loaded all the time, but for those desktop users who spend a lot of time in Microsoft Outlook, this is going to help!
Now here’s why I can’t use it: It requires running Microsoft Outlook. Since I use a BlackBerry device, and carry that with me all the time. I have it set to sync every hour, with the RTM servers.
If I move to MilkSync for Outlook, I lose that functionality, and the only place I can create Tasks that sync to RTM, is inside Outlook running inside that VM, running on a laptop/desktop machine. That doesn’t fit my “always on, always connected” methodology, but it might be perfect for everyone else!
I also run Linux, and the only access I’d have would be by virtualizing Windows + Outlook in that host environment.
Give it a try, and see if you like it. They love feedback, so let them know!
SOLVED: Sharing TweetDeck settings across multiple Windows and Linux machines
Tags: Adobe, dropbox, servers, sync, TweetDeck, VMware I’ve been using TweetDeck for quite some time on Linux, after I managed to get getting Twhirl working on Linux under 64-bit Adobe Air.
TweetDeck is a lovely app, graceful and very useful. It has its minor visual and UI bugs, but it’s the best I’ve seen out of the other hundreds of Twitter apps out there… and it’s 100% free.
I have 3 laptops I use on a regular basis running both Windows and Linux. I’m not always on the Linux laptop, but I wanted to make sure that my TweetDeck settings on my Windows laptops were identical to the ones on my Linux laptop, including all of my searches, columns and other settings. I plug one of my Windows laptops into my television, so I can use the larger screen as my monitor (see below).
Read the rest of this entry »
SOLVED: Calendar Printing Assistant for Office 2010
Tags: CPA, google, GUI, microsoft, Printing Assistant, VMware, Windows 7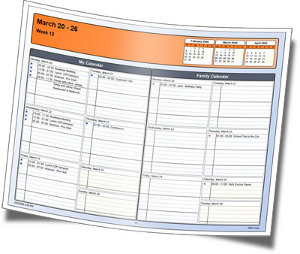 I installed the “Calendar Printing Assistant” for Office 2007 in a VM, and was very impressed with the output. Slick and lots of choices.
I recently upgraded to Office 2010, and have been tinkering with the conversion of my Office 2007 daily usage in a VM to the Office 2010 usage in a VM, but missed the power and flexibility of the Calendar Printing Assistant.
If you Google the tool, you come to this page on Microsoft’s site, which refers to ‘version 4’ of the CPA. Unfortunately, this only works with Office 2007, not Office 2010.
In fact, if you search around some more, you even find posts from Microsoft themselves, saying that it isn’t updated to handle Office 2010 yet.
Being one to never give up, I kept digging, and digging, and digging… and after many searches through Microsoft’s site directly, I found it! The Calendar Printing Assistant for Office 2010 (and Office 2007), “updated” to version 2.0.
Microsoft Calendar Printing Assistant for Microsoft Office 2007 (12.0.6520.3001) MSO (12.0.6520.5000)
I just verified that it does indeed install and work on Office 2010, without any issues at all… other than some GUI artifacts (probably due to some funky VMware video drivers for Windows 7, more than CPA itself).
Enjoy!
SOLVED: Windows 7 networking in VMware Workstation and ESXi
Tags: VMware![]() I’ve been using VMware Workstation for many, many years and I run a few hundred gigabytes of virtual machines for development and testing on various platforms. Some of these include physical machines that have been converted to virtual machines (using VMware Converter, which used to be called P2V [Physical 2 Virtual]) and some include purely virtual machines I’ve built from scratch using the default ISO file or installation media.
I’ve been using VMware Workstation for many, many years and I run a few hundred gigabytes of virtual machines for development and testing on various platforms. Some of these include physical machines that have been converted to virtual machines (using VMware Converter, which used to be called P2V [Physical 2 Virtual]) and some include purely virtual machines I’ve built from scratch using the default ISO file or installation media.
Almost all of my Windows virtual machines are physical machines converted to virtual machines, due to the cost and licensing of that platform.
I have a Windows 7 virtual machine that I’ve built up and have been testing with some new Office products and other snap-ins to help me test Funambol and productivity tools, but I noticed that the 64-bit Windows 7 version I have lacked any networking. It flat-out did not have a valid network driver.
I looked around on the CD, installed the VMware Tools from the menu, and made sure the current patches and service packs were applied (I keep a local repository of these to avoid re-fetching them over the WAN every time I have to rebuild my virtual machines). The 32-bit Windows 7 had working networking, but the 64-bit did not… and I couldn’t figure it out. I installed a 64-bit Windows XP VM, and it had the same exact problem… no networking.
Being the reverse-engineer that I am, I started looking into the VMware configuration and the files themselves, and grep’ing the source and strings(1) on the binaries, and then I stumbled upon the solution…
Shut down your Windows VM (do not suspend it, you have to shut it down completely) and open the main .vmx file in an editor and add the following line:
ethernet0.virtualDev = "e1000"
If your VM has more than one network device, make sure you set the right one in your .vmx file for your networking. I have several in my session: one for bridged, one for host-only and one for NAT. The NAT one happens to be ethernet0, so that’s the one I wanted the “public” networking functional on.
That’s it… when you reboot the VM, Windows will detect the “new” Ethernet interface, configure it for you, and then networking will work perfectly. Another VMware problem solved!
SOLVED: Building VMware Workstation modules on Linux 2.6.32
Tags: linux, VMware![]() I use a lot of VMware Workstation here to manage my development and testing, as well as virtualizing my work environment. Since my daughter crashed my laptop (quite literally, by accidentally dropping it on the floor), I had to rebuild it. The new build is running Ubuntu 10 (“Lucid”), and with it comes the 2.6.32-10-generic kernel.
I use a lot of VMware Workstation here to manage my development and testing, as well as virtualizing my work environment. Since my daughter crashed my laptop (quite literally, by accidentally dropping it on the floor), I had to rebuild it. The new build is running Ubuntu 10 (“Lucid”), and with it comes the 2.6.32-10-generic kernel.
Since VMware Workstation was released before 2.6.32, it doesn’t build clean. If you see errors building the initial modules, you’ll need to patch it. The errors you’ll see will look like this (scroll down for the simple fix):
Read the rest of this entry »
How to Become a High-Tech Minimalist
Tags: Battery, clutter, dropbox, Evernote, linux, minimalist, productivity, servers, Shoeboxed, VMware, Windows This will be the first in a series of posts I’ll write about going minimal as a technologist in today’s world.
The mere mention of the word “minimalist” or “minimalism” to most people means “getting rid of luxuries and convenience”, and going back to basics. The former is just a myth, but the latter is really the goal. Everyone can get by with a lot less “stuff” in their lives, but what remains can certainly be very convenient and still remain current, “cool” and functional.
Being a high-tech minimalist means reducing what you have, but not necessarily spending less to achieve that goal. To achieve the goal of reducing the amount of things in your life, you may have to spend more, to get less, so you can ultimately spend less in the future.
There are certainly extremists in this field, who want to try to get their lives down to zero-impact, zero-waste, zero consumption, but I am not personally on that side of the dial.
My life is surrounded by ones and zeros. Lots and lots of them. I have a lot of high-tech gear at my fingertips at any one time. This is my digital life. Multiple laptops, servers and dozens of chargers and cables are all jacked in at any one time in my life, not including my office at work and its various sundry items.
But I also have my analog life, which includes archives of paperwork going back 10-15 years. Boxes and file cabinets of paperwork, files, documents, articles, magazines, books and other material that I’ve needed to capture or save over the years.
As I move to the next stage of my life, I’m looking very hard at everything I own, everything I use, and making a very binary decision:
- Keep it (because I need it or use it on a regular basis)
- Let it go (because I no longer need it, use it, or have replaced it with something better)
There is no third option.
I’m approaching this new lifestyle change because frankly, I have too much stuff.
Stuff leads to clutter.
Clutter leads to chaos.
Chaos leads to living a confusing, unfocused life.
I need to reduce the complexity of my life, by reducing the clutter and chaos within it.
Read the rest of this entry »
Encrypting EVERYTHING With geli On FreeBSD
Tags: VMware![]() I’ve been a long-time user and supporter of FreeBSD ever since I was exposed to it by Greg Lehey and Ceren Ercen back in the Linuxcare days. I’ve come to enjoy its security, speed and powerful simplicity. The FreeBSD documentation is also unrivaled in the community.
I’ve been a long-time user and supporter of FreeBSD ever since I was exposed to it by Greg Lehey and Ceren Ercen back in the Linuxcare days. I’ve come to enjoy its security, speed and powerful simplicity. The FreeBSD documentation is also unrivaled in the community.
But I also realized that securing the system itself only means so much, if I don’t actually encrypt the data it stores locally on those platters, so I had to do better.
You can lock down externally-facing services, ports and daemons.. but someone who has physical access to your systems can bypass almost everything if they have the tools and the skills. This includes a clueless operations person working in a datacenter (which I’ve been fighting quite a bit lately, as my own hosting provider rooted one of my machines, because I refused to give them the root password. Grr!).
Enter “geli” encryption under FreeBSD!
But getting geli encryption working isn’t quite as straightforward as you’d think. It requires some prior planning and preparation to make sure you’re doing it correctly. We’ll do this in two steps:
- Set up encrypted swap
- Encrypt the secondary drive and mount
/hometo it, encrypted
Read the rest of this entry »