
More Novatel MiFi Hacking: Exceeding the 5 connection limit
Tags: AT&T, dd-wrt, hacking, identd, mifi, Novatel, router
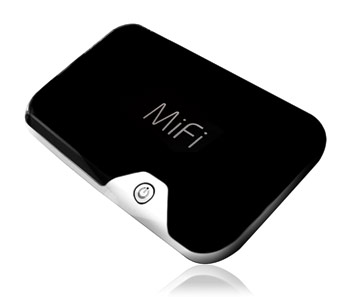 After testing several different methods, I finally managed to get around the 5-client restriction on the Novatel MiFi 2372 I recently purchased from Amazon.
First, some background information:
The Novatel 2372 I purchased had “some minor issues“, and I was looking for a way to get at the firmware, or updated versions of the firmware, so I could address and hopefully fix these. I was more than happy to start rolling my own firmware, to put onto the device if necessary.
If you search the Interweb, there are hundreds of posts, blogs and webpages out there on how to tweak the MiFi device by making changes to the exported config.xml file and re-import it. Some of these work, some (even after making the changes), do not. One of them is the hard-coded limit on incoming device (client) connections on the MiFi itself… this is hard-locked at 5 connections, no matter how you modify the config.xml to support more.
You can however, update the number of DHCP addresses the DHCP server on the MiFi will give out, just not the number of incoming connections to the MiFi.
But I figured out a better way to solve this in a very clean and elegant way. Unfortunately, it involves a second router… but one with a LOT more functionality. This can probably be reproduced by a smaller router, but I used what I already had in my personal lab to create this working proof of concept.
Because I travel with all of this gear on my back (literally), I wanted to keep everything small, tight and light. I pack it all in a North Face Surge backpack (so far, the best backpack I’ve ever owned for computers and commuting) and carry it with me to/from work (a 2.5-hour train ride each way, every day; 5 hours total). I looked into the smaller “pocket” routers from Asus, D-Link, Linksys, Netgear and others to start with.
I started with two D-Link portable units; the D-Link DWL-G730AP and the D-Link DAP-1350.
Both of these D-Link models support multi-mode functionality with wireless router, access point, or wireless client mode. You can also power both of these access points directly via USB, which is a huge requirement in my case.
I have my entire kit down to one wire to the wall, and don’t want to relax that requirement. Anything I buy that I intend to travel with, has to support charging over USB, or be able to run from an external solar or battery solution.
While both of these models are small, light and capable… neither of them support “multi-mode wireless”. Multi-mode wireless means that the device can behave as a wireless client as well as a wireless Access Point.
Some devices don’t support multi-mode out of the box, but that functionality can be added by re-flashing with third-party firmware like DD-WRT or Tomato or others.
Next, I looked at the ASUS WL-330GE and the Netgear WGR101 units.
(Sorry, ASUS, I had to link to Amazon, because your site is so broken, I can’t find or link directly to any products on it. Please drop the unnecessary use of Flash and Javascript; it’s not helping you here).
These units were also small, light and powerful… but also lack the ability to do multi-mode as well.
Also, none of these devices can be re-flashed with DD-WRT, my choice for a replacement firmware to add increased functionality that the hardware supports, but the on-board vendor software does not. DD-WRT has a very large list of supported devices, and these are not on that list.
So, I fell back to an old staple, my Buffalo Wireless WHR-HP-G54 router, which I flashed with DD-WRT.
“DD-WRT is a Linux based alternative OpenSource firmware suitable for a great variety of WLAN routers and embedded systems. The main emphasis lies on providing the easiest possible handling while at the same time supporting a great number of functionalities within the framework of the respective hardware platform used.”
I had to flash my WHR with the latest v2.4 firmware to support “Universal Repeater Mode“. Universal Repeater Mode is where you have an access point (AP1) that you can place anywhere and it will wirelessly connect to, and then re-broadcast (“repeat”) the strongest signal onto another wireless network (with or without security). Unlike WDS, once you have this appliance setup, it will work with any open network.
I flashed the WHR, and then configured it as follows (full screenshots follow below, click to see full-size). In the instructions below, my MiFi is ‘router-1’, and my WHR is ‘router-2’.
- Plug your computer/laptop into the router (router-2) directly, using one of the wired ports. The router does not need to be connected to the Internet at all, just powered on. You’ll get a DHCP address from the router.
- Log into the router and change the IP of this router (router-2) to one that is on a different IP range from the one your MiFi (router-1) is configured for. For example, if your MiFi is on
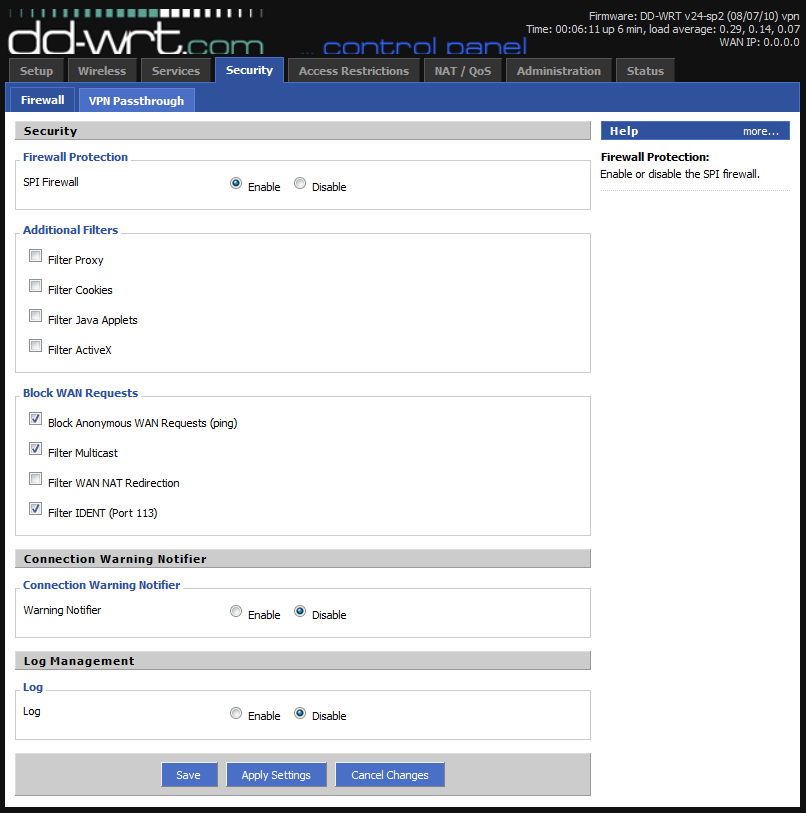
192.168.1.1, put this router on192.168.50.1. Click “Save” to save the settings, then click “Apply Settings” to activate them. This will cause your connection to drop out temporarily, and reconnect you with a new DHCP address in the new IP range. - Once you’re reconnected, log back into the GUI with the new IP and go to the “Security” -> “Firewall” tab. Temporarily set the “SPI Firewall” to “Enabled”, and uncheck all of the boxes. Click “Save”, then “Apply Settings”. In my configuration, I’ve enabled the firewall for ping, multicast and identd (as shown below). Choose whatever will work in your environment.

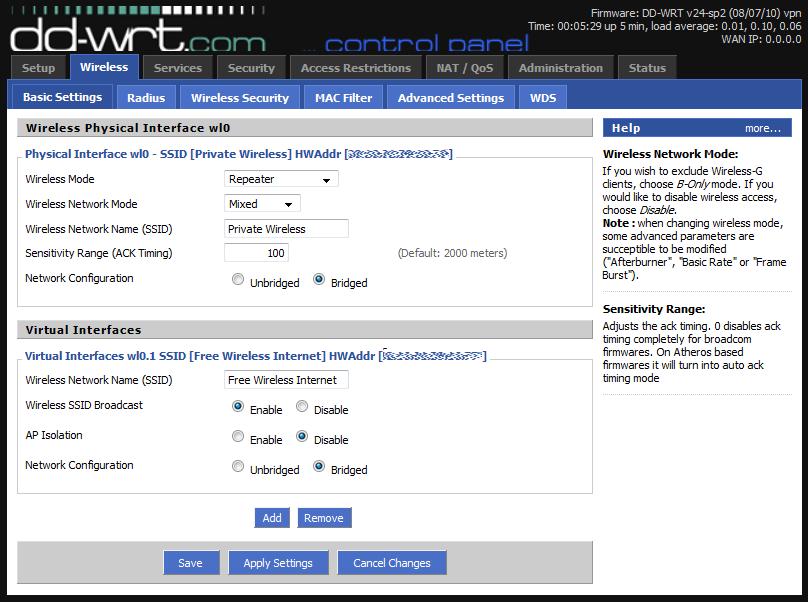
(click to see full-size version) - Next, go to the “Wireless” -> “Basic Settings”, and set Wireless Mode to “Repeater”.
- Under “Wireless Physical Interface”, set “Wireless Network Name (SSID)” to the network you wish to repeat. Mine is set to “Private Wireless” in the screenshot below; this is the exact name (SSID) that my MiFi is configured for.
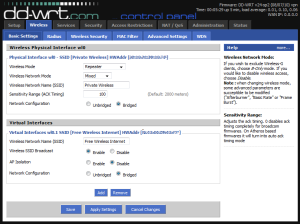
(click to see full-size version) - Set Network Configuration to “Bridged”, click on “Save”. The “Virtual Interfaces” section does not appear until you save the changes here.
- Click on “Add” under “Virtual Interfaces”, and enter an SSID for your public-facing SSID (I used “Free Wireless Internet” in the screenshot below). Set the AP Isolation to “disabled” and Network Configuration set to “Bridged”.

(click to see full-size version) - For faster latching to the MiFi, set the wireless channel to some numbered channel; specifically the same channel your MiFi is set to communicate on. If you set it to “Auto” here, it will take longer to associate and bridge to the MiFi. Click “Save” and then “Apply Settings” here to save and activate these settings.
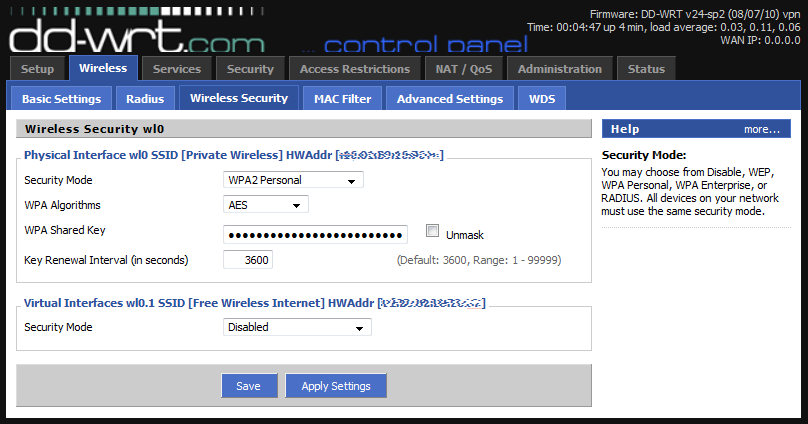
- Go to “Wireless” -> “Wireless Security” and configure the
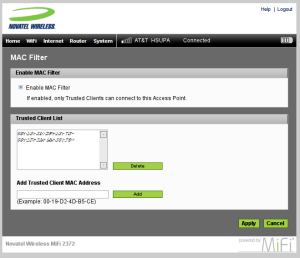
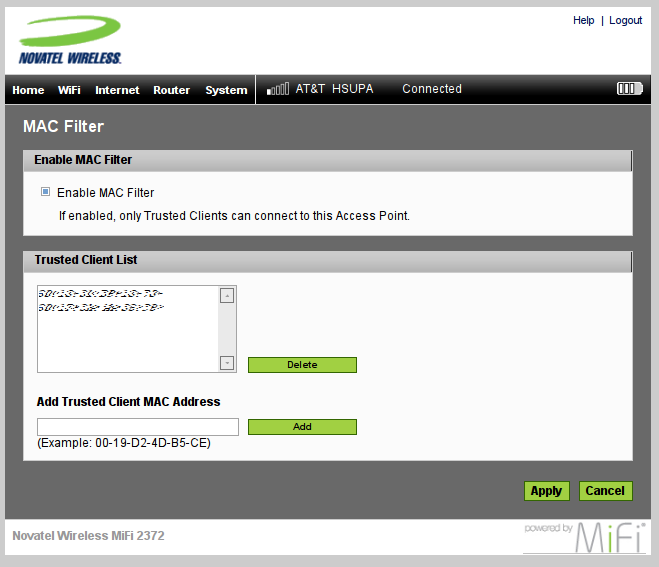
wl0interface (the vlan interface) to WPA2 Personal with a strong password. You can configure thewl0.1(router-2) interface for whatever security you want to use. In my case, I left wl0.1 completely open, no encryption, to allow anyone within range to connect to my public-facing AP (router-2). - Power on your MiFi and log into its web interface (
192.168.1.1). Here you’ll want to configure the MAC filter to only allow this router (router-2) to connect as the MiFi’s only wireless client. Since it’s secured with WPA2 and MAC filtering, you can be sure that nobody will log directly into your MiFi, bypassing your (router-2) universal router sitting behind it.
(click to see full-size version) - Now if you restart router-2 (public-facing WHR) and power-on router-1 (private, internal, MiFi), you’ll connect from router-2 -> router-1 -> 3G -> Internet. All wireless clients can connect directly to router-2, sending traffic back through router-1 to the live Internet.
This means that the WHR is the MiFi’s only wireless client (i.e. eating 1 out of 5 leases), but the WHR will accept and route ~253 individual clients, far exceeding the 5-device maximum imposed by the MiFi.
Here’s what the current lineup looks like…
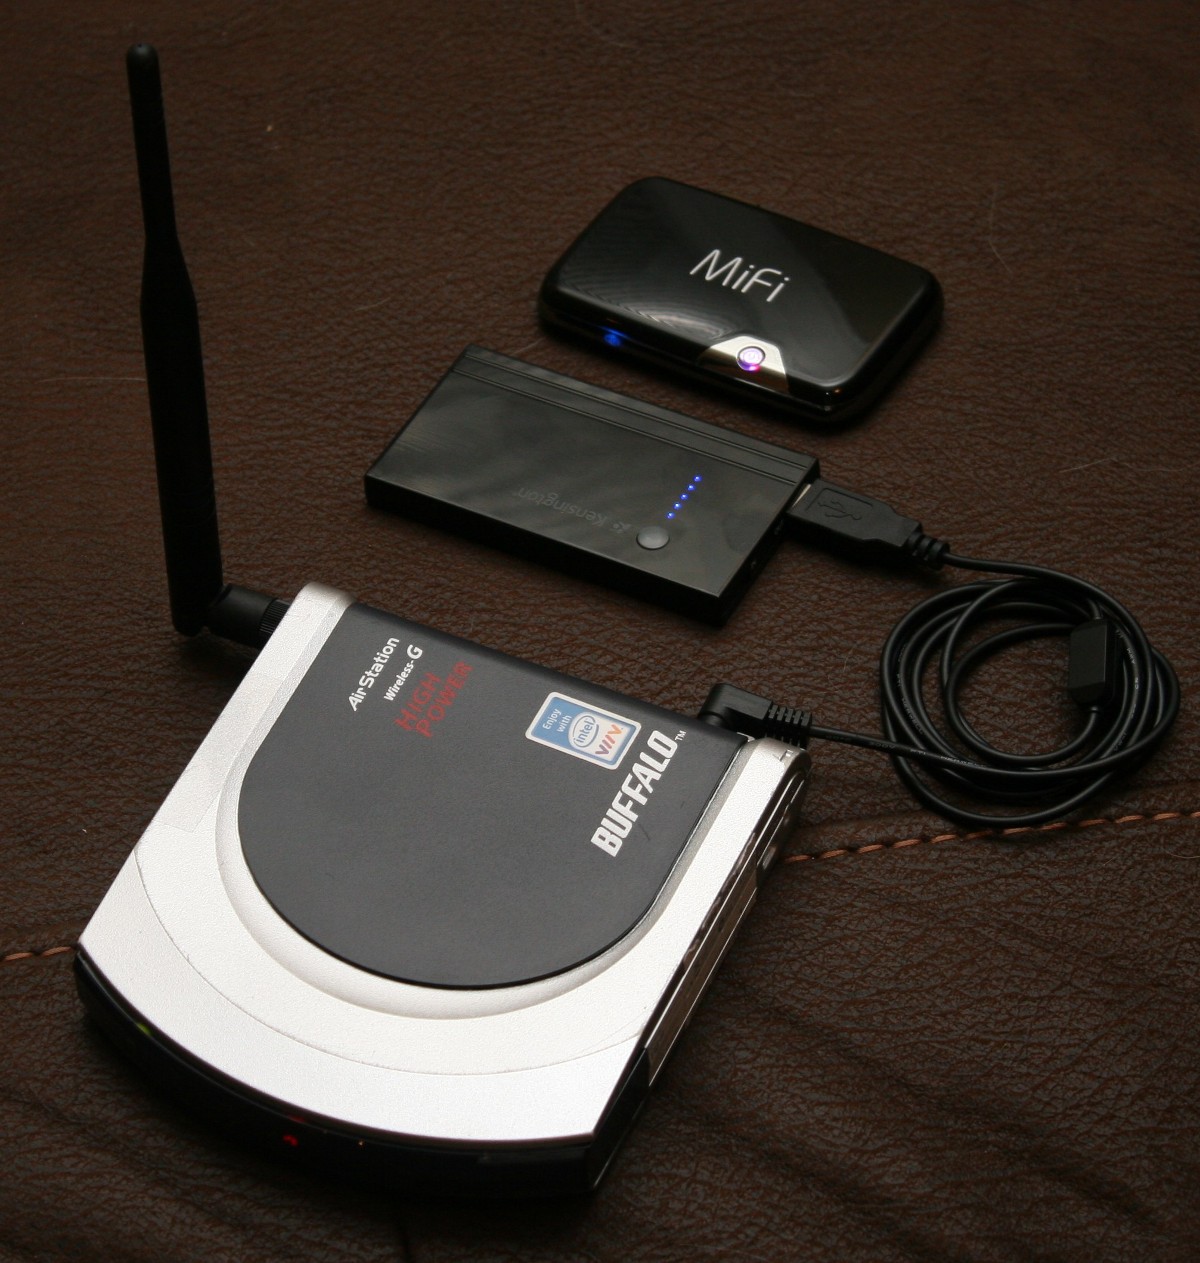
(click to see full-size version)
Rev 3 of my design will compress this even smaller, perhaps into a single unit. I’m still working on the final design of that…
This works like a champ, and I’ve tested it on a busy Amtrak Acela train and in Penn Station in NYC…
If anyone has any questions about any steps here, or my configuration, let me know in the comments section below.
Good luck!
crazy88 said on September 9th, 2010 at 5:18 am quote
Hello, Mugen Power just released the 3300mAh Extended Battery for for Novatel Wireless MiFi 2352 and 2372, and 3600mAh Extended Battery for for Novatel/Verizon Wireless MiFi 2200.
it should be last over 10 hours use with 1 charge!
http://mugen.hk/mugen-power-3300mah-extended-battery-for-for-novatel-wireless-mifi-2352-and-2372.html
http://mugen.hk/mugen-power-3600mah-extended-battery-for-for-novatel-verizon-wireless-mifi-2200.html
and if you visit their page on facebook, you can find a discount code:
http://www.facebook.com/MugenPowerBatteries
Sunday at Starbucks | Mikes Thoughts said on October 31st, 2010 at 7:25 pm quote
[…] such a great router admin UI that you always learn something new with it. Thanks to Dave for this blogpost which has taught me how to do repeating of wireless signals using the Buffalo Wireless WHR-HP-G54 […]
Iggy said on November 13th, 2010 at 11:26 pm quote
Haved you given any thought to using OpenVPN on your Buffalo to tunnel through the MiFi device and the 3G network to your VPN end point? I would be curious to read about this configuration as I am considering it.
McManus said on January 3rd, 2011 at 10:07 pm quote
Thank you so much! This works perfectly on my Virgin Mobile MiFi 2200! It is exactly what I needed!
McManus said on January 3rd, 2011 at 10:09 pm quote
Thank you so much! This works perfectly with my Virgin Mobile MiFi 2200 and Linksys WRT54G router with DD-WRT. This is exactly what I needed!
HOWTO: Configure Tor + SASL + irc to connect to Freenode | random neuron misfires said on March 24th, 2011 at 5:13 pm quote
[…] at 8:39 pm | 2 views | trackback urlI fought this problem on the train into the city today, because my MiFi‘s hostname was not correctly reversing to it’s given IP (verified by dig) and Freenode […]
My Newest Travel Router | Mikes Thoughts said on October 13th, 2011 at 1:01 pm quote
[…] a great set of instructions for how to “multiply” the port to allow wireless repeating here. The forum at DD-wrt is a good resource as welll for configuration issues and how to work around […]
Shawn Smith said on December 28th, 2011 at 1:42 pm quote
Does it give u an ip address for the wan ?
I had it working for a brief time but not it is not traveling throu to the Internet. Where exactly would I find the wan connection status of it it is connected to my wifi.
Thanks for the good post