
Archive for the 'Technology' Category
Using an Elgato Stream Deck XL for Desktop and Livestream Productivity
I recently rebooted my home office to support a lot more professional, studio-quality AV.
This included moving away from the onboard laptop webcam to a dedicated USB webcam for better quality. I chose the Logitech BRIO Ultra HD because it could do 1080p as well as 4k, if needed, and had a very wide FOV. I also moved from a USB microphone to an XLR microphone. I originally started with an Audio -Technica AT2020USB (Cardioid Condenser) USB mic, but moved over to the XLR version of the same mic, the Audio-Technica AT2041SP (Condenser) mic.
At the same time, I added an audio mixer, a Mackie ProFx6 v3. I originally bought the Focusrite Scarlett 18i8 (3rd Gen), but I could never get it to do anything at all, and even with a TRiTON FedHead attached, the audio was so low, and full of hissing background noise, it was unacceptable.
So that covered audio and video, but I needed a better way to present these into my meetings, work and personal, using Zoom, Teams, Google Meet and other tools.
Enter OBS, the Open Broadcaster Software. Since I use Linux, a lot of the free and commercial Windows alternatives were off the list, so I had to use OBS. With OBS, I can connect my cam to my Linux laptop and then create a ‘virtual’ camera that would be shared out via OBS, that I can configure in each video app I need. This allows me to add ‘scenes’ (more on this in another blog post) as well as overlays and other features to my video feed.
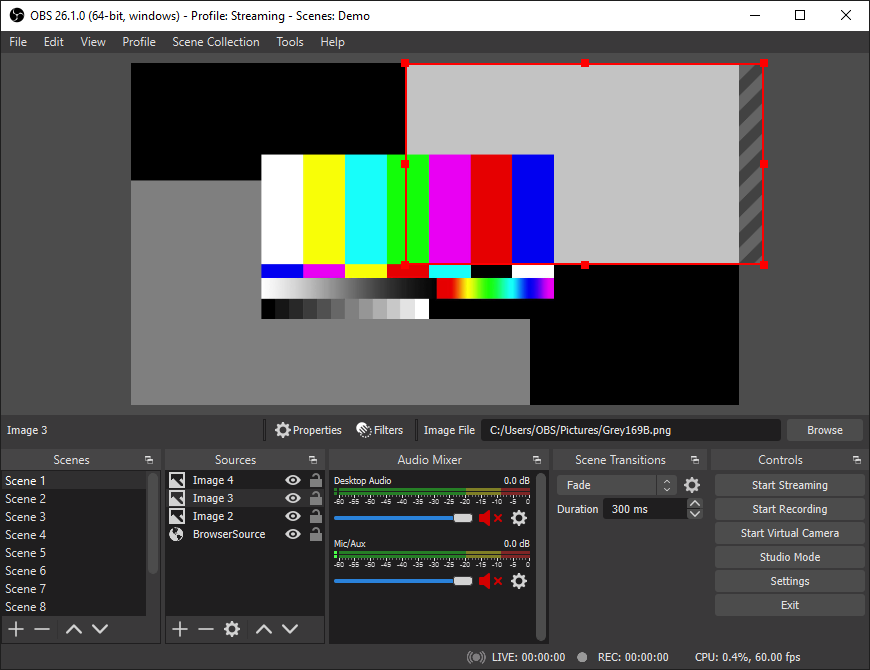
Currently, I have several cams set up, and can switch between them with a single keystroke, mouse click, or (as I’ll explain shortly), with a button-press on my Elgato Stream Deck XL. I have these set up with captions, an active clock (ticking each second visibly on my camera) and some other features.
I still use the Logitech Brio camera, but it’s now a secondary cam, replaced by a new primary cam, the Sony A6100.

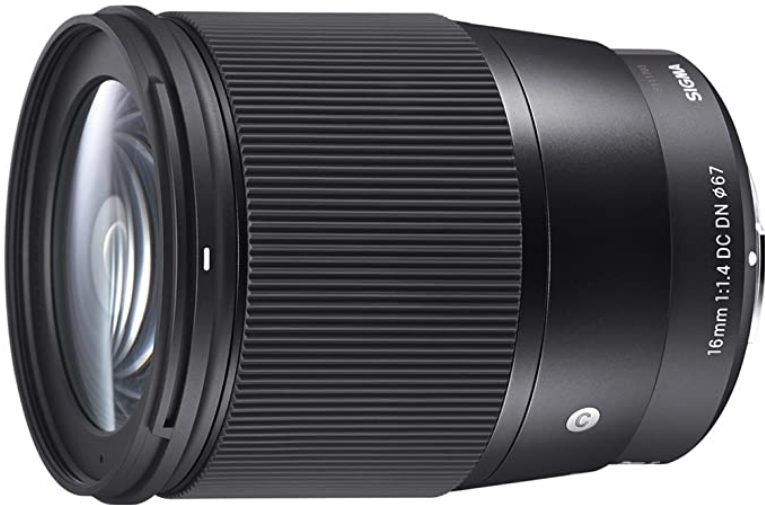
I bought this camera with the kit lens, and quickly realized I needed a better f-stop than the kit lens had. I wanted to go down to f/1.4 or f/1.2, from the f/3.5-5.6 that the kit lens had. I upgraded that lens to a Sigma 16mm f/1.4 about a week later, and I couldn’t be happier with the results. It’s shockingly crisp and the AF (AutoFocus) is the fastest I’ve seen on a lens in this class.
There’s much more to my environment I’ll talk about later, but this is the main pillars of my tools and studio.
I don’t have the mic going through OBS at the moment, but that’s coming soon. Once I do that, I can do some pre-processing of the audio and clean up background noise, increase gain and make the sound quality MUCH better.
That’s the high level change: Upgraded cams, mic, added a mixer, routed it all through OBS and manage it there. There’s so much that can be done with OBS, and I’ll do a whole series on that later.
Now let’s talk about how I’ve incorporated the Stream Deck XL into my workflow. This is normally a Windows/Mac only device, with dedicated software for those platforms. That won’t work for me, since I use Linux for everything. I found Timothy Crosley‘s project ‘streamdeck-ui‘, a Python project, does almost exactly what the Elgato native software does, with some additional features that Elgato doesn’t have. It was drop-in simple to get it up and running.
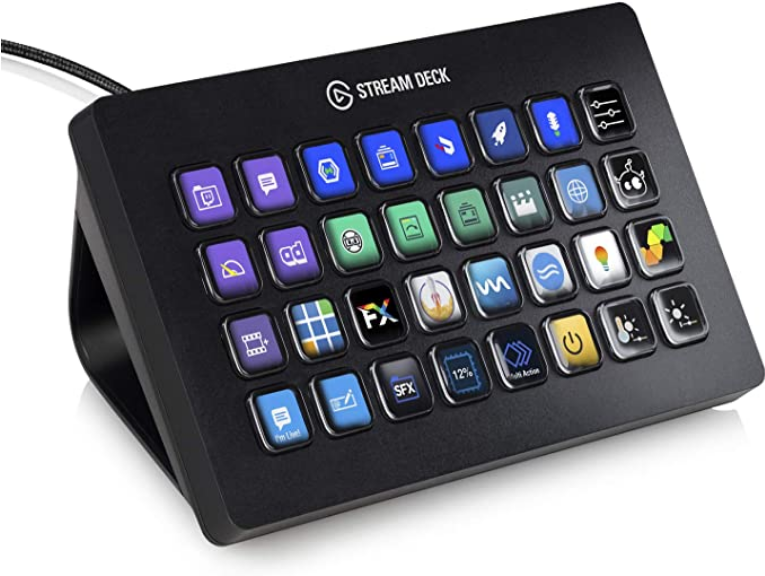
The XL has 32 buttons on its face, and with streamdeck-ui, I can have up to 10 pages of actions for those buttons, giving me a total of a whopping 320 possible buttons/actions to choose from.
I started configuring the first page for the most-used actions I would need with OBS, including:
- Launch OBS itself
- Open my normal work/desktop productivity apps, including Mattermost, Slack, Telegram, IRCCloud, Discord
- Open media apps I need; Google docs/sheets/drive, Spotify, Pandora, Dropbox and others
Then the other fun began. I wanted a way to target specific applications and stuff keystrokes into those apps. The first need was to be able to DM any of my teammates with a single button press.
I needed to find a way to “find” the Mattermost (or Slack) window on the desktop, target that window, raise it, then send keystrokes to that window, for example /msg SuperManager Good morning! I have a question...
To do this, I needed to create a shell script as a wrapper around wmctrl, xwininfo, and xdotool to do what I needed. I had to create a second script, similar to the first, to target specific public channels in Mattermost. Each of these is subtly different; one uses /msg and the other uses /join ~$channel before stuffing in keystrokes for actions.
Here’s an example:
#!/bin/bash

dm=$1
wmctrl -xa Mattermost
mm=$(xwininfo -root -tree | awk '/Mattermost/ {print $1}');
xdotool windowfocus ${mm} type "/msg $dm";
xdotool windowfocus ${mm} key KP_Enter
I can then call that from a streamdeck-ui button action with: mm-dm @SuperManager and it will find and open Mattermost, target that private conversation window, and I can start typing away.
The next extension of this of course, was to create custom buttons on the Stream Deck itself, for each member of my team. I have a separate page (32 buttons) with photos from our internal corporate directory, one photo per-button, for each member of my team, cross-teams, management and so on. A single press on their photo, will find Mattermost, target that window, and begin a DM with them.
It’s the Stream Deck equivalent of a visual phone directory.
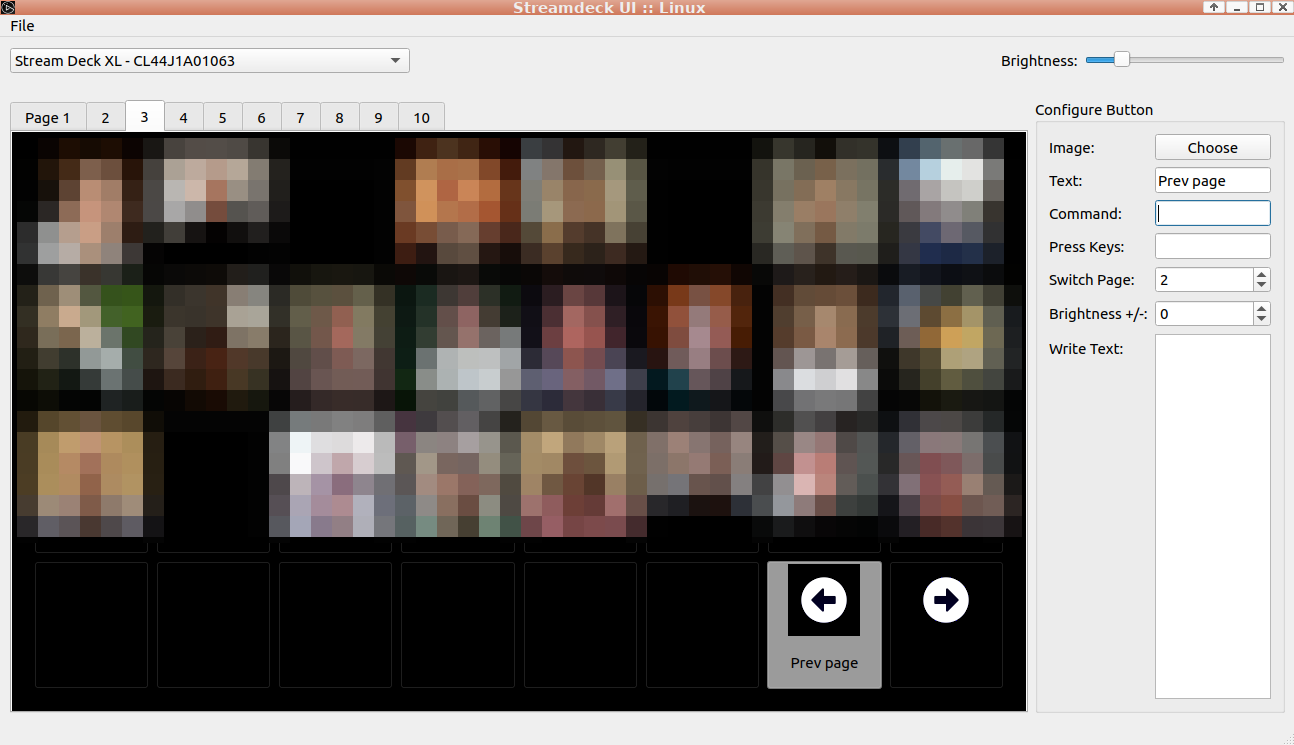
I also created forward/back buttons for switching between pages on the XL, which you can see here in the screenshot below. I have the ‘Switch Page’ action configured to switch to the previous or next pages, as needed. On Page 1, there’s only one button there, ‘Next Page’, which switches to Page 2. On all other pages, it goes forward or back, and page 10 wraps back to Page 1.
I also have the XL set up for my streaming environment, Govee Lyra and Govee Aura lights that live behind me on camera, uxplay for using my iPad Mini as a ‘lightboard’ during meetings. Here’s an example of how this looks with an actual glass lightboard.
I figured out how to do this without any of the complexities of actual glass, markers or extra hardware. Just Linux, OBS, my iPad, Stream Deck and uxplay. Works fantastic! I’ll do a whole post on that later.
The most-recent addition I figured out, literally this afternoon after fumbling to find my active Meet window and mute my mic, was how to use a single button on the Stream Deck XL, to mute and unmute my Google Meet calls. It’s similar to the way I’m targeting my Mattermost (Slack, Telegram, IRCCloud, etc.) windows, but instead, I’m targeting the top-most Google Chrome window that has Meet running in it. The script, tied to a ‘mute/unmute’ button, looks like this:
wmctrl -xa Chrome
chrome=$(xwininfo -root -tree | awk '/Meet .* Google Chrome/ {print $1}')
xdotool windowfocus ${chrome} key "ctrl+d";
That’s it. I configured streamdeck-ui with a single button press to toggle that on and off.
So that’s it for now, some great ideas to use a Stream Deck XL along with your regular desktop apps and productivity tools, to enhance even more productivity out of your environment.
Deploying Firefox and Thunderbird Policies to Prevent auto-updates and Tune Other Features

Long-time Firefox and Thunderbird user here. I’ve tried dozens and dozens of other browsers, including the much lauded Google Chrome, but always come back to Firefox. It’s just much faster, lighter on memory, 100x more feature rich, flexible and more secure than the alternatives. Chrome by comparison, is slow, an extreme memory hog, questionable security model, and lacks any powerful features that I’ve come to user over the years.
I tend to run the latest “Developer” or “Nightly” editions of these tools, and by doing so, I agree to certain constraints (daily, enforced upgrades being one example), but with that sometimes comes product changes that cause new, undiscovered issues, breakage and undefined behavior.
My Thunderbird mail folders for example, go back 20 years and contain well over 200,000 archived and active emails. I’ve purged all of the garbage, junk, unnecessary emails as they come in, being a big proponent of Merlin Mann’s “Inbox Zero” methodology for almost 15 years, but it’s important that mail be available and accessible on-demand. Something that breaks my ability to read an IMAP folder or search across those folders and tags, would not be good.
Enter Policies!
With policies deployed, you can govern what behavior is turned on, off and supported by your Firefox browser or Thunderbird mail client. For Firefox, there’s an easy add-on called “Enterprise Policy Generator” written by Sören Hentzschel that I use to start off the policies I’m interested in. Here’s just a small sample of what’s available in the tool:
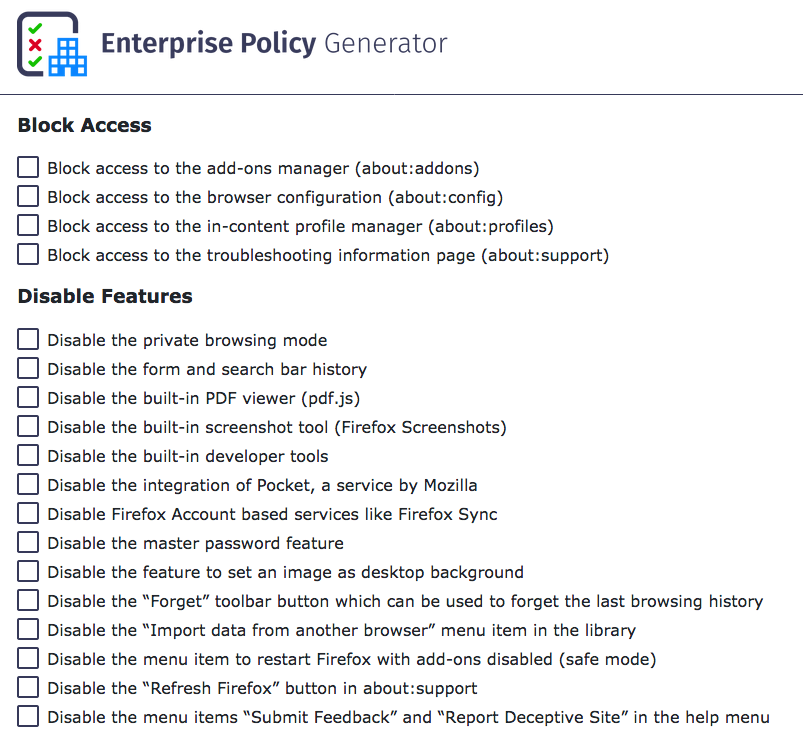
Two of the first items I turn off, is the use of “Pocket” and the constantly daily upgrade notices. I do upgrade frequently, but I make sure I back up my profile, add-ons and browser data before testing an upgrade, so I have a means to downgrade if the new version breaks my add-ons or use of the browser. To do that, you can create a policy that disables these with the EPG, or you can just create a policies.json and add the following to it:
{
    "policies": {
        "DisableAppUpdate": true
    }
}
This will stop the browser from requesting updates on a daily basis. There is a feature in Firefox under about:config called app.update.auto which can be set to “False”, but it doesn’t work. Likewise, blanking out the app.update.url in the same configuration pane does not work either. The only way to do this, is to deploy a policy that forbids it.
The policies.json file has to go into a specific directory in the application directory, not the user’s profile (where it could be altered or modified by each user). Here’s where those need to go:
On macOS
/Applications/Firefox Developer Edition.app/Contents/Resources/distribution
On Linux
If you’re using packages:
/usr/lib/firefox/distribution
If you’re using the tarball or nightly releases:
/opt/firefox/distribution
On Microsoft Windows
C:\Program Files\Firefox Developer Edition\distribution
The important part is that it lives in a new directory called distribution inside the same directory that holds the main Firefox data files. You’ll need to create this directory if it doesn’t already exist. For Thunderbird, the process is similar, just a slightly different directory:
On macOS:
/Applications/Thunderbird.app/Contents/Resources/distribution
or
/Applications/Thunderbird Daily.app/Contents/Resources/distribution
Follow the same model and paths you did with Firefox for Linux and Microsoft Windows.
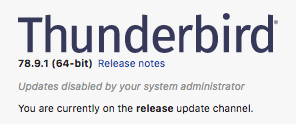
You’ll know if you put the policies.json in the correct directory, if you close and relaunch your Firefox or Thunderbird client, go to Help -> About, and see the following, near the top of the About dialog:

Here is a copy of an expanded policies.json that I use on my production systems:
{
  "policies": {
    "DisableAppUpdate": true,
    "DisableFeedbackCommands": true,
    "DisableFirefoxStudies": true,
    "DisablePocket": true,
    "DisableSystemAddonUpdate": true,
    "DisableTelemetry": true,
    "ExtensionUpdate": false,
    "NetworkPrediction": true,
    "Preferences": {
      "browser.fixup.dns_first_for_single_words": true,
      "browser.tabs.warnOnClose": true
    },
    "PromptForDownloadLocation": true
  }
}
You can use this for both Firefox and Thunderbird.
If you want a full breakdown of every possible policy item, you can visit the Mozilla Policy Templates github page for detailed explanations.
While we’re on the subject of Git, you might also want to investigate using Git to manage these policies and configurations, so you can easily deploy them across multiple machines that you use your browser or mail client in.
Hope that helps. Good luck!
Converting SuperMicro BMC Sensor Temperatures from Celsius to Fahrenheit
If you’ve ever used a SuperMicro BMC before, you’ve no-doubt seen the temperatures section under Server Health => Sensor Readings. These are always expressed in Celsius, but sometimes you want to quickly convert those to Fahrenheit so you can compare them with other data/sensors.

Enter Tampermonkey! I’ve been using Tampermonkey under Firefox for the last few years to re-skin/re-theme Salesforce, Greenhouse and 1/2 dozen other sites I use, some of them in very extreme ways, adding features and functions that the parent site itself doesn’t have or support.
In this case, this is a very simple snippet that will parse the sensor table and convert the Celsius values to Fahrenheit for you, just by loading the page. The code is:
// ==UserScript==
// @name           SuperMicro Sensor Conversion
// @namespace      https://192.168.4.50/
// @description    Convert the SMC Sensor outputs to Fahrenheit vs. Celsius
// @include        /^https?://192.168.4.50/.*$/
// @author         setuid@gmail.com
// @version        1.00
// ==========================================================================
//
// ==/UserScript==


'use strict';

setTimeout(() => {
    document.querySelectorAll('div[id="HtmlSensorTable"] > table > tbody > tr > td').forEach(node => {
        if (node.innerText.includes(' degrees C')) {
            var temp = node.innerText.match(/(\d+) \w+ \w/)
            var fah = (parseInt(temp, 10) * 9 / 5 + 32).toFixed(1);
        }
        node.innerText = node.innerText.replace(/(.*?)(\d+) degrees C/, `$1 ${fah}° F)
    });
}, 500);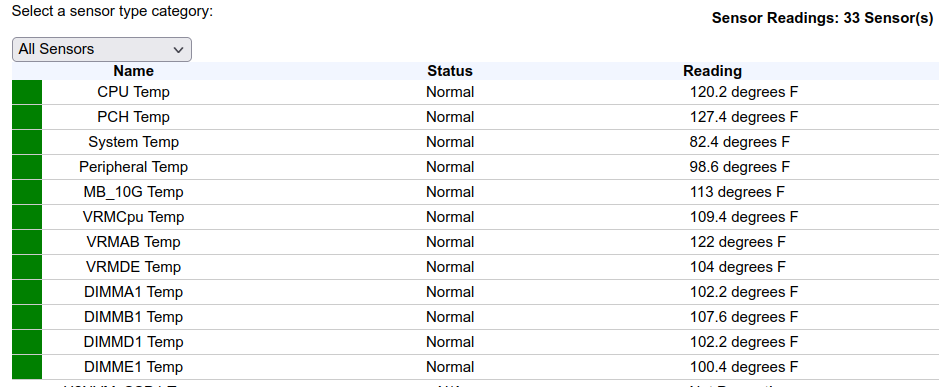
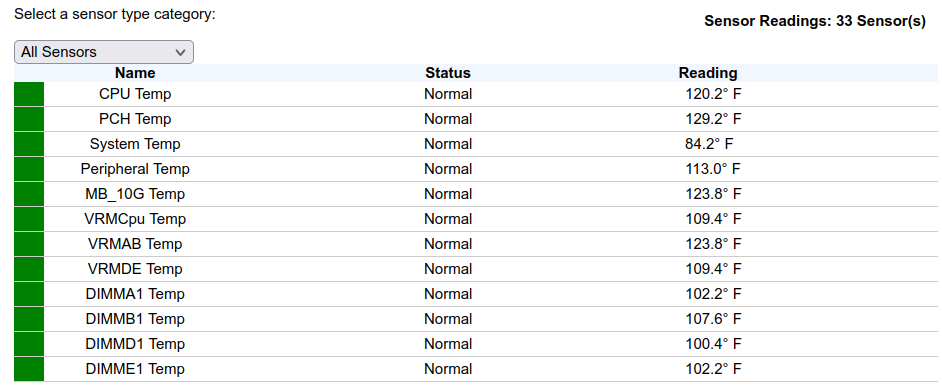
I tuned that a little more, by adding the degree symbol, instead of the words ‘degrees’, which now looks like:
It could be refined even further, targeting the inner iframes that this table resides in, or converting to React, but this was a quick 30-minute hack to solve a specific need I had.
Note, you can also get these same temperature values programmatically, via the RedFish API, if your chassis is properly licensed to permit it.
My homelab gets VERY warm during the day when the gear is running at full tilt, so I picked up a Govee Temp/Humidity sensor [Amazon link, not a referral or affiliate link][Govee main website product link], and it’s been very enlightening, showing me more about the trends in my office than I had visibility into before.
Here’s the last week’s temps and humidity in my office/homelab:
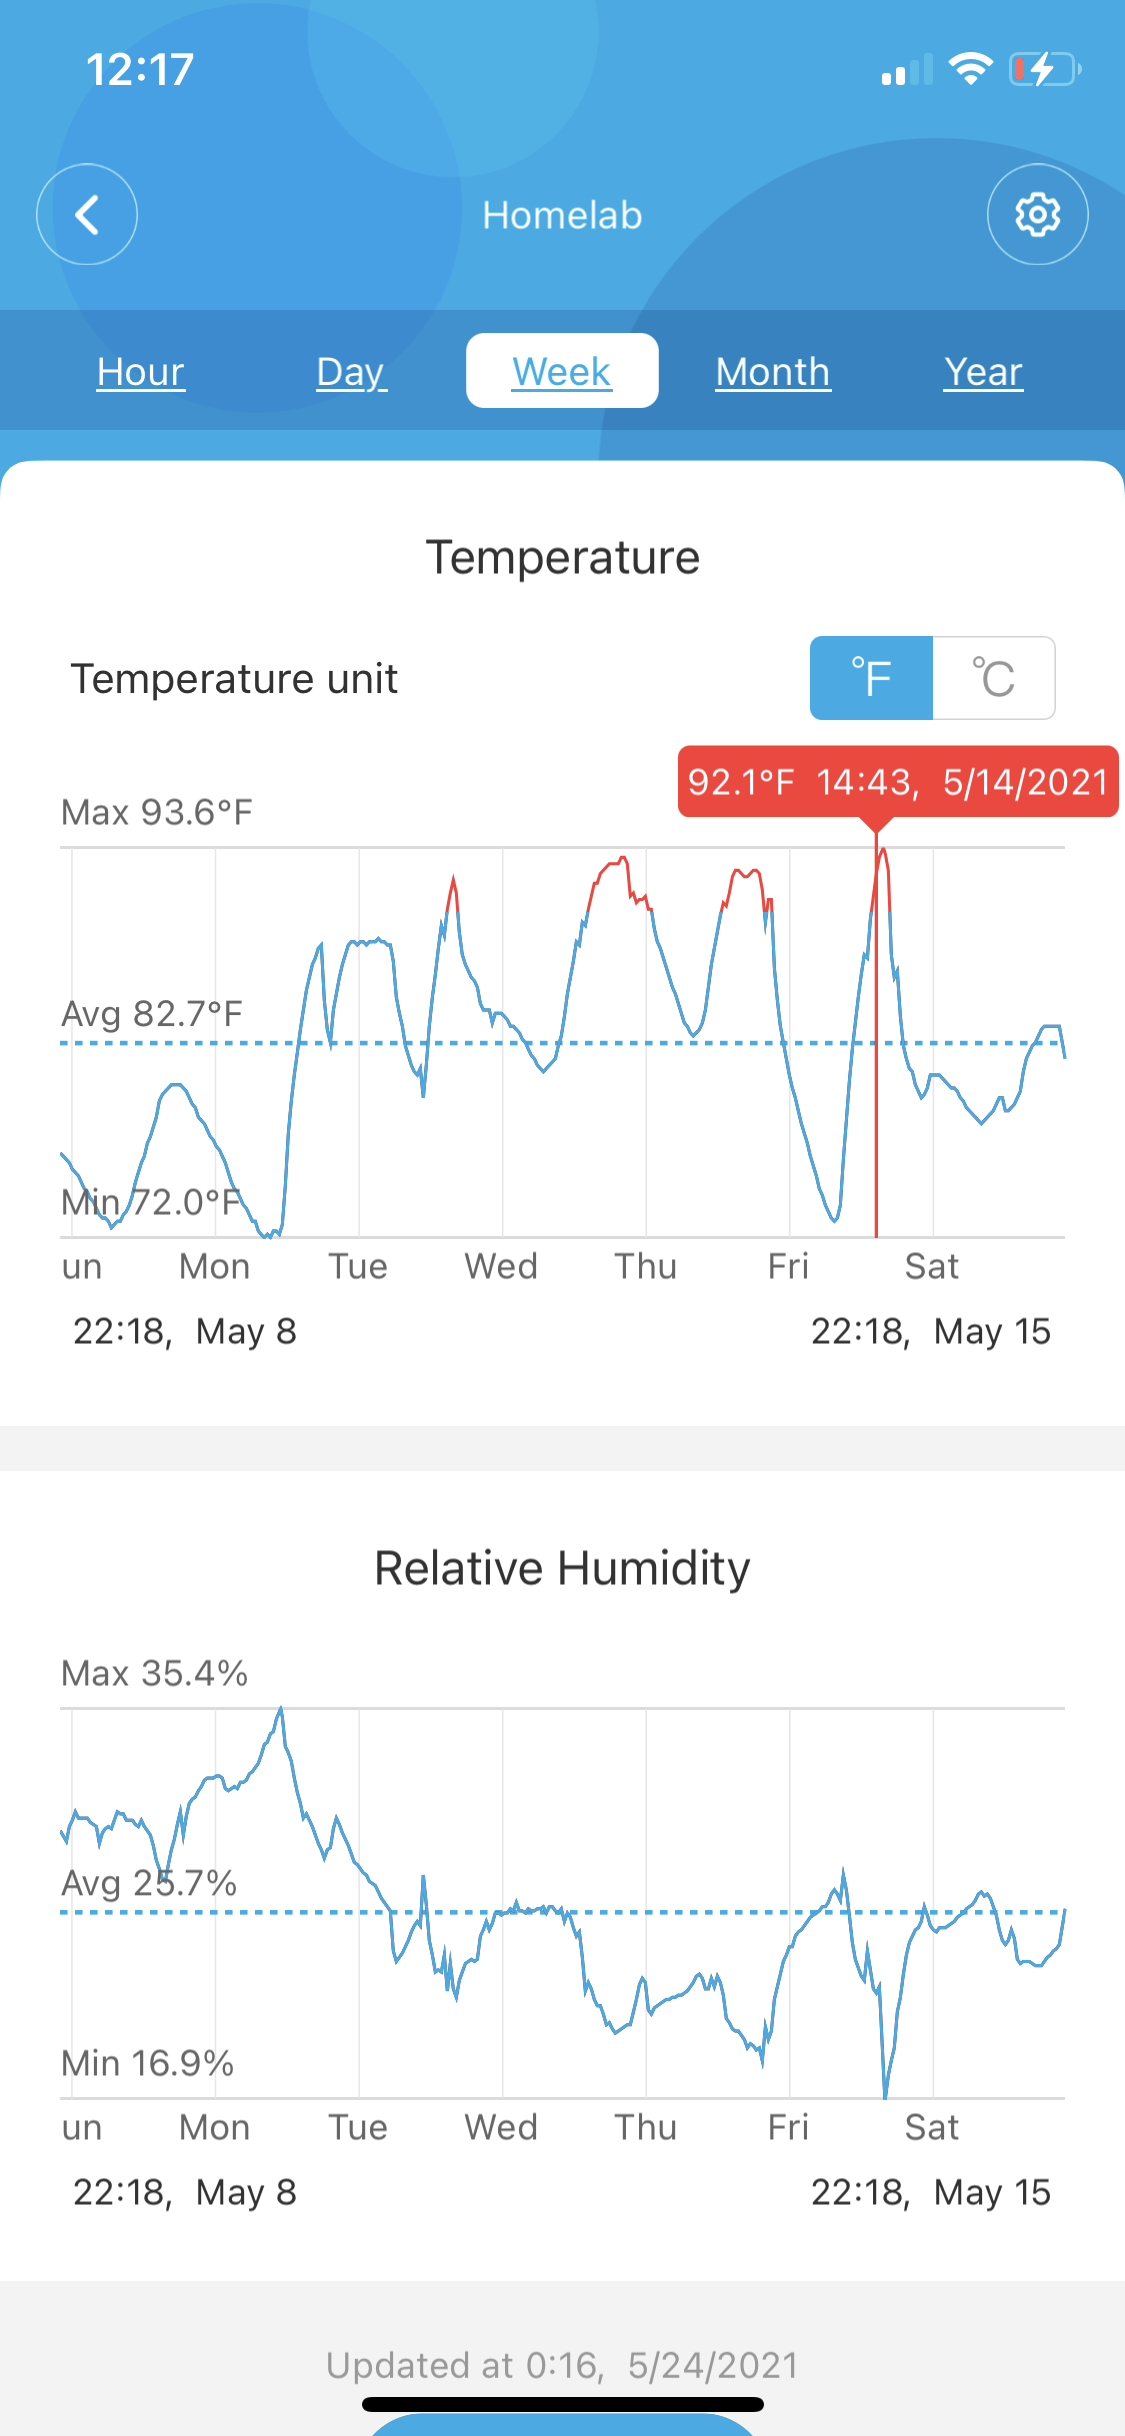
The only downside, is I can’t figure out a way to automate pulling/exporting this data, so I can import it into my Prometheus server and graph it with Grafana. Of note: I just taught myself Prometheus + Grafana tonight while adding all of my servers + UPS into it for monitoring. The UPS took a bit more effort, as it’s only using SNMP. I’ll go into more detail on that in future blog posts.
HOWTO: Run Proxmox 6.3 under VMware ESXi with networked guest instances
One of my machines in my production homelab is an ESXi server, a long-toothed upgrade from the 5.x days.
I keep a lot of legacy VMs and copies of every version of Ubuntu, Fedora, Slackware, Debian, CentOS and hundreds of other VMs on it. It’s invaluable to be able to spin up a test machine on any OS, any capacity, within seconds.
Recently, the need to ramp up fast on Proxmox has come to the front of my priority list for work and specific customer needs. I don’t have spare, baremetal hardware to install Proxmox natively, so I have to spin it up under my existing VMware environment as a guest.
The problem here, is that running one hypervisor under another hypervisor as a guest, requires some specific preparations, so that the networking of the nested guest, will have its packets correctly and cleanly routed through the parent host’s physical network interfaces.
Read on for how to configure this in your own environment!
VMware ESXi
In VMware ESXi, there are a few settings that you need to adjust, to enable “Promiscuous Mode”, “Forged Transmits” and “MAC Changes”. These are found under the “VM Network” section of your ESXi web-ui:

Once you’ve made these changes, you need to restart your VMware host in order to enable them for newly-created VMs under that host.
VMware Workstation
If you’re running VMware Workstation instead of ESXi, you need to make sure your ‘vmnet’ devices in /dev/ have the correct permissions to permit enabling promiscuous mode. You can do that with a quick chmod 0777 /dev/vmnet* or you can adjust the VMware init script that creates these nodes. Normally these would be adjusted in ‘udev’ rules, but those rules are run before the VMware startup, so changes are overwritten by VMware’s own automation.
In /etc/init.d/vmware, make the following adjustment:
vmwareStartVmnet() {
   vmwareLoadModule $vnet
   "$BINDIR"/vmware-networks --start >> $VNETLIB_LOG 2>&1
   chmod 666 /dev/vmnet* # Add this line
}
Now that you have your host hypervisor configured to support nested guest hypervisors, let’s proceed with the Proxmox installation.
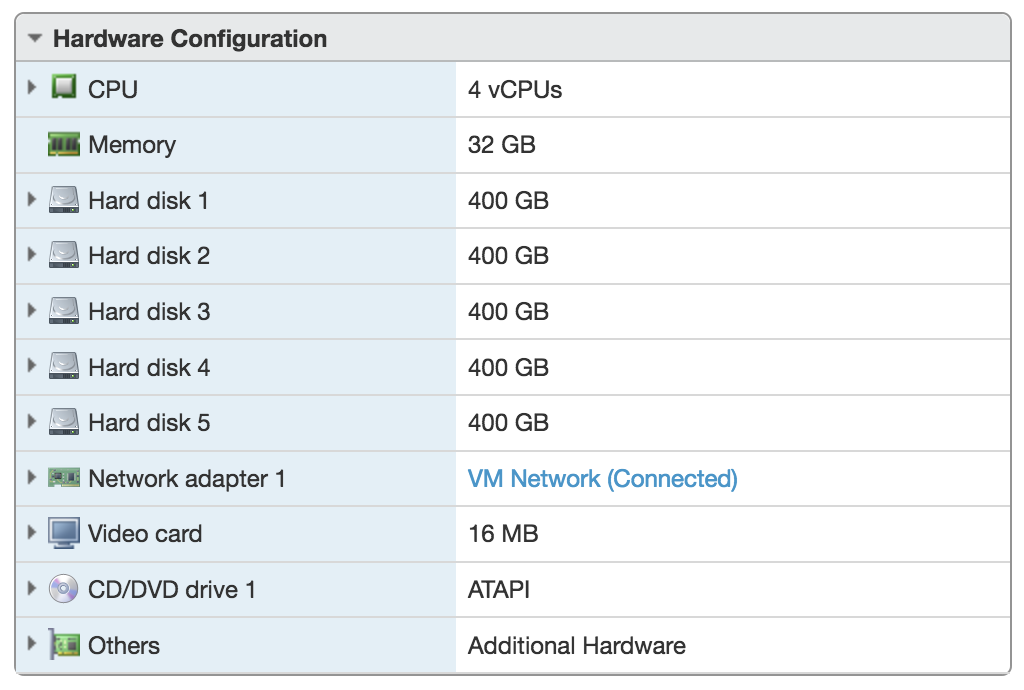
Download the most-recent Proxmox ISO image and create a new VM in your VMware environment (ESXi or Workstation). Make sure to give your newly created VM enough resources to be able to launch its own VMs. I created a VM with 32GB RAM and 2TB of storage, configured as a ZFS RAIDZ-3 array (5 x 400GB disks). That configuration looks like this:
Thoughts about cheating on Zwift
Tags: Cheating, Technology, Zwift- Begin the distribution of Certified Zwift Engineers (aka “ZCE”). These would initially probably be the bike mechanic at your LBS to start with. They’re already there, they have the gear and they’re probably fixing your bike or adding equipment each season already. The ZCE would be able to train up on all aspects of Zwift, including app/game configuration, optimizing the experience for the end user. Oh, you have a Dell laptop with an integrated video card? Here’s some settings you can apply to make that work for you during crowded group events.They’d also be trained in how to configure and validate bike fit, power meters and sensors that tie back to the machine/device used to run Zwift. Having drop-outs? Here’s the tools to identify drop-outs and some workarounds that can help. This engages the LBS mechanics and the LBS itself to be a part of the growing Zwift ecosystem, not only just as an endpoint for bike upgrades and repair, but a full, end-to-end solution for building out a Zwift environment for the riders. Incentivizing those LBS mechanics to become ZCE then has the potential to ensure that more people come into the shop for bike fit, possible recommendations, upgrades, etc. I haven’t met a single bike mechanic who hates cycling. They do it because they have a passion for it, and they, like others, want to grow that passion. Who wouldn’t turn down the ability to learn something new and exciting about your passion?
- Those same LBS that have their mechanics certified as ZCE, can now brand their shop as “Zwift Certified Training Center”, and teach riders how to use Zwift (ala spin class? LBS Fondo?). Tactics, when to drain your power-up so you can pull the next one over that hill. Buying a trainer at Best Buy won’t have the same overall value as buying it at your Zwift Certified LBS, even if Best Buy has them for 10% cheaper.
- Those same LBS + ZCE, can now perform equipment certification and qualification. They can properly calibrate your Power Meter + trainer combination, regardless of what you’re using. Forget trusting Qalvin on your iOS device to calibrate your Quarq PM or trusting your Garmin Vector pedals to be accurate out of the box, let the ZCE at your LBS (ZBS?) handle that for you.
The Enormous Dating Fraud: Match.com, Plenty of Fish, Tinder and OkCupid
 The Top 4 dating sites out there; Match.com, Plenty of Fish, Tinder and OkCupid are so completely overrun with fraud now, it’s appalling.
Note: Match.com, Plenty of Fish, Tinder and OkCupid are all owned by the same parent company, along with roughly 40 other dating site properties.
I’ve been a free and paid member of these sites for 8 years (with 3 years off in the middle as I was dating someone). I have spent hundreds of hours pouring through profiles, code, APIs, mobile apps and other interactions with these specific sites.
Right from the top, I’m going to stronly suggest you do not give any of these sites your money! Do not subscribe, do not give them a credit card, do not let them bill you, do not give them a single dollar. None.
I’ll break down exactly why below..
Let’s start with the biggest and worst offender: Match.com:
Read the rest of this entry »
HOWTO: Back up your Android device with native rsync

Recently, one of my Android devices stopped reading the memory card. Opening the device, the microSD card was so hot I couldn’t hold it in my hand. The battery on that corner of the device had started to swell slightly. I’ve used this device every day for 3+ years without any issues. Until this week.
I also use TitaniumBackup to back up my Android to this external memory card, but since the device can’t read the card, I can’t back it up to the card.
The card is fine, and works in my other devices, as well as being seen from the desktop. Other, blank microSD card can’t be read in the device and similarly overheat within seconds. It’s bad.
Enter rsync, the Swiss-Army Knife of power, to back up my Android device!
Here’s how:
Read the rest of this entry »
HOWTO: Purge Amazon Echo History with iMacros

This one is quick and easy… Have you ever wanted to go back into your Amazon Echo device and delete the history of all commands you asked Alexa to do for you? All the searches? All the weather requests?
Well, you can… manually from the mobile app, or from the Amazon Alexa Configuration page, but that can take hours, because each card you wan to remove is a minimum of two taps or clicks.
But there’s an even easier way… iMacros!
Load up the iMacros browser extension (Chrome version) (Firefox version) and create a new macro. You can edit it ‘raw’, if you wish, but you want only these lines in your macro:
VERSION BUILD=8970419 RECORDER=FX
TAB T=1
URL GOTO=http://alexa.amazon.com/spa/index.html#cards
TAG POS=1 TYPE=BUTTON ATTR=TXT:More
TAG POS=1 TYPE=SPAN ATTR=TXT:Removecard
Now when you load up the Amazon Alexa Configuration page, you can just launch your macro from iMacros and play it in a loop to progressively delete each and every one of those cards in seconds.
I personally wiped out over 5,000 cards in under 2 minutes with this approach. It works great!
Comment below if you have any luck with it, or modify it in a way that becomes more useful to others.
HOWTO: Run multiple Zwift sessions on the same PC (Windows only)
 Many people have asked me to write this up and I’m happy to be the first person to push Zwift this far with multiple, simultaneous sessions.
I can say with confidence that up to this point, I’m actually the only person who has this working correctly without overwriting or clobbering critical logs and data files. Others have tried some hacky methods, but they all result in instability and data loss (see “What does NOT work, and why” below).
I started this quest because I am working on a product design (“Secret Sauce” to be withheld in this HOWTO) that involves running multiple Zwift sessions on a single, 100% wireless PC, with the only wire being the single power cable to the wall. No USB cables, no video cables, no HDMI cables, no network cables.
Let’s get some general housekeeping out of the way first…
Read the rest of this entry »
HOWTO: Fully automated Zwift login on Mac OS X
Quite a few riders on the Facebook Zwift Riders group have expressed an interest in this, so I decided to take a couple of hours, learn AppleScript and knock this out. Done! (if you’re on Windows, you want this other HOWTO instead)
What this code does, is allows you to create a single icon that will log you into Zwift, with no human interaction needed. It will put in your email, password, click the “Start Ride” button and away you go!
This also leverages the OS X Keychain to store your Zwift email address and password, so it’s secure, not leaked into the filesystem and is able to be called on by any other apps that might need it (ahem, like… Zwift itself!) :D
So here’s how to get it working…
First, we need to create a separate keychain to store the Zwift credentials. You could store them in the main keychain, but I’m a fan of credential separation, so let’s use that.
Read the rest of this entry »