Archive for January, 2015
HOWTO: Enable Docker API through firewalld on CentOS 7.x (el7)
 Playing more and more with Docker across multiple Linux distributions has taught me that not all Linux distributions are treated the same.
There’s a discord right now in the Linux community about systemd vs. SysV init. In our example, CentOS 7.x uses systemd, where all system services are spawned and started.
I am using this version of Linux to set up my own Docker lab host for tire-kicking, but it needs some tweaks.
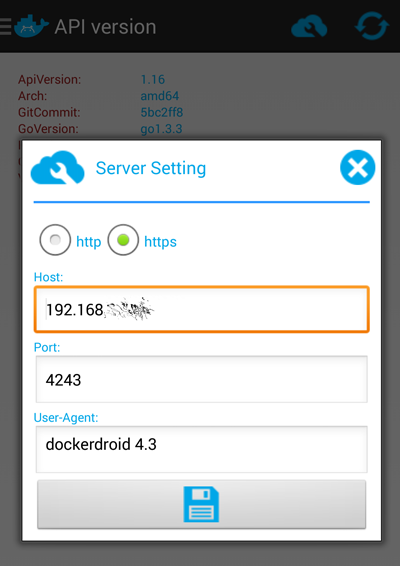
I also wanted to see if I could use the Docker API from my Android phone, using DockerDroid, which (after configuring this) works famously!
Here’s what you need to do:
- Log into your CentOS machine and update to the most-current Docker version. The version shipped with CentOS 7 in the repo as I write this post, is “docker-1.3.2-4.el7.centos.x86_64”. You want to be using something more current, and 1.4 is the latest. To fetch that (and preserve your existing version), run the following:
$ su -
# cd /bin && mv /bin/docker /bin/docker.el7
# wget https://get.docker.com/builds/Linux/x86_64/docker-latest -O docker
# systemctl restart docker
# exit
$
Now you should have a working Docker with the right version (current). You can verify that:
$ sudo docker version
Client version: 1.4.1
Client API version: 1.16
Go version (client): go1.3.3
Git commit (client): 5bc2ff8
OS/Arch (client): linux/amd64
Server version: 1.4.1
Server API version: 1.16
Go version (server): go1.3.3
Git commit (server): 5bc2ff8
- So far, so good! Now we need to make sure firewalld has a rule to permit this port to be exposed for external connections:
$ sudo firewall-cmd --zone=public --add-port=4243/tcp --permanent
$ sudo firewall-cmd --reload
success
You can verify that this new rule was added, by looking at /etc/firewalld/zones/public.xml, which should now have a line that looks like this:
<port protocol="tcp" port="4243"/>
- Now let’s reconfigure Docker to expose the API to external client connections, by making sure the OPTIONS line in /etc/sysconfig/docker looks like this (note the portion in bold):
OPTIONS=--selinux-enabled -H fd:// -H tcp://0.0.0.0:4243
- Restart the Docker service to enact the API on that port (if successful, you will not see any output):
sudo systemctl restart docker
- To test the port locally, install telnet and then try telnet’ing to the port on localhost:
$ sudo telnet localhost 4243
Trying ::1...
Connected to localhost.
Escape character is '^]'.

HTTP/1.1 400 Bad Request

Connection closed by foreign host.
All looks good so far!
- Lastly, install DockerDroid and configure it to talk to your server on this port:

Now you should be able to use DockerDroid to navigate your Images, Containers and API.
Good luck!
Tuesday Tip: rsync Command to Include Only Specific Files
 I find myself using rsync a lot, both for moving data around, for creating backups using rsnapshot (yes, even on Windows!) and for mirroring public Open Source projects and repositories.
I used to create all sorts of filters and scripts to make sure I was getting only the files I wanted and needed, but I found a better way, and it wasn’t exactly intuitive.
--include="*/" --include="*.iso" --exclude="*"
In order for this to work as intended, the “include” patterns have to come before the “excludes”. This is because the very first pattern that matches is the one that gets evaluated. If your intended filename matches the specified exclude pattern first, it gets excluded from the scope.
When dealing with a very large, possibly unknown remote directory structure, you either have to include all of the remote subdirectories individually like this:
--include="/opt" --include="/var" --include="/home"
Or you can use the following syntax to include all directories (not files) in the scope:
--include="*/"
Once you’ve included every directory below your target scope, you can pass the filespec you’re interested in (in this case, I wanted every bootable ISO file from a remote CentOS mirror), and then you exclude everything else that doesn’t match that filespec. It looks like this:
1.) Include every directory:
--include="*/"
2.) Include *.iso as your intended matching scope
--include="*.iso"
3.) Exclude everything else
--exclude="*"
That’s the magic sauce.
Some of these options and the order they appear in may seem very non-intuitive, so please read the rsync documentation carefully paying specific attention to the “EXCLUDE PATTERNS” section of the docs.
When in doubt, always use “–dry-run –stats” to check your work before copying or modifying any data.
Measure twice, cut once.
HOWTO: Run boot2docker in VMware Fusion and ESXi with Shipyard to Manage Your Containers
 This took me awhile to piece together, and I had to go direct to the maintainers of several of these components to get clarity on why some things worked, while others did not, even following the explicit instructions. Here, I present the 100% working HOWTO:
I started with a post I found written by someone on the boot2docker project page, describing how to get this working in VMware. But he missed some crucial steps, and the syntax is wrong. Also, Shipyard has gone to a new version, and the method of starting the containers is very different from the steps posted.
Creating the boot2docker VM Instance
First, we need to create a VM inside VMware Fusion and/or ESXi. If you’re using VMware Workstation, the steps are roughly the same, but the screenshots may differ slightly.
You’ll create a new VM, and add two NICs and a single IDE HDD to the VM. Something like 10GB should be fine to hold all of your containers, build scripts and any other persistent data you might need. Follow the screenshots below for some specifics and details. There are a few subtle tweaks you’ll need to maximize your boot2docker VM.
Read the rest of this entry »
