
HOWTO: Run boot2docker in VMware Fusion and ESXi with Shipyard to Manage Your Containers
 This took me awhile to piece together, and I had to go direct to the maintainers of several of these components to get clarity on why some things worked, while others did not, even following the explicit instructions. Here, I present the 100% working HOWTO:
I started with a post I found written by someone on the boot2docker project page, describing how to get this working in VMware. But he missed some crucial steps, and the syntax is wrong. Also, Shipyard has gone to a new version, and the method of starting the containers is very different from the steps posted.
Creating the boot2docker VM Instance
First, we need to create a VM inside VMware Fusion and/or ESXi. If you’re using VMware Workstation, the steps are roughly the same, but the screenshots may differ slightly.
You’ll create a new VM, and add two NICs and a single IDE HDD to the VM. Something like 10GB should be fine to hold all of your containers, build scripts and any other persistent data you might need. Follow the screenshots below for some specifics and details. There are a few subtle tweaks you’ll need to maximize your boot2docker VM.
-
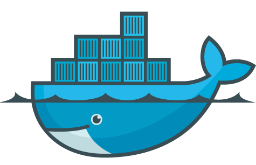
Create a custom VM, set it as “Other Linux, 64-bit”, rename it to something meaningful, as shown here:
-
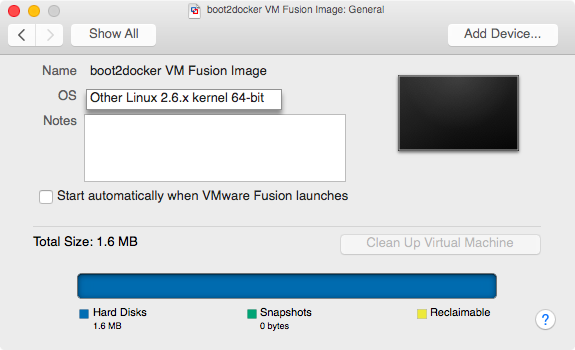
Attach your freshly downloaded boot2docker ISO image to that custom VM. Make sure you change the SCSI to IDE for the Bus Type and that you set the drive to “On”, so it’s enabled and can be booted from.
-
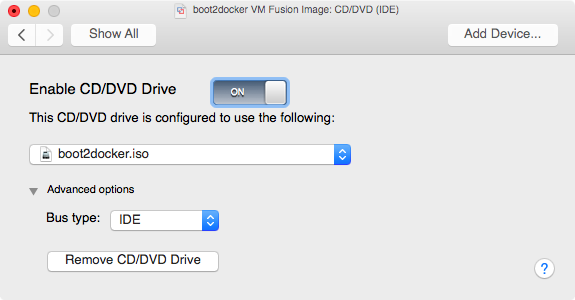
Under “Startup Disk” options, you want to make sure you choose the CD as the primary boot device, or your VM will just hang on startup, not having anything to boot from:
-
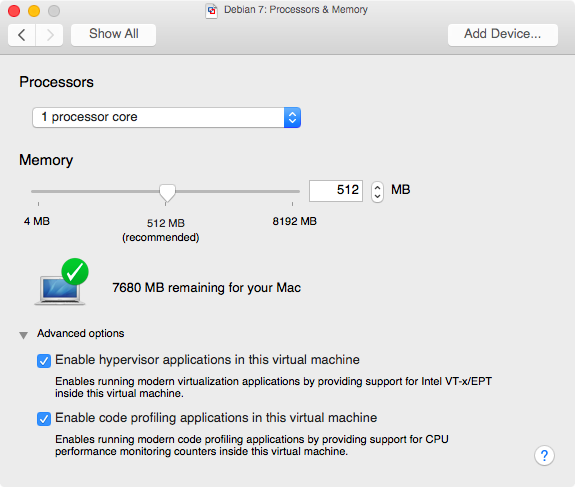
These tweaks may not be necessary, but I do them anyway. Open up the Advanced Options dialog and check the two boxes shown below:
-
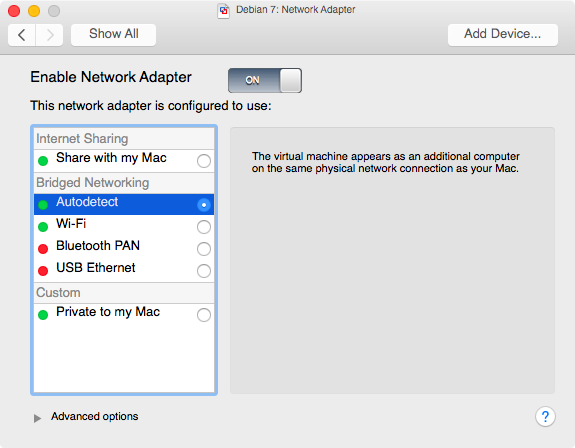
When you add the NICs (Network Adapters) to this VM, make sure you choose “Autodetect” as shown below, so the networks that boot2docker gets are from the same physical network as your host machine.
If you take the default “Share with my Mac” option, your boot2docker VM will get two IPs on the private vmnet NAT network, which may not be what you want, if you want to access the containers from other hosts inside your LAN.
-
Back on the main VM options, under “Advanced”, you’ll want to tweak some of the options as shown here, to disable debug logging (for performance) and enable disk buffering:
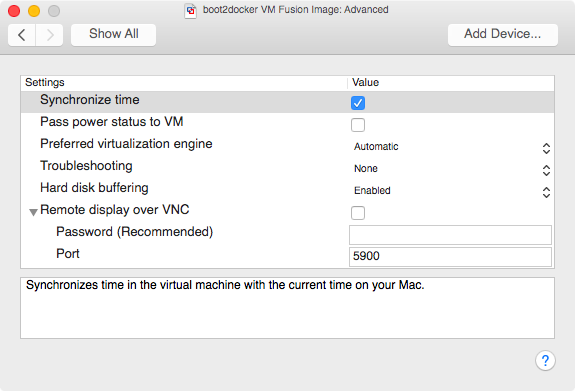
This should do it for tweaks for now. Play around with the options and see if there’s more you can twiddle to make things work better in your own personal environment.
Now let’s boot this VM and start configuring it!
Boot and Configure Your New boot2docker VM Instance
-
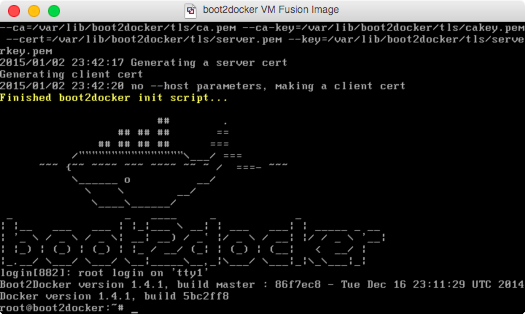
Once you boot your VM, after a few moments you’ll be at a root prompt that looks like this:
- It’s easier to cut and paste if you’re logged into the boot2docker instance over SSH. That’s how I manage almost all of my machines. From the booted VM run the following command and take note of the IP address that you see there. You’ll see something that looks like this:
docker@boot2docker:~$ /sbin/ifconfig eth0
eth0      Link encap:Ethernet  HWaddr 00:0C:29:29:BF:12
          inet addr:10.0.1.108  Bcast:10.0.1.255  Mask:255.255.255.0
          inet6 addr: fe80::20c:29ff:fe29:bf12/64 Scope:Link
          UP BROADCAST RUNNING MULTICAST  MTU:1500  Metric:1
          RX packets:16423 errors:0 dropped:0 overruns:0 frame:0
          TX packets:8032 errors:0 dropped:0 overruns:0 carrier:0
          collisions:0 txqueuelen:1000
          RX bytes:21927572 (20.9 MiB)  TX bytes:563779 (550.5 KiB)
          Interrupt:19 Base address:0x2000
Open a terminal on your Mac or host machine, and SSH in as follows:
$ ssh docker@10.0.1.108 docker@10.0.1.108's password: ## . ## ## ## == ## ## ## ## === /""""""""""""""""\___/ === ~~~ {~~ ~~~~ ~~~ ~~~~ ~~ ~ / ===- ~~~ \______ o __/ \ \ __/ \____\______/ _ _ ____ _ _ | |__ ___ ___ | |_|___ \ __| | ___ ___| | _____ _ __ | '_ \ / _ \ / _ \| __| __) / _` |/ _ \ / __| |/ / _ \ '__| | |_) | (_) | (_) | |_ / __/ (_| | (_) | (__| < __/ | |_.__/ \___/ \___/ \__|_____\__,_|\___/ \___|_|\_\___|_| Boot2Docker version 1.4.1, build master : 86f7ec8 - Tue Dec 16 23:11:29 UTC 2014 Docker version 1.4.1, build 5bc2ff8 -
Now you're SSH'd into your boot2docker VM. You'll want to configure persistant storage from here using fdisk(1). Let's do that.
docker@boot2docker:~$ fdisk -l /dev/sd?

Disk /dev/sda: 10.7 GB, 10737418240 bytes
255 heads, 63 sectors/track, 1305 cylinders
Units = cylinders of 16065 * 512 = 8225280 bytes

Disk /dev/sda doesn't contain a valid partition table
fdisk: can't open '/dev/sdb': No such device or address
From here, we can see that the disk is available to the VM, but not yet partitioned. Let's carve it up into a single partition for boot2docker data storage. The volume label we set is significant to boot2docker, so it can mount it when the ISO boots, presenting persistent storage to the booted VM.
docker@boot2docker:~$ sudo fdisk /dev/sda

The number of cylinders for this disk is set to 1305.
There is nothing wrong with that, but this is larger than 1024,
and could in certain setups cause problems with:
1) software that runs at boot time (e.g., old versions of LILO)
2) booting and partitioning software from other OSs
   (e.g., DOS FDISK, OS/2 FDISK)

Command (m for help): n
Command action
   e   extended
   p   primary partition (1-4)
p
Partition number (1-4): 1
First cylinder (1-1305, default 1): Using default value 1
Last cylinder or +size or +sizeM or +sizeK (1-1305, default 1305): Using default value 1305

Command (m for help): w
The partition table has been altered.
Calling ioctl() to re-read partition table
-
Now we have a single partition on the disk we can use to hold boot2docker images, keys, certificates and other scratch data. Let's format it:
docker@boot2docker:~$ sudo mkfs.ext4 -L boot2docker-data /dev/sda1
mke2fs 1.42.7 (21-Jan-2013)
Filesystem label=boot2docker-data
OS type: Linux
Block size=4096 (log=2)
Fragment size=4096 (log=2)
Stride=0 blocks, Stripe width=0 blocks
655360 inodes, 2620595 blocks
131029 blocks (5.00%) reserved for the super user
First data block=0
Maximum filesystem blocks=2684354560
80 block groups
32768 blocks per group, 32768 fragments per group
8192 inodes per group
Superblock backups stored on blocks:
	32768, 98304, 163840, 229376, 294912, 819200, 884736, 1605632

Allocating group tables: done
Writing inode tables: done
Creating journal (32768 blocks): done
Writing superblocks and filesystem accounting information: done
-
With the disk carved and formatted, ready for boot2docker to write to it, we have to reboot, so boot2docker can mount it. When the VM boots now, it will detect the disk via it's new label (boot2docker-data) and mount it under /mnt/sdXY/ and then symlink /var/lib/docker and /var/lib/boot2docker into the mounted storage, so anything that writes to those locations, will land on our persistent storage. Neat, right? Go ahead and reboot your VM now. I'll wait until you come back.
-
Once rebooted, you can SSH back into the VM as you did before, using the same IP address. You may get a warning that the SSH key has changed, as shown here:
$ ssh docker@10.0.1.108
@@@@@@@@@@@@@@@@@@@@@@@@@@@@@@@@@@@@@@@@@@@@@@@@@@@@@@@@@@@
@    WARNING: REMOTE HOST IDENTIFICATION HAS CHANGED!     @
@@@@@@@@@@@@@@@@@@@@@@@@@@@@@@@@@@@@@@@@@@@@@@@@@@@@@@@@@@@
IT IS POSSIBLE THAT SOMEONE IS DOING SOMETHING NASTY!
Someone could be eavesdropping on you right now (man-in-the-middle attack)!
It is also possible that a host key has just been changed.
The fingerprint for the RSA key sent by the remote host is
55:88:c5:4a:a3:08:dd:c8:31:04:ed:84:7a:fe:97:99.
Please contact your system administrator.
Add correct host key in /Users/dd/.ssh/known_hosts to get rid of this message.
Offending RSA key in /Users/dd/.ssh/known_hosts:3
RSA host key for 10.0.1.108 has changed and you have requested strict checking.
Host key verification failed.
Because boot2docker generates new SSH keys at each boot when running without persistent storage, this is the last time you should see this message. Any subsequent reboots will use the same keys already generated, which are now stored our persistent storage volume. Just edit your known_hosts file on the client side and remove the key indicated from the file and try again.
Once SSH'd back in, you'll now see that the new disk is mounted and symlinked where boot2docker can find it:
docker@boot2docker:~$ mount | grep sda
/dev/sda1 on /mnt/sda1 type ext4 (rw,relatime,data=ordered)
/dev/sda1 on /mnt/sda1/var/lib/docker/aufs type ext4 (rw,relatime,data=ordered)
-
Now let's make sure Docker works as expected from here:
docker@boot2docker:~$ docker version
Client version: 1.4.1
Client API version: 1.16
Go version (client): go1.3.3
Git commit (client): 5bc2ff8
OS/Arch (client): linux/amd64
Server version: 1.4.1
Server API version: 1.16
Go version (server): go1.3.3
Git commit (server): 5bc2ff8
Pulling a simplistic base image should give us an idea if Docker is configured and working, and that we can run containers from images.
docker@boot2docker:~$ docker run phusion/baseimage echo "Hello World!"
Unable to find image 'phusion/baseimage:latest' locally
Pulling repository phusion/baseimage
cf39b476aeec: Download complete
511136ea3c5a: Download complete
b18d0a2076a1: Download complete
67b66f26d423: Download complete
25c4824a5268: Download complete
8b1c48305638: Download complete
[...]
Status: Downloaded newer image for phusion/baseimage:latest
Hello World!
Lets see if that container exited cleanly and properly:
docker@boot2docker:~$ docker ps -a | less -S
CONTAINER ID        IMAGE                      COMMAND                CREATED             STATUS                     PORTS
7f79659a91ab        phusion/baseimage:0.9.15   "echo 'Hello World!'   3 minutes ago       Exited (0) 3 minutes ago
All looks good. Let's install and configure Shipyard to manage our containers from a GUI:
Install and Configure Shipyard
Shipyard is project that provides a GUI and CLI based tool that gives you the ability to manage Docker resources including containers, hosts and more.
Shipyard is a very slick tool you can use to manage your entire Docker environment, from cluster down to container and logs. It comes in several pieces, and each one has to be installed and configured separately. It is by-far the most complex piece of this HOWTO, so please follow carefully!
-
First step is to download Shipyard images and get them spun up. You'll need 1.) a Data Volume instance (storage), 2.) a database (RethinkDB) and 3.) a controller service.
docker@boot2docker:~$ docker run -it -d --name shipyard-rethinkdb-data --entrypoint /bin/bash shipyard/rethinkdb -l
Unable to find image 'shipyard/rethinkdb:latest' locally
Pulling repository shipyard/rethinkdb
3321c25168cd: Download complete
511136ea3c5a: Download complete
134b5dc84bc7: Download complete
692254366b1a: Download complete
ed98671f0531: Download complete
bffdbd3bc4b2: Download complete
[...]
Status: Downloaded newer image for shipyard/rethinkdb:latest
75b3cbadbbd554a48a6c293a3f6910582c8398db2e74d88ef3f256edf0edf126
Now we have a shipyard storage volume running from that image. We can verify that with a command we saw previously: docker ps
docker@boot2docker:~$ docker ps -a | less -S
CONTAINER ID        IMAGE                       COMMAND             CREATED              STATUS              PORTS                            NAMES
75b3cbadbbd5        shipyard/rethinkdb:latest   "/bin/bash -l"      About a minute ago   Up About a minute   29015/tcp, 8080/tcp, 28015/tcp   shipyard-rethinkdb-data
-
Next we want to run the RethinkDB instance in its own container. Remember, Docker containers run one, and only one command.
docker@boot2docker:~$ docker run -it -P -d --name shipyard-rethinkdb --volumes-from shipyard-rethinkdb-data shipyard/rethinkdb
45ac864ef2d35e8cd62000fe768abc216aba31bbaa3b036efe52d2082c270562
Now we can verify that new database is running in its own container:
docker@boot2docker:~$ docker ps
CONTAINER ID        IMAGE                       COMMAND                CREATED             STATUS              PORTS                                                                         NAMES
45ac864ef2d3        shipyard/rethinkdb:latest   "/usr/bin/rethinkdb    52 seconds ago      Up 51 seconds       0.0.0.0:49156->28015/tcp, 0.0.0.0:49157->29015/tcp, 0.0.0.0:49158->8080/tcp   shipyard-rethinkdb
75b3cbadbbd5        shipyard/rethinkdb:latest   "/bin/bash -l"         6 minutes ago       Up 6 minutes        28015/tcp, 29015/tcp, 8080/tcp                                                shipyard-rethinkdb-data
-
Starting the Shipyard controller is just as simple:
docker@boot2docker:~$ docker run -it -p 8080:8080 -d --name shipyard --link shipyard-rethinkdb:rethinkdb shipyard/shipyard
Unable to find image 'shipyard/shipyard:latest' locally
Pulling repository shipyard/shipyard
6b1bc5c4565f: Download complete
511136ea3c5a: Download complete
16386e29a1f4: Download complete
835c4d274060: Download complete
f85e239608f8: Download complete
a097d002a51c: Download complete
39630470ad12: Download complete
d4bd0e0fa279: Download complete
Status: Downloaded newer image for shipyard/shipyard:latest
baecfbf130a6b44745512da6eac68f65f97c6b94613f032961079532ff095f70
-
The last container we need to start is the CLI container, so we can use that CLI (via the API) to interact with the Shipyard service, along with the web UI itself:
docker@boot2docker:~$ docker run -it shipyard/shipyard-cli
Unable to find image 'shipyard/shipyard-cli:latest' locally
Pulling repository shipyard/shipyard-cli
b73f9452c2ff: Download complete
511136ea3c5a: Download complete
16386e29a1f4: Download complete
835c4d274060: Download complete
822b564bccc7: Download complete
d021daf25fb3: Download complete
c2dfcd48a7c7: Download complete
6c27e998c8b0: Download complete
6f66a854f309: Download complete
d743234d68d6: Download complete
Status: Downloaded newer image for shipyard/shipyard-cli:latest
shipyard cli>
We can test that the CLI works by logging into our new controller instance with it (username "admin", password "shipyard"). Remember that host IP we used before to SSH into the boot2docker instance? We'll use it again here:
shipyard cli> shipyard login
URL: http://10.0.1.108:8080
Username: admin
Password:
shipyard cli>
You can also validate that the login works by going to that same URL in a browser. If you do, you should now see a purty login page:
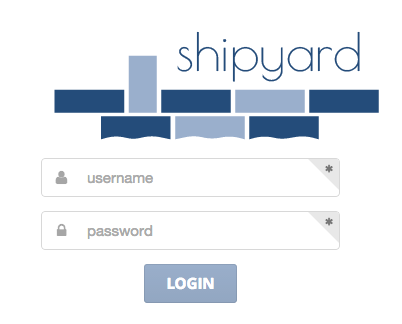
-
Let's configure an "Engine", so Shipyard knows which host to start managing. At the time of this blog post, there's an issue creating an Engine using the API, and the main developer knows about it. We're going to do it with the web interface.
As with the CLI test, go to your browser and log into Shipyard with the username of "admin" and the password of "shipyard". You'll now see a web interface that has a few tabs and options on it.
- Click on the "Engines" tab here, and then on "+ Add".
- Name your host with something meaningful, it's just a tag. I called mine "Primary".
- The Address should be https://your-host-ip:2376
- The next three fields are where you put your SSL keys. You can find these on your host, inside /home/docker/.docker/, named cert.pem, key.pem and ca.pem. You'll need to cat(1) these in your open SSH session and cut and paste them into the form fields as below:
- Copy the text from /home/docker/.docker/cert.pem into the “SSL Certificate†form field
- Copy the text from /home/docker/.docker/key.pem into the “SSL Key†form field
- Copy the text from /home/docker/.docker/ca.pem into the “CA Certificate†form field
- Click “Addâ€
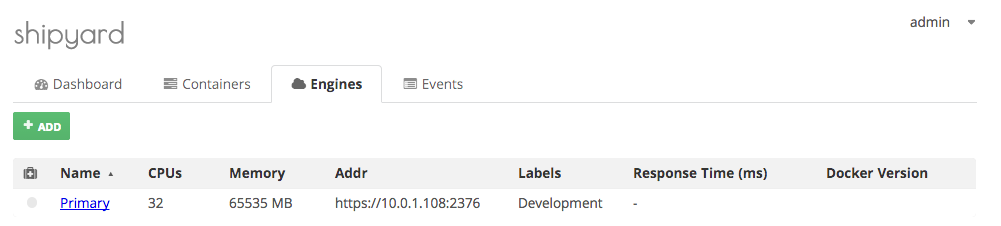
Now you should have a working "Engine" configured, which looks like this:
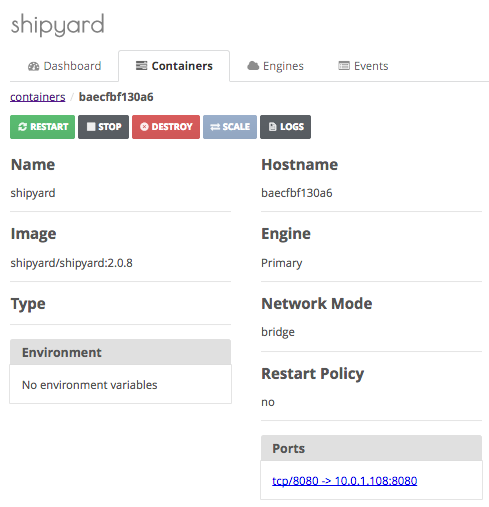
If you click on the "Containers" tab in the web interface, you'll now see your running containers on that Docker host:

Clicking on any of their IDs will give you extra options and details you can use to manage them:
That's it, you're done! Good luck and have fun with Docker!