HOWTO: Configure XChat Azure on OS X to connect to Freenode using SASL + Tor
Tags: Apple, Encryption, irc, Open Source, OSX, Tor
With all the recent news about the NSA, Prism Surveillance Program and the US Federal Government actively spying on its citizens without cause, I decided to update the detailed HOWTO I posted in early 2011 describing how to connect to Freenode using Xchat (on Linux/FreeBSD) using SASL + Tor. The process is relatively simple, but there is a simplified version now, and it works seamlessly with XChat Azure on OS X, as well as Linux, without having to compile any plugins using GCC.
A win, win, all around! Let’s get started! (click the images below to zoom to full size)
Installing Tor on Your OS X Machine
Configuring Browsers to use Tor (to validate Tor functionality)
Configuring XChat Azure to Speak Through the Tor Proxy
Adding a Freenode Tor Network Server to XChat Azure
Installing the SASL Perl Script to Manage SASL Connections
Connecting to Freenode using SASL + Tor
Installing Tor on Your OS X Machine
To get Tor running on your OS X machine, you’ll need to install it. There are several ways to do this, but the easiest is to use the TorBrowser Bundle, package for OS X.
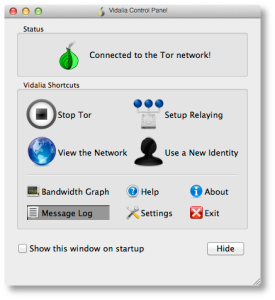
It’s straightforward to install that, just download and install it as you would any other OS X software. Once you’ve got it installed, you’ll see the main Control Panel, shown here:
If you see the green “onion” icon in your Finder menubar at the top of your screen, you’re up and running and connected to the Tor network. You can check this further by looking at the “Bandwidth Graph” to see if bytes are actually flowing across your connection.
Configuring Browsers to use Tor (to validate Tor functionality)
Now you’ve got Tor running, you’ll need to verify that it actually works and that you can send and receive traffic over it.
Open your browser of choice (I use Firefox but any browser will work) and find the configuration option in your browser’s Preferences pane for setting a “Proxy Server”. You’ll want to point it to a proxy server address of 127.0.0.1, port 9150, as shown below.
The reason this isn’t the “standard” Tor port of 9050, is because the Tor Browser Bundle project wanted to ensure that they didn’t collide with a system-installed version of Tor, so they went with 9150 instead.
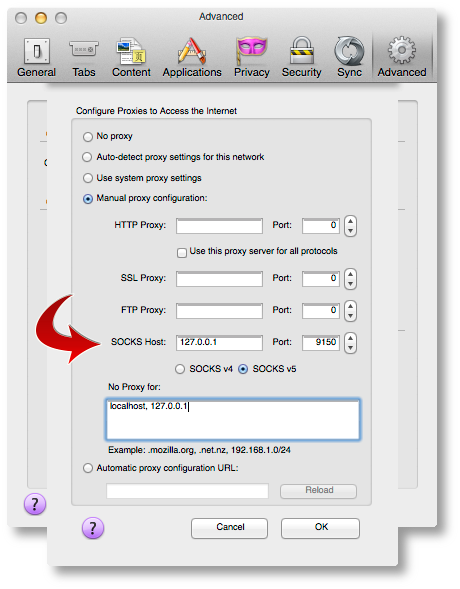
Once you’ve got that configured, point your browser to the Tor Check Site. You should see output that looks like this:
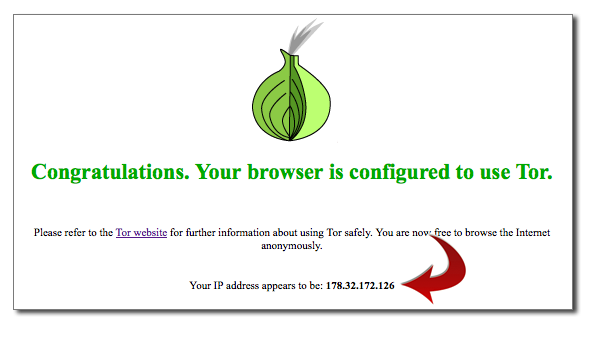
If you’ve gotten this far, you’re almost there! If you see an error message or cannot connect to the Proxy, make sure Tor Browser is running, that it’s showing ‘green’ in your menubar, and that you’re using port 9150, not 9050 in your Proxy port configuration.
Configuring XChat Azure to Speak Through the Tor Proxy
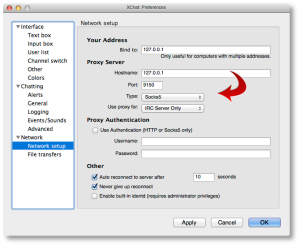
Now let’s configure XChat Azure. Open up your XChat Preferences (Command-,) and go to the “Network setup” page. Here is where you’ll configure similar parameters we just used for Firefox above to permit XChat Azure to communicate across Tor.
Configure it to look like the following values:
Now ALL of your networks will attempt to use Tor, which may not be what you want. We’ll go over that in a moment, so you can exclude (“bypass”) the proxy for public networks.
Adding a Freenode Tor Network Server to XChat Azure
To add a new Network in XChat Azure, you’ll want to go to “File => Network List”, or use Command-S. You’ll see a default network list here.
Click the [+] sign in the lower-left corner to add a new network. You’ll name this “Freenode_Tor” or something similar. Don’t put spaces in the name, this is important.
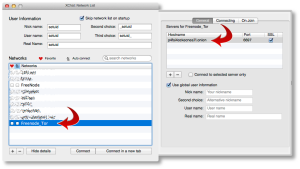
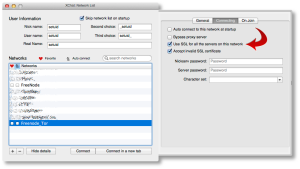
When you add this network, you’ll want to click on “Show Details” and configure it to look similar to the following two screenshots.
The first tab, you’ll want to double-click the server name line and add a server with the name:
p4fsi4ockecnea7l.onion
And the port:
6697
Make sure you also check the “SSL” box there. This is the SSL port for Freenode servers.
On the second tab, you’ll want to check the two boxes shown. If you want to reject invalid SSL certs (not a bad idea), uncheck that second box.
You’ll also see a checkbox that says “Bypass proxy server”. You’ll want to check that box for all other non-Tor networks, but not this one. We actually want to use the proxy server here, so leave it unchecked.
Installing the SASL Perl Script to Manage SASL Connections
Next, we need to install a small script that will be used to manage our SASL connections under XChat Azure. You can find several of those on the Freenode SASL page. I haven’t tested any of the scripts there except the Perl script, so we’re going to use that one for this HOWTO.
Download that Perl script using whatever tool you use, and put it into your $USER/.xchat2/ directory using iTerm or Finder.
Now when you start up XChat Azure, you should see something like this at the top:
[07:58]   Perl interface loaded
[07:58]   Python interface loaded
[07:58]   SASL: auth loaded from /Users/setuid/Library/Containers/org.3rddev.xchatazure/Data/Library/Application Support/XChat Azure/sasl.auth
We need to make sure we set some auth values while this script is loaded. To do that, you’ll run the following command inside the XChat Azure text box:
/sasl set Freenode_Tor <username> <password> PLAIN
/sasl save
So if your Freenode username was ‘foobar’ with a Freenode NickServ password of ‘MyS3cretPas5word’, you’d type:
/sasl set Freenode_Tor foobar MyS3cretPas5word PLAIN
/sasl save
Now your SASL authentication is saved, and you’re ready to connect!
Connecting to Freenode using SASL + Tor
Using Command-S (or File => Network List from the app menus), highlight your “Freenode_Tor” network and click the “Connect” button. It will take a few moments, but you should see something that looks like the following:
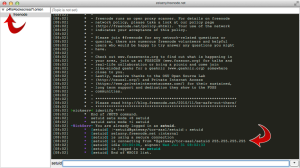
If you see that, you’re all set! Now you can join any channels you wish and be sure that your IRC communications are being anonymized behind the Tor network.
Note: Sometimes you’ll see an error that looks like the one below, when you randomly reach a Freenode server with a wildcard SSL cert.
If you run into this, just close XChat down and restart, or attempt to reconnect to the “Freenode_Tor” network again until you get a proper server in the randomized list.
That’s it, good luck!

