
Archive for August, 2013
HOWTO: Properly install native VMware Tools in pfSense 2.0.3 (FreeBSD 8.1)
Tags: FreeBSD, Open Source, security, VMware![]() If you’re anything like me, you take security seriously. With all the recent news about the NSA and Prism and over-reach of surveillance, you’ll take this very seriously. I run several layers of nested firewalls, VPNs and other layers of security at my office.
If you’re anything like me, you take security seriously. With all the recent news about the NSA and Prism and over-reach of surveillance, you’ll take this very seriously. I run several layers of nested firewalls, VPNs and other layers of security at my office.
One of the things I run in a virtualized environment (VMware ESXi), is pfSense. pfSense ibs an Open Source firewall distribution based on FreeBSD. It’s very full-featured, has a web-management console, and lots of add-on packages to enhance it’s capabilities.
“pfSense is a free, open source customized distribution of FreeBSD tailored for use as a firewall and router. In addition to being a powerful, flexible firewalling and routing platform, it includes a long list of related features and a package system allowing further expandability without adding bloat and potential security vulnerabilities to the base distribution. pfSense is a popular project with more than 1 million downloads since its inception, and proven in countless installations ranging from small home networks protecting a single computer to large corporations, universities and other organizations protecting thousands of network devices.”
pfSense is currently using FreeBSD 8.1, which has been EOL’d by the BSD team last July. The pfSense team is diligently working on new versions, but they’re not out yet. For now, you can continue to use FreeBSD 8.1.
If you run pfSense inside a VM, you’ll want and need to get the base VMware tools installed within it, but that process isn’t straightforward. You want to make sure you install the VMware Tools dependencies and core modules before installing anything else, so you don’t get into package conflicts and other troubles.
I’ve been writing a lot of posts about VMware lately, because I’m finding myself using it more and more, and I’m teaching myself how to use it in a higher-volume capacity.
Here’s how to install pfSense and immedaitely get the correct version of VMware Tools (from VMware itself, not the Open Source ‘open-vm-toolbox‘ or ‘vmfs-tools’) installed within it.
Let’s get started (click any images below to view them full-size):
- First, create a new VM and attach your pfSense ISO to it, using whatever mechanism your hypervisor of choice provides. Boot it, and install pfSense into your VM. This part is easy and straightforward.
- Once fully installed, shut down (power off) your VM, and detach the CD, so it no longer boots, but keep the CD/DVD device configured for your VM, you’ll use that again in a moment.
- Boot your pfSense VM back up, configure networking (in my case the NIC was em0), and you’ll get to a screen that looks something like this:
(click image to view full size)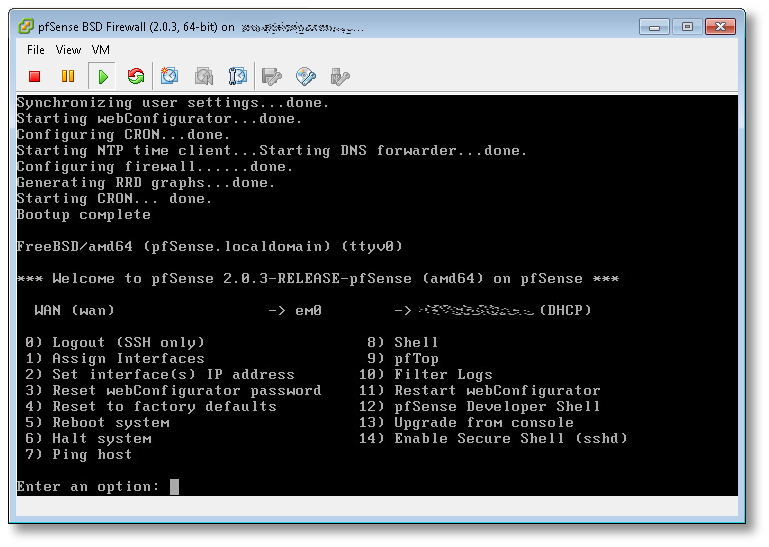
- From here, the first thing you want to do, is change your root password! Hit (8) to drop to a shell, and use the standard passwd(1) utility. Once changed, hit ^D (Control-D) to exit and return to the pfSense main menu.
- Next, we’re going to start SSHD, so we can log into the VM remotely, and manage it using a normal Windows, Mac or Linux terminal, vs. interacting with it using the VMware ESXi console (as in this example). Hit (14) to enable the SSH shell.
- In the previous screenshot, directly to the left of the (DHCP) part, was the IP of the pfSense server. SSH over to that now, as the root user, using whatever native terminal you prefer.
$ ssh root@192.168.1.50
- Once SSH’d into pfSense remotely, you’ll need to set the PACKAGESITE environment variable, to make sure all core packging tools refer to the 8.1-release tag from the FreeBSD archive site, and not the 8.1-release-p13 that it will try to use by default from the primary site, which will fail, because FreeBSD 8.1 is EOL as I write this.
-
[2.0.3-RELEASE][root@pfSense.localdomain]/root(1): setenv \
PACKAGESITE \
http://ftp-archive.freebsd.org/pub/FreeBSD-Archive/ports/amd64/packages-8.1-release/Latest/
Here’s what will happen if you do not set this variable:
[2.0.3-RELEASE][root@pfSense.localdomain]/root(3): pkg_add -rv wget
looking up ftp.freebsd.org
connecting to ftp.freebsd.org:21
Error: Unable to get ftp://ftp.freebsd.org/pub/FreeBSD/ports/amd64/packages-8.1-release/Latest/wget.tbz:
File unavailable (e.g., file not found, no access)
pkg_add: unable to fetch 'ftp://ftp.freebsd.org/pub/FreeBSD/ports/amd64/packages-8.1-release/Latest/wget.tbz' by URL
pkg_add: 1 package addition(s) failed
Once you set the variable to refer to the archive site, you’ll have success here:
[2.0.3-RELEASE][root@pfSense.localdomain]/root(5): pkg_add -rv wget
looking up ftp-archive.freebsd.org
connecting to ftp-archive.freebsd.org:80
requesting http://ftp-archive.freebsd.org/pub/FreeBSD-Archive/ports/amd64/packages-8.1-release/Latest/wget.tbz
Fetching http://ftp-archive.freebsd.org/pub/FreeBSD-Archive/ports/amd64/packages-8.1-release/Latest/wget.tbz...x +CONTENTS
x +COMMENT
x +DESC
x +MTREE_DIRS
x man/man1/wget.1.gz
x bin/wget
...
- Now we know we can get to the backup/archive site that holds the 8.1 RELEASE packages, let’s get the ones we need to get VMware Tools up and running. We’re going to need two core packages: compat6x-amd64 and perl to be able to run the script and dynamically load the VMware modules at kernel boot.
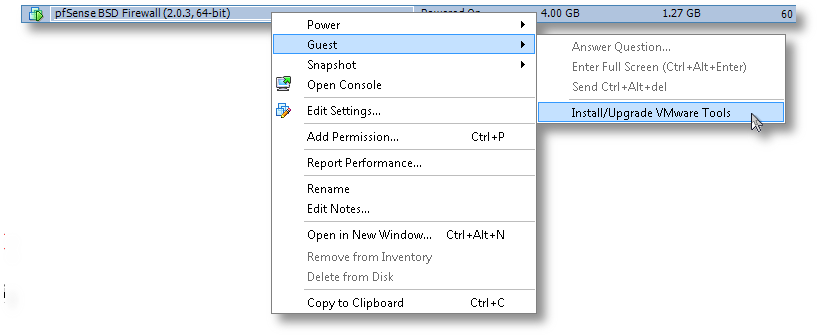
[2.0.3-RELEASE][root@pfSense.localdomain]/root(6): pkg_add -r compat6x-amd64 perl Fetching http://ftp-archive.freebsd.org/pub/FreeBSD-Archive/ports/amd64/packages-8.1-release/Latest/compat6x-amd64.tbz... Done. ******************************************************************************* * * * Do not forget to add COMPAT_FREEBSD6 into * * your kernel configuration (enabled by default). * * * * To configure and recompile your kernel see: * * http://www.freebsd.org/doc/en_US.ISO8859-1/books/handbook/kernelconfig.html * * * ******************************************************************************* Fetching http://ftp-archive.freebsd.org/pub/FreeBSD-Archive/ports/amd64/packages-8.1-release/Latest/perl.tbz... Done. Removing stale symlinks from /usr/bin... Skipping /usr/bin/perl Skipping /usr/bin/perl5 Done. Creating various symlinks in /usr/bin... Symlinking /usr/local/bin/perl5.10.1 to /usr/bin/perl Symlinking /usr/local/bin/perl5.10.1 to /usr/bin/perl5 Done. cd: can't cd to /usr/include Cleaning up /etc/make.conf... Done. Spamming /etc/make.conf... Done. Cleaning up /etc/manpath.config... Done. Spamming /etc/manpath.config... Done. - Now we need to mount the CD ISO for VMware Tools for FreeBSD. This is the step I mentioned earlier and why we needed to keep the CD/DVD device configured for this VM. In ESXi, you’ll need to do that from the console, by right-clicking on the VM, go to Guest and then to “Install VMware Tools”, as shown here:

- Now the drive is mapped to the VM, we need to mount it and access the vmware tarball within:
[2.0.3-RELEASE][root@pfSense.localdomain]/root(8): mkdir /tmp/cdrom/
[2.0.3-RELEASE][root@pfSense.localdomain]/root(9): mount_cd9660 /dev/acd0 /tmp/cdrom/
[2.0.3-RELEASE][root@pfSense.localdomain]/root(10): cd /tmp/cdrom/
[2.0.3-RELEASE][root@pfSense.localdomain]/tmp/cdrom(11): ls -l
total 15030
-r--r--r--  1 root  wheel        29 Mar 23 15:02 manifest.txt
-r--r--r--  1 root  wheel  15390306 Mar 23 15:02 vmware-freebsd-tools.tar.gz
[2.0.3-RELEASE][root@pfSense.localdomain]/tmp/cdrom(12): tar zxvf vmware-freebsd-tools.tar.gz -C /tmp/
- Now we can go into /tmp/vmware-tools-distrib and build the required interfaces for FreeBSD. For the most part, you’ll just accept the defaults to most of the questions. Read them carefully if you think you want something custom for your needs.
[2.0.3-RELEASE][root@pfSense.localdomain]/tmp/vmware-tools-distrib(14): ./vmware-install.pl --clobber-kernel-modules=vmci    \
                  --clobber-kernel-modules=vsock   \
                  --clobber-kernel-modules=vmxnet3 \
                  --clobber-kernel-modules=pvscsi  \
                  --clobber-kernel-modules=vmmemctl
Creating a new VMware Tools installer database using the tar4 format.

Installing VMware Tools.

In which directory do you want to install the binary files?
[/usr/local/bin]

In which directory do you want to install the startup script?
[/usr/local/etc/rc.d]

In which directory do you want to install the daemon files?
[/usr/local/sbin]

In which directory do you want to install the library files?
[/usr/local/lib/vmware-tools]

The path "/usr/local/lib/vmware-tools" does not exist currently. This program
is going to create it, including needed parent directories. Is this what you
want? [yes]

In which directory do you want to install the documentation files?
[/usr/local/share/doc/vmware-tools]

The path "/usr/local/share/doc/vmware-tools" does not exist currently. This
program is going to create it, including needed parent directories. Is this
what you want? [yes]

The installation of VMware Tools 9.0.5 build-1065307 for FreeBSD completed
successfully. You can decide to remove this software from your system at any
time by invoking the following command:
"/usr/local/bin/vmware-uninstall-tools.pl".

Before running VMware Tools for the first time, you need to configure it by
invoking the following command: "/usr/local/bin/vmware-config-tools.pl". Do you
want this program to invoke the command for you now? [yes]

Initializing...


Making sure services for VMware Tools are stopped.

Stopping VMware Tools services in the virtual machine:
   Guest operating system daemon:                                      done


The vmblock enables dragging or copying files between host and guest in a
Fusion or Workstation virtual environment.  Do you wish to enable this feature?
[no]

No X install found.

Starting VMware Tools services in the virtual machine:
   Switching to guest configuration:                                   done
   Guest memory manager:                                               done
   Guest operating system daemon:                                      done
The configuration of VMware Tools 9.0.5 build-1065307 for FreeBSD for this
running kernel completed successfully.

You must restart your X session before any mouse or graphics changes take
effect.

You can now run VMware Tools by invoking "/usr/local/bin/vmware-toolbox-cmd"
from the command line.

Please remember to configure your network by adding:
ifconfig_vxn0="dhcp"
to the /etc/rc.conf file and start the network with:
/etc/netstart
to use the vmxnet interface using DHCP.

Enjoy,

--the VMware team
That’s it. You’ve now got a working VMware Tools install using the native, VMware-provided kit, inside your VM. If you’re running ESXi, you’ll now notice that it correctly reports its version, status and IP back to the console, which was missing before we started.

Good luck!
SOLVED: VMware Tools create_proc_entry Error with vmballoon_procfs_init on Linux Kernel 3.11.0
Another quick VMware Tools patch and fix if you’re using Linux Kernel 3.10 and 3.11.0 (and probably later, until this gets integrated into mainline). This time, if you’re seeing the following error:
Using 2.6.x kernel build system.
make: Entering directory `/tmp/modconfig-CZk9AS/vmmemctl-only'
/usr/bin/make -C /lib/modules/3.11.0-999-generic/build/include/.. SUBDIRS=$PWD SRCROOT=$PWD/. \
	  MODULEBUILDDIR= modules
make[1]: Entering directory `/usr/src/linux-headers-3.11.0-999-generic'
  CC [M]  /tmp/modconfig-CZk9AS/vmmemctl-only/backdoorGcc64.o
  CC [M]  /tmp/modconfig-CZk9AS/vmmemctl-only/os.o
  CC [M]  /tmp/modconfig-CZk9AS/vmmemctl-only/vmballoon.o
/tmp/modconfig-CZk9AS/vmmemctl-only/os.c: In function ‘vmballoon_procfs_init’:
/tmp/modconfig-CZk9AS/vmmemctl-only/os.c:468:4: error: implicit declaration of function ‘create_proc_entry’ [-Werror=implicit-function-declaration]
/tmp/modconfig-CZk9AS/vmmemctl-only/os.c:468:8: warning: assignment makes pointer from integer without a cast [enabled by default]
/tmp/modconfig-CZk9AS/vmmemctl-only/os.c:470:10: error: dereferencing pointer to incomplete type
cc1: some warnings being treated as errors
make[2]: *** [/tmp/modconfig-CZk9AS/vmmemctl-only/os.o] Error 1
make[1]: *** [_module_/tmp/modconfig-CZk9AS/vmmemctl-only] Error 2
make[1]: Leaving directory `/usr/src/linux-headers-3.11.0-999-generic'
make: *** [vmmemctl.ko] Error 2
make: Leaving directory `/tmp/modconfig-CZk9AS/vmmemctl-only'
create_proc_entry() has been deprecated in the latest kernel, replaced with proc_create(), with different accessors. I hacked up a quick-and-dirty patch to fix it:
--- os.c	2013-03-23 10:01:51.000000000 -0400
+++ os.c.patched	2013-08-23 15:00:01.416322190 -0400
@@ -460,15 +460,16 @@
    .release = single_release,
 };

-static void
+static int
 vmballoon_procfs_init(void)
 {
    struct proc_dir_entry *pde;

-   pde = create_proc_entry("vmmemctl", S_IFREG | S_IRUGO, NULL);
-   if (pde) {
-      pde->proc_fops = &vmballoon_proc_fops;
+   pde = proc_create("vmmemctl", 0, NULL, &vmballoon_proc_fops);
+   if (pde == NULL) {
+      return -ENOMEM;
    }
+   return 0;
 }

 static void
Apply this patch to os.c in vmmemctl-only, and you’ll have a clean build:
- Mount your VMware Tools ISO somewhere
# mkdir /tmp/cdrom
# mount /dev/sr0 /tmp/cdrom
- Extract the tarball to /tmp/
# cd /tmp/cdrom
# tar zxvf VMwareTools-9.0.5-1065307.tar.gz -C /tmp/
- Change into the VMware Tools directory that was just created
# cd /tmp/vmware-tools-distrib/
- Patch the tree with the above patch
# tar -xvf lib/modules/source/vmmemctl.tar
# cd lib/modules/source/
# patch -p0 < /tmp/vmware-tools-linux-kernel-3.11.0_vmmemctl_proc_create_vmballoon.patch
- Tar up the patched source so we can rebuild using the new tarball
# tar -cf vmmemctl.tar vmmemctl-only/
- Now let's rebuild it!
# cd /tmp/vmware-tools-distrib/
# ./vmware-install.pl --clobber-kernel-modules=vmci    \
                  --clobber-kernel-modules=vsock   \
                  --clobber-kernel-modules=vmxnet3 \
                  --clobber-kernel-modules=pvscsi  \
                  --clobber-kernel-modules=vmmemctl
And it works, of course!
Using 2.6.x kernel build system.
make: Entering directory `/tmp/modconfig-AssZbT/vmmemctl-only'
/usr/bin/make -C /lib/modules/3.11.0-999-generic/build/include/.. SUBDIRS=$PWD SRCROOT=$PWD/. \
	  MODULEBUILDDIR= modules
make[1]: Entering directory `/usr/src/linux-headers-3.11.0-999-generic'
  CC [M]  /tmp/modconfig-AssZbT/vmmemctl-only/backdoorGcc64.o
  CC [M]  /tmp/modconfig-AssZbT/vmmemctl-only/os.o
  CC [M]  /tmp/modconfig-AssZbT/vmmemctl-only/vmballoon.o
  CC [M]  /tmp/modconfig-AssZbT/vmmemctl-only/vmmemctl.mod.o
  LD [M]  /tmp/modconfig-AssZbT/vmmemctl-only/vmmemctl.o
  Building modules, stage 2.
  MODPOST 1 modules
  CC      /tmp/modconfig-AssZbT/vmmemctl-only/vmmemctl.mod.o
  LD [M]  /tmp/modconfig-AssZbT/vmmemctl-only/vmmemctl.ko
make[1]: Leaving directory `/usr/src/linux-headers-3.11.0-999-generic'
/usr/bin/make -C $PWD SRCROOT=$PWD/. \
	  MODULEBUILDDIR= postbuild
make[1]: Entering directory `/tmp/modconfig-AssZbT/vmmemctl-only'
make[1]: `postbuild' is up to date.
make[1]: Leaving directory `/tmp/modconfig-AssZbT/vmmemctl-only'
cp -f vmmemctl.ko ./../vmmemctl.o
make: Leaving directory `/tmp/modconfig-AssZbT/vmmemctl-only'
Reboot your machine, and you should see something like the following:
$ uname -a
Linux ubuntu-1304-esx-vm 3.11.0-999-generic #201308230405 SMP Fri Aug 23 08:06:47 UTC 2013 x86_64 x86_64 x86_64 GNU/Linux
Good luck!
UPDATE: I tested this against the 3.10.9-200.fc19.x86_64 kernel in Fedora FC19 as well as the 3.11.0-999 kernel in Ubuntu Kernel Mainline, and they both work flawlessly. YMMV, but email me if you have trouble.
Using fdupes to Solve the Data Duplication Problem: I’ve got some dupes!
Well, 11.6 hours later after scanning the NAS with fdupes, I noticed that I’ve got some dupes across my system backups.
# time ./fdupes -R -Sm "/nas/Backups/System Backups/"
2153352 duplicate files (in 717685 sets), occupying 102224.5 megabytes


real	698m15.606s
user	38m20.758s
sys	92m17.217s
That’s 2.1 million duplicate files occupying about 100GB of storage capacity in my backups folder on the NAS. DOH!
Now the real work begins, making sense of what needs to stay and what needs to get tossed in here.
UPDATE: I may give up on fsdupes altogether, and jump to rmlint instead. rmlint is significantly faster, and has more features and functions. Here’s a sample of the output:
# rmlint -t12 -v6 -KY -o "/nas/Backups/System Backups/"
Now scanning "/nas/Backups/System Backups/".. done.
Now in total 3716761 useable file(s) in cache.
Now mergesorting list based on filesize... done.
Now finding easy lint...
Now attempting to find duplicates. This may take a while...
Now removing files with unique sizes from list...109783 item(s) less in list.
Now removing 3917500 empty files / bad links / junk names from list...
Now sorting groups based on their location on the drive... done.
Now doing fingerprints and full checksums..
Now calculation finished.. now writing end of log...
=> In total 3716761 files, whereof 1664491 are duplicate(s)
=> In total  77.66 GB  [83382805000 Bytes] can be removed without dataloss.
SOLVED: VMware Tools __devexit_p Error on Linux Kernel 3.8 and Earlier
If you run a current version of VMware Workstation, VMware Server, ESXi or VMware Fusion with a recent Linux kernel as a guest, you’ve most-likely run into this already.
UPDATE: If you’re using Linux kernel 3.11.0, see my updated blog post for the patch and fix for that revision.
Using 2.6.x kernel build system.
make: Entering directory `/tmp/modconfig-N9AMbf/vmci-only'
/usr/bin/make -C /lib/modules/3.8.0-19-generic/build/include/.. SUBDIRS=$PWD SRCROOT=$PWD/. \
	  MODULEBUILDDIR= modules
make[1]: Entering directory `/usr/src/linux-headers-3.8.0-19-generic'
  CC [M]  /tmp/modconfig-N9AMbf/vmci-only/linux/vmciKernelIf.o
  CC [M]  /tmp/modconfig-N9AMbf/vmci-only/linux/driver.o
/tmp/modconfig-N9AMbf/vmci-only/linux/driver.c:127:4: error: implicit declaration of function ‘__devexit_p’ [-Werror=implicit-function-declaration]
/tmp/modconfig-N9AMbf/vmci-only/linux/driver.c:127:4: error: initializer element is not constant
/tmp/modconfig-N9AMbf/vmci-only/linux/driver.c:127:4: error: (near initialization for ‘vmci_driver.remove’)
/tmp/modconfig-N9AMbf/vmci-only/linux/driver.c:1754:1: error: expected ‘=’, ‘,’, ‘;’, ‘asm’ or ‘__attribute__’ before ‘vmci_probe_device’
/tmp/modconfig-N9AMbf/vmci-only/linux/driver.c:1982:1: error: expected ‘=’, ‘,’, ‘;’, ‘asm’ or ‘__attribute__’ before ‘vmci_remove_device’
/tmp/modconfig-N9AMbf/vmci-only/linux/driver.c:119:12: warning: ‘vmci_probe_device’ used but never defined [enabled by default]
/tmp/modconfig-N9AMbf/vmci-only/linux/driver.c:121:13: warning: ‘vmci_remove_device’ used but never defined [enabled by default]
/tmp/modconfig-N9AMbf/vmci-only/linux/driver.c:2063:1: warning: ‘vmci_interrupt’ defined but not used [-Wunused-function]
/tmp/modconfig-N9AMbf/vmci-only/linux/driver.c:2137:1: warning: ‘vmci_interrupt_bm’ defined but not used [-Wunused-function]
/tmp/modconfig-N9AMbf/vmci-only/linux/driver.c:1717:1: warning: ‘vmci_enable_msix’ defined but not used [-Wunused-function]
cc1: some warnings being treated as errors
make[2]: *** [/tmp/modconfig-N9AMbf/vmci-only/linux/driver.o] Error 1
make[2]: *** Waiting for unfinished jobs....
make[1]: *** [_module_/tmp/modconfig-N9AMbf/vmci-only] Error 2
make[1]: Leaving directory `/usr/src/linux-headers-3.8.0-19-generic'
make: *** [vmci.ko] Error 2
make: Leaving directory `/tmp/modconfig-N9AMbf/vmci-only'
Here’s the patch to fix it. Either cut-and-paste the code snippet below and save it to a file, or you can download it here.
--- vmci-only/linux/driver.c	2012-11-01 16:22:03.000000000 +0900
+++ vmci-only/linux/driver.c.patched	2013-03-01 04:21:08.402942111 +0900
@@ -124,7 +124,11 @@ static struct pci_driver vmci_driver = {
    .name     = "vmci",
    .id_table = vmci_ids,
    .probe = vmci_probe_device,
+#if LINUX_VERSION_CODE < KERNEL_VERSION(3,8,0)
    .remove = __devexit_p(vmci_remove_device),
+#else
+   .remove = vmci_remove_device,
+#endif
 };

 #if LINUX_VERSION_CODE < KERNEL_VERSION(2, 6, 19)
@@ -1750,7 +1754,11 @@ vmci_enable_msix(struct pci_dev *pdev) /
  *-----------------------------------------------------------------------------
  */

-static int __devinit
+#if LINUX_VERSION_CODE < KERNEL_VERSION(3,8,0)
+ static int __devinit
+#else
+ static int
+#endif
 vmci_probe_device(struct pci_dev *pdev,           // IN: vmci PCI device
                   const struct pci_device_id *id) // IN: matching device ID
 {
@@ -1978,7 +1986,11 @@ vmci_probe_device(struct pci_dev *pdev,
  *-----------------------------------------------------------------------------
  */

-static void __devexit
+#if LINUX_VERSION_CODE < KERNEL_VERSION(3,8,0)
+ static void __devexit
+#else
+ static void
+#endif
 vmci_remove_device(struct pci_dev* pdev)
 {
    struct vmci_device *dev = pci_get_drvdata(pdev);
And here's how to apply it and fix the problem:
- Mount your VMware Tools ISO somewhere
# mkdir /tmp/cdrom
# mount /dev/sr0 /tmp/cdrom
- Extract the tarball to /tmp/
# cd /tmp/cdrom
# tar zxvf VMwareTools-9.0.5-1065307.tar.gz -C /tmp/
- Change into the VMware Tools directory that was just created
# cd /tmp/vmware-tools-distrib/
- Patch the tree with the above patch
# cd lib/modules/source/
# tar -xvf vmci.tar
# patch -p0 < /tmp/vmware-tools-linux-kernel-3.8_vmci_pci_hotplug_struct.patch
- Tar up the patched source so we can rebuild using the new tarball
# tar -cf vmci.tar vmci-only/
- Now let's rebuild it!
# cd /tmp/vmware-tools-distrib/
# ./vmware-install.pl
If you've done it right, it will build cleanly:
Using 2.6.x kernel build system.
make: Entering directory `/tmp/modconfig-qs1htj/vmci-only'
/usr/bin/make -C /lib/modules/3.8.0-19-generic/build/include/.. SUBDIRS=$PWD SRCROOT=$PWD/. \
	  MODULEBUILDDIR= modules
make[1]: Entering directory `/usr/src/linux-headers-3.8.0-19-generic'
  CC [M]  /tmp/modconfig-qs1htj/vmci-only/linux/driver.o
  CC [M]  /tmp/modconfig-qs1htj/vmci-only/linux/vmciKernelIf.o
  CC [M]  /tmp/modconfig-qs1htj/vmci-only/common/vmciContext.o
  CC [M]  /tmp/modconfig-qs1htj/vmci-only/common/vmciDatagram.o
  CC [M]  /tmp/modconfig-qs1htj/vmci-only/common/vmciDoorbell.o
  CC [M]  /tmp/modconfig-qs1htj/vmci-only/common/vmciDriver.o
  CC [M]  /tmp/modconfig-qs1htj/vmci-only/common/vmciEvent.o
  CC [M]  /tmp/modconfig-qs1htj/vmci-only/common/vmciHashtable.o
  CC [M]  /tmp/modconfig-qs1htj/vmci-only/common/vmciQPair.o
  CC [M]  /tmp/modconfig-qs1htj/vmci-only/common/vmciQueuePair.o
  CC [M]  /tmp/modconfig-qs1htj/vmci-only/common/vmciResource.o
  CC [M]  /tmp/modconfig-qs1htj/vmci-only/common/vmciRoute.o
  CC [M]  /tmp/modconfig-qs1htj/vmci-only/driverLog.o
  LD [M]  /tmp/modconfig-qs1htj/vmci-only/vmci.o
  Building modules, stage 2.
  MODPOST 1 modules
  CC      /tmp/modconfig-qs1htj/vmci-only/vmci.mod.o
  LD [M]  /tmp/modconfig-qs1htj/vmci-only/vmci.ko
make[1]: Leaving directory `/usr/src/linux-headers-3.8.0-19-generic'
/usr/bin/make -C $PWD SRCROOT=$PWD/. \
	  MODULEBUILDDIR= postbuild
make[1]: Entering directory `/tmp/modconfig-qs1htj/vmci-only'
make[1]: `postbuild' is up to date.
make[1]: Leaving directory `/tmp/modconfig-qs1htj/vmci-only'
cp -f vmci.ko ./../vmci.o
make: Leaving directory `/tmp/modconfig-qs1htj/vmci-only'
That's it! This same patch will work with all previous kernels, as well as those up to the most current 3.8 kernels.
If you're rebuilding your kernel modules using the command vmware-install.pl from the VMware Tools package, remember to use the following, to force a module rebuild:
vmware-install.pl --clobber-kernel-modules=vmci    \
                  --clobber-kernel-modules=vsock   \
                  --clobber-kernel-modules=vmxnet3 \
                  --clobber-kernel-modules=pvscsi  \
                  --clobber-kernel-modules=vmmemctl
Note: I haven't tested Linux kernel 3.10.9 or later yet, but I will shortly and update this post to reflect those results (see here for the fix for the 3.11.0 kernel).
Good luck!
HOWTO: How to Fix a Forgotten Windows Administrator or User Password with Sticky Keys
I pulled some of my very old Windows VMs out of my backup NAS recently with the intent to pull them into ESXi 5.0.1, and manage them there.
But they hadn’t been booted or updated in 4+ years. I thought I remembered the password for the users of these VMs, but none of my obvious choices worked.
I tried getting into it by booting an ISO loaded with chntpw to blank the Administrator password, but that didn’t work. I tried enabling the Guest account and setting a password there (also with chntpw), but that failed as well.
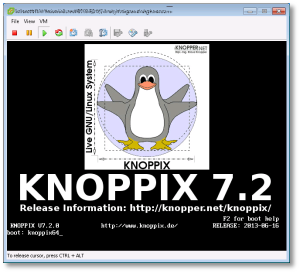
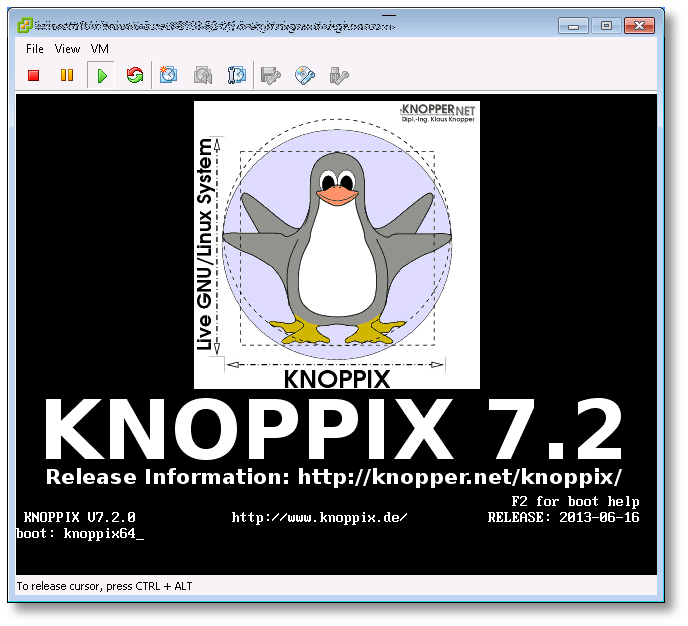
So the next option was to boot up a KNOPPIX DVD in my VM, and follow these steps to reset the password using the “Sticky Keys” trick:
Click image to open full size
- Boot from the KNOPPIX DVD (or Windows PE, Windows RE) in your Windows machine or VM. When you get to the boot prompt, type the following to get a 64-bit environment:
- Let the OS load (graphical or otherwise) and open a shell session (Linux “command prompt”). You’re going to manually mount the Windows drive here, and copy some files around.

- sudo to root
$ sudo su -
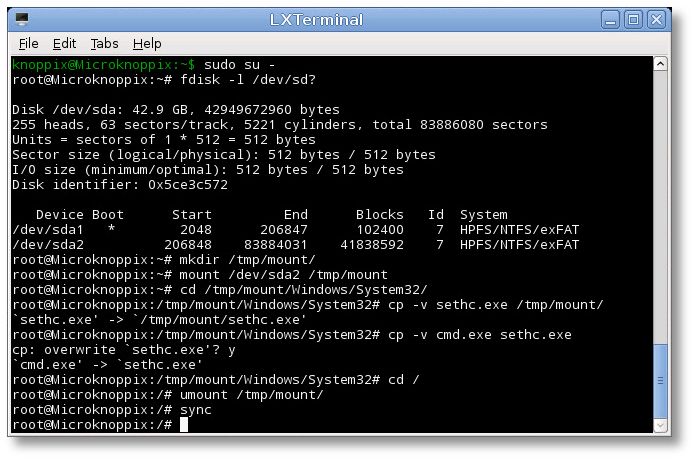
- At the shell, find your Windows drive. It will typically be something like /dev/sda1, as seen from KNOPPIX. The following fdisk(1) command will help you find it:
# fdisk -l /dev/sd?
- Now you’ll need to mount that drive to access it:
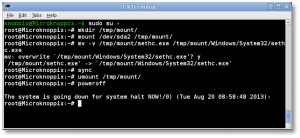
# mkdir /tmp/mount
# mount /dev/sda1 /tmp/mount
# cd /tmp/mount
- Change to the System32 directory under the Windows directory in your temporary mountpoint. Note that depending on your OS version, this may have a different case sensitivity. It may be “Windows”, “WINDOWS”, or “WinNT”.
# cd /tmp/mount/WINDOWS/System32
- Now we can preserve and copy files that will help us get into the machine. In this next step, we’re going to back up a copy of “sethc.exe” to the root of the C:\ drive. This is a backup copy we’ll use to restore later, once we’re able to log into the machine.
# cp -v sethc.exe /tmp/mount/
# cp -v cmd.exe sethc.exe
- Now you can unmount the drive, shut down your machine, disconnect the KNOPPIX DVD and boot back up to the drive natively, back to the point where you forgot the Administrator or user’s password.
# cd /
# umount /tmp/mount/
# sync
# poweroff
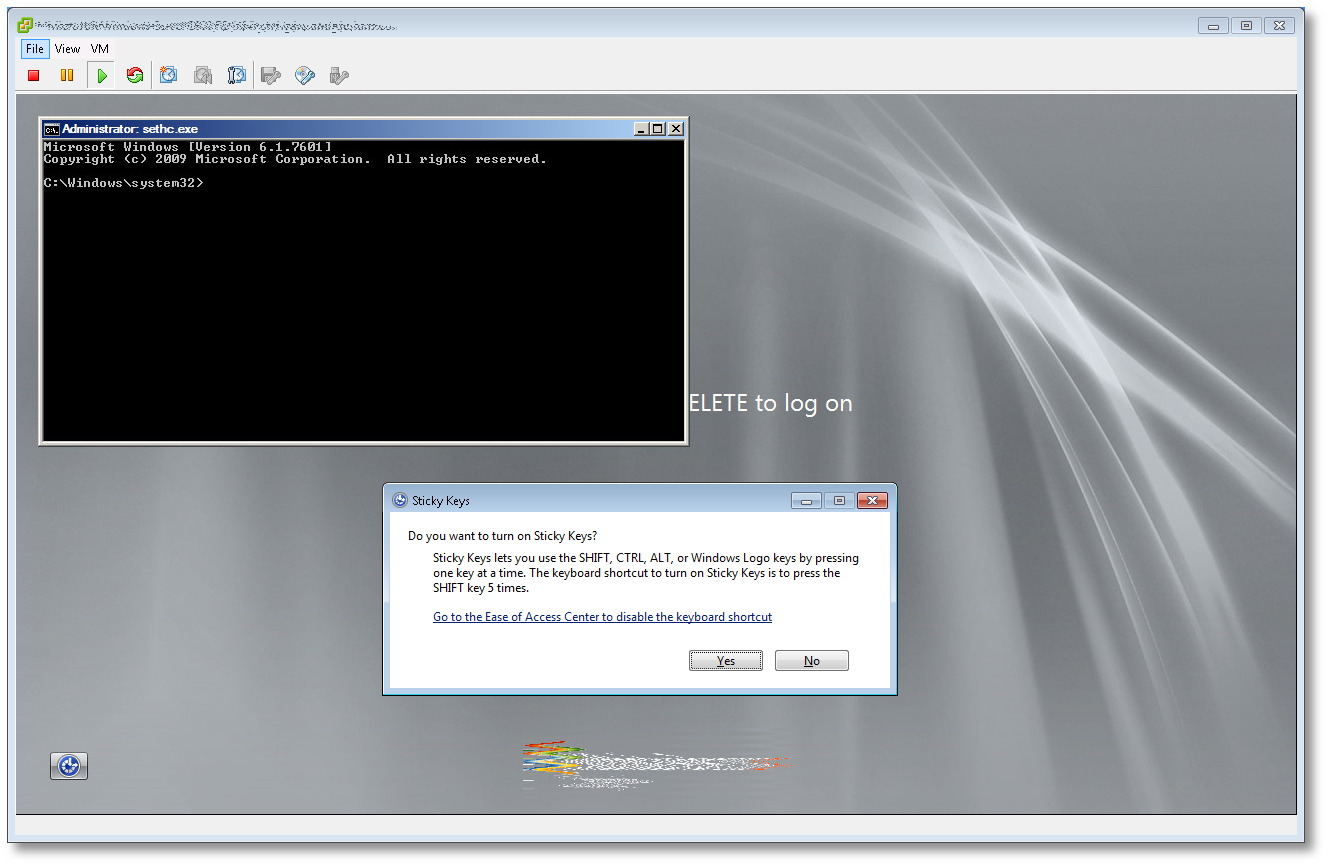
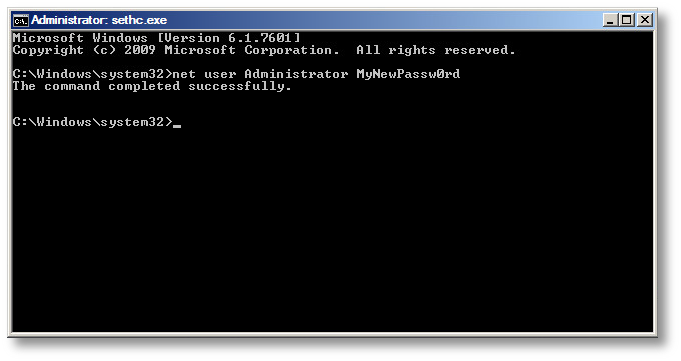
- Once your machine has fully booted, after you see the logon screen, press the SHIFT key five times. Do not hit Ctrl-Alt-Del here, just hit [shift] 5 times in a row. If you’ve done it right, you should see a Windows command prompt where you can enter the following command to reset the Windows password.


C:\Windows\System32\net user Administrator MyNewPassw0rd
Or if you need to just reset a non-Administrator account password, replace ‘Administrator’ in the above command with the appropriate username. If you don’t know your user name, just type the following to get list the available user names:
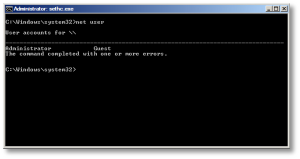
C:\Windows\System32\net user
- You should now be able to log on with the new password you just created.
- Don’t forget to restore C:\seth.exe to C:\Windows\System32\seth.exe, or anyone with access to your machine will be able to use the same trick to reset your password and breach your account! To do that, follow the same steps above (boot to KNOPPIX, mount drive, copy files) to replace the backed-up copy of the original file. You won’t be able to do this while the machine is booted, as those files are locked and will not be replaceable.


That’s it! Now you’ve got your password recovered, and you can log in without issues.
Note: If you want to prevent someone from using this same trick, or using Kon-Boot against your server, you need to install and configure full-disk encryption with a tool like TrueCrypt. Do not use Microsoft’s “Bitlocker” product, as it is easily cracked.