
HOWTO: Run Proxmox 6.3 under VMware ESXi with networked guest instances
One of my machines in my production homelab is an ESXi server, a long-toothed upgrade from the 5.x days.
I keep a lot of legacy VMs and copies of every version of Ubuntu, Fedora, Slackware, Debian, CentOS and hundreds of other VMs on it. It’s invaluable to be able to spin up a test machine on any OS, any capacity, within seconds.
Recently, the need to ramp up fast on Proxmox has come to the front of my priority list for work and specific customer needs. I don’t have spare, baremetal hardware to install Proxmox natively, so I have to spin it up under my existing VMware environment as a guest.
The problem here, is that running one hypervisor under another hypervisor as a guest, requires some specific preparations, so that the networking of the nested guest, will have its packets correctly and cleanly routed through the parent host’s physical network interfaces.
Read on for how to configure this in your own environment!
VMware ESXi
In VMware ESXi, there are a few settings that you need to adjust, to enable “Promiscuous Mode”, “Forged Transmits” and “MAC Changes”. These are found under the “VM Network” section of your ESXi web-ui:

Once you’ve made these changes, you need to restart your VMware host in order to enable them for newly-created VMs under that host.
VMware Workstation
If you’re running VMware Workstation instead of ESXi, you need to make sure your ‘vmnet’ devices in /dev/ have the correct permissions to permit enabling promiscuous mode. You can do that with a quick chmod 0777 /dev/vmnet* or you can adjust the VMware init script that creates these nodes. Normally these would be adjusted in ‘udev’ rules, but those rules are run before the VMware startup, so changes are overwritten by VMware’s own automation.
In /etc/init.d/vmware, make the following adjustment:
vmwareStartVmnet() {
   vmwareLoadModule $vnet
   "$BINDIR"/vmware-networks --start >> $VNETLIB_LOG 2>&1
   chmod 666 /dev/vmnet* # Add this line
}
Now that you have your host hypervisor configured to support nested guest hypervisors, let’s proceed with the Proxmox installation.
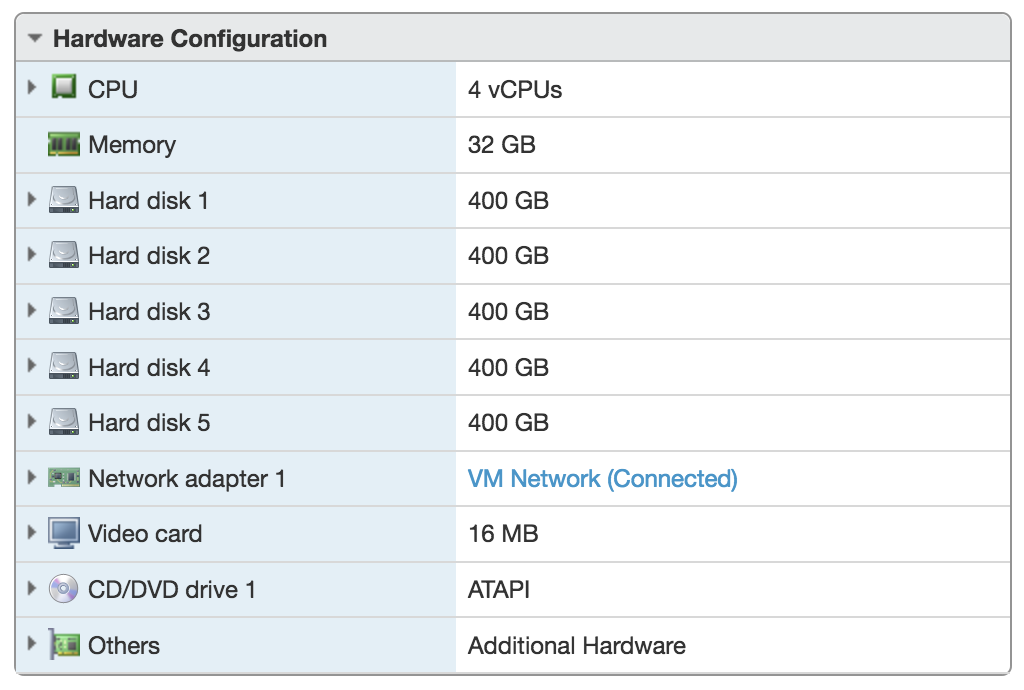
Download the most-recent Proxmox ISO image and create a new VM in your VMware environment (ESXi or Workstation). Make sure to give your newly created VM enough resources to be able to launch its own VMs. I created a VM with 32GB RAM and 2TB of storage, configured as a ZFS RAIDZ-3 array (5 x 400GB disks). That configuration looks like this:
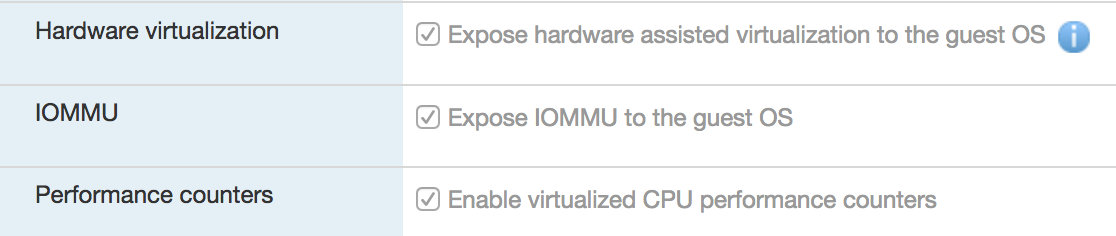
When you create your Proxmox VM, you need to go into the CPU settings, and ensure that you’ve enabled the VxT extensions to allow virtualization. Those are simple checkboxes in the VMware UI:
Proceed with the rest of the Proxmox installation with whatever customizations and configuration you need for your environment. I took most of the defaults. There is nothing in the Proxmox installation that you need to adjust just yet, to accommodate being a nested hypervisor.
Updating Proxmox to Current with the No Subscription Repository
If you’re doing this with the free (unlicensed) version of Proxmox, you’ll need to make a few adjustments to the package repositories and update your host to all current packages.
To do that, we’ll edit /etc/apt/sources.list.d/pve-enterprise.list so that it looks like this, after the modifications. All we’re doing is commenting out the first line (used by licensed, enterprise users) and add the second line:
# deb https://enterprise.proxmox.com/debian/pve buster pve-enterprise
deb http://download.proxmox.com/debian/pve buster pve-no-subscription
Now we need to update our package lists, to include packages from this new repository:
apt-get update
From here, we can now upgrade our Proxmox host to the most-recent, stable, current pacakges with the following one-liner:
apt-get -fyu dist-upgrade
From here, we need one more package, required so we can adjust the networking directly from the Proxmox web interface:
apt-get -fy install ifupdown2
Once your Proxmox is installed and rebooted with all of these new packges and configuration, we need to enable this new VM host, to be its own DHCP and DNS server, and enable IPv4 forwarding on that host. Let’s go through these one by one:
Enable IPv4 Forwarding
In /etc/sysctl.conf, uncomment (remove the leading ‘#’ mark from) the line that reads:
#net.ipv4.ip_forward=1
The final result should look like:
net.ipv4.ip_forward=1
Next, we need to install and configure a DHCP server to respond to requests from Proxmox VMs for a DHCP lease.
Install and Configure DHCP Server
To install a DHCP and DNS server on your Proxmox host, you’ll need to install and configure the isc-dhcp-server package and install bind9:
apt-get -y install isc-dhcp-server bind9
Once that is installed, we can configure it by making some minor changes to two files:
In /etc/default/isc-dhcp-server, we need to add our Proxmox bridge interface on the INTERFACESv4 line and comment out the IPv6 line as follows:
INTERFACESv4="vmbr0"#INTERFACESv6=""
In /etc/dhcp/dhcpd.conf, at the end of the file, add a block that looks similar to the following. My Proxmox host is 192.168.1.109, and I’m setting a DHCP range for Proxmox guest VMs from 192.168.2.50 and 192.168.2.100.
subnet 192.168.0.0 netmask 255.255.252.0 {
	range 192.168.2.50 192.168.2.100;
	option routers 192.168.1.109;
}

option domain-name-servers 192.168.1.109;
You can then either restart your Proxmox VM, or you can restart the isc-dhcp-server service itself:
systemctl restart isc-dhcp-server
You can verify that the service started cleanly with:
# systemctl status isc-dhcp-server
? isc-dhcp-server.service - LSB: DHCP server
   Loaded: loaded (/etc/init.d/isc-dhcp-server; generated)
   Active: active (running) since Wed 2020-12-23 01:12:11 EST; 53min ago
     Docs: man:systemd-sysv-generator(8)
  Process: 32508 ExecStart=/etc/init.d/isc-dhcp-server start (code=exited, status=0/SUCCESS)
    Tasks: 1 (limit: 4915)
   Memory: 6.1M
   CGroup: /system.slice/isc-dhcp-server.service
           ??32520 /usr/sbin/dhcpd -4 -q -cf /etc/dhcp/dhcpd.conf vmbr0
Now you can create a new, guest VM under Proxmox (which is itself, a guest VM under VMware ESXi or VMware Workstation), and during installation, it should get a DHCP lease from the Proxmox server’s own DHCP server and route those requests back through to the vmbr0 bridge to the host “physical” NIC (the virtual NIC that VMware provisioned for Proxmox to use).
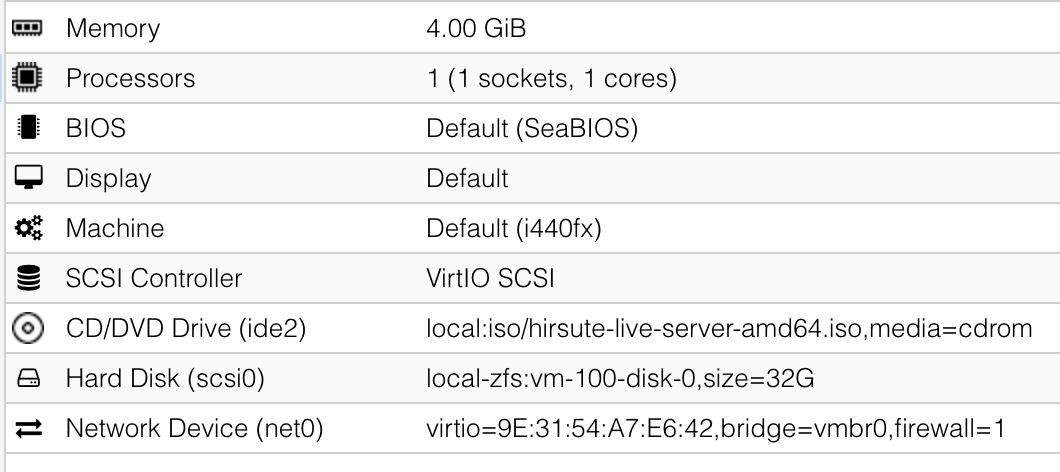
My test, guest VM was configured with the following basic parameters:
The routes on that guest VM should look similar to the following:

That’s it! Now you’ve got your nested hypervisor lab all set up and running!